Top view of the completed display matrix.
The construction of the display matrix is the most time-consuming part of the project.
These plans assume that you will be using the same displays that the author did, the G7705 Red Dot Displays from Electronics Goldmine. These displays are fairly generic, so the wiring may be applicable for other displays as well. In fact, another display type might even work better; as you can see from the photo above, the G7705 leaves undesirable horizontal gaps between the three sections, as it is designed to be ganged into a 7xN alphanumeric display.
In fact, these displays don't even fit on the perfboard all that well. In installing the displays sideways across the board, the author found that they sat with 3mm gaps between them. The leads were consequently bent at a forty-five degree angle to allow the displays to be forced to sit flush with each other. The perfboard supporting the displays is somewhat deformed by the resulting tension between them; not a very professional project, I realize.
The conductors making up the ribbon cable connecting the display board to the EMF detector and the display driver board were found to be too large to fit through the predrilled holes in the perfboard. The author used needle files to increase the size of the existing perfboard holes to allow the conductors to pass through. The cable is woven through the board as a means of stress relief, preventing tension from being put on the connections on the back of the board.
The G7705 Red Dot Display |
|
|
|
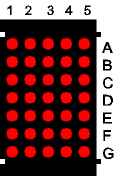
In this diagram, the rows and columns of LEDs in the G7705 Red Dot Display have been labeled for reference. Note the notches in the upper and lower sides of the display unit; they differentiate the top from the bottom. The columns, marked with numbers, are the cathode (or negative) connections; rows, marked by letters, are annode (or positive). |
|
|
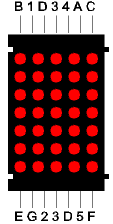
This diagram shows the pin assignments for the G7705 Red Dot Display. There are seven pins at both ends of the unit; with fourteen pins, two of them are duplicates. The author found no functional difference between the two pins marked 3 or the two marked D. |
As can be seen in the photo at the top of this page, the displays are arrayed three across and two down. Once the units have been satisfactorily seated on their perfboard support, their rows and columns must be connected. The A pin of a top unit must be connected to the A pin of the unit beneath it, for example, and the 1 pin of a middle unit must be connected to the 1 pin of the two units beside it.
Bottom view of the completed display matrix.
When the display matrix is completed, there will be a total of thirty "pins" to control it, just as there were fourteen pins to control each individual display unit: ten rows (pins 1, 2, 3, 4, and 5 of the top-left display unit and pins 1, 2, 3, 4, and 5 of the bottom-left display unit) and twenty columns (pins A, B, C, D, E, F, and G of the bottom-left display unit, pins A, B, C, D, E, F, and G of the bottom-middle display unit, and pins A, B, C, D, E, and F of the bottom-right display unit). The author chose to wire the display units together first, then connect ribbon cable directly onto the completed display matrix at the thirty points mentioned above. This method of construction was somewhat messy (as can be seen in the photo above), but relatively painless.