To date I have managed to stain our sink, the bog, the shower, the carpets, the cat and the YL..!
Ferric chloride eats ANYTHING! Once stained you'll never get the stuff off!

Now we have our artwork on the copper-clad board, the final process is to remove the unwanted copper leaving just the pads and tracks.
Some constructors prefer to use a shallow tray to hold the ferric chloride - as I did before I made my etching tank. A small tip here is to stick some tape to the board. This will make it easier to place/retrieve to/from the etchant without getting any on your fingers.
"OK, bring on the etching solution - Hoorah!" - Yep, time for the dreaded ferric chloride to make an appearance. I hate this stuff - or rather, I don't... my YL does! But, for those of you new to this believe me... it stains everything. That is the last warning you'll hear on the subject so watch what you're doing with this liquid divorce kit! Also, If you have any pets, now is the time to make sure they are well clear of your working area... Our cat 'Blacky' will testify to this - he used to be called 'Snowy'!
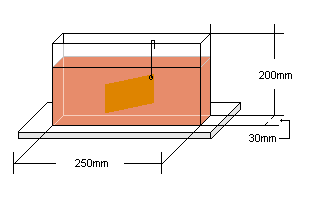
Before submerging the board in the tank I drill a small hole in one corner and attach a stiff length of wire. The pictorial above will explain it better than I can but it's simply so I can place/retrieve the board without any mess.
With the board fully submerged apply a gentle rocking motion every few minutes to assist with the etching process. After five or ten minutes remove the board and check for any trapped air pockets on the surface. If any are apparent gently dab and remove them with a cloth/paper towel moistened with the ferric acid then place back into the tank. Me..? I use a finger!
Depending on how many PCB's you make, the etchant will eventually become weaker and your boards will take longer to develop. A simple way to extend the etchant's life is to add a little salt or warm up the solution. Fresh ferric chloride will etch a board, depending on temperature, etc. between 20 and 45 minutes.
When the board is fully etched, rinse thoroughly under cold running water. When all traces of etchant are gone remove the artwork etch-resist. There are various chemicals to do this but I usually use a Brillo pad and elbow grease. Wash the board again and give a final clean with the abrasive block.
If at this stage you are not ready to drill and populate the board, place inside a sealed polythene bag and store in a cool, dry place. This will help protect and prevent the copper from tarnishing.
For most components you'll need a 0.75mm - 1.0mm drill bit. Larger bits will be needed for components like metal inductor ground lugs, etc.
Best Regards... Pete
http://www.keirle.fsnet.co.uk