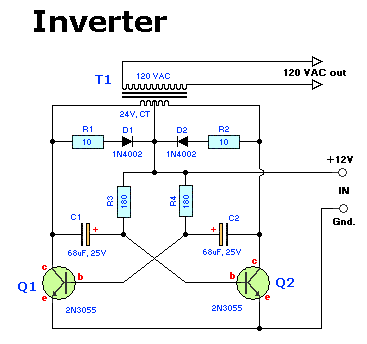
Parts List
R1,R2 = 10 ohm, 5 watt, WW
R3,R4 = 180 ohm, 1 watt, WW
C1,C2 = 68uF, 25Volt, Tantalum
D1,D2 = 1N4002, or substitute with a NTE116
Q1,Q2 = 2N3055, or substitute with a NTE130
  *T1 = 120/24ct (or 220/24ct) Transformer
Description:
This inverter will
sufficiently power any of your 115VAC (or 220VAC)small appliances. T1 choice of amperage is yours to make, but if
you can salvage a heavy-duty unit from somewhere, use it. The least expensive method to get a larger transformer
would be to remove the old 2000v primary and then re-wind an old microwave transformer. Most of these transformers
are rated 1KW or better. Your local TV or Electronics repair shop may have one or dig one up from the dumpster.
Just in case you don't know, micro-wave transformers can keep their charge (via the connected electronics) for a long
time, so be careful!
R1 and R2 are 10 ohm, wire-wound, and at least 5 watts. Wattage/cooling should be increased accordingly if you
decide to beef up the output. For D1 and D2 you can use any power diode like the 1N4002 to 1N4005.
If you live in Europe, Australia, or any other country with a 220VAC system, the only different is the transformer.
This particular circuit can be constructed to handle up to 1 KiloWatt (1000 watt). If there is enough interest,
I can modify this circuit to include a crow-bar circuit, battery backup, or more output in watts, or everything.
The power output is determined by transformer T1, and power transistors Q1 & Q2. Assume a transformer of about 15A
and the chosen transistors of 2N3055 (15A) type, the inverter can supply about 300 watts with the parts shown.
If you are good with electronics all you have to do is replace the 2N3055's and T1 accordingly for more output. It
is imperative to mount Q1 and Q2 on large coolribs. If you intend to beef everything up with a couple
kilowatts a standard (5") cooling fan will also be required. If this is the case, the 2N3771 power transistor is a
good choice at 30Amps. NTE's replacement, NTE181, is an improved version of the 2N3771 and carries 90volts instead of
the 40 volts and can dissipate 200W instead of 2N3771's 150W.
It is mandatory to include at least one suitable fuse and enclose this project
in the correct casing. To be really safe you may want to include a primary and secundary fuse for your own protection.
You are dealing with 120VAC or 220VAC at respectible amperage so be careful. The powercord also needs to be secured
to prevent accidents.
The 68uF Tantalum capacitors were chosen for their endurance. Normal electrolytic capacitors would overheat and
explode. Somesort of cooling fan inside the project case may be a good choice, I myself use a ball-bearing cpu-fan
from an old computer. New they don't cost that much either, about 3 bucks or so.
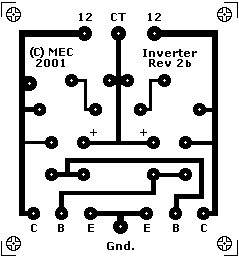
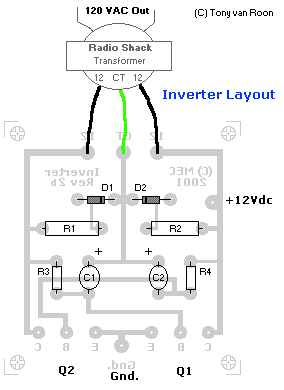
Since T1, and Q1/Q2 are NOT part of the PCB, these few parts can easily be used on a piece of Vero or experimenters
board. Radio Shack and Tandy have these boards also available at a very reasonable price (in Canada $3.50). The
receptacle(s) on T1's output will be part of the case (obviously). Just a small note about the 12 Volt battery,
this circuit and others similar can draw huge amounts of current and will drain your battery in hurry so don't let
your battery go dead! That's why a wind/solar power combination would be an excellent future addition. For those
interested in a PCB, I have included one below with a layout. As soon as I get my digital camera I will include
pictures of the finished project.
If you wish to check for pin-outs or other references, visit their website: NTE Electronics
My next (experimental) projects during the winter months will be to use a beefed-up version of the above circuit with
wind and solar power. I will start out with a small model so I can easier experiment with the type of wind vanes and
the solar power 'type'.
Return to Circuits Page
 Page Copyright © 1995 - 2001
Tony van Roon
Page Copyright © 1995 - 2001
Tony van Roon