Today, there are literally thousands of dedicated IC voltage regulators.
Nearly every manufacturer has a range of regulators to suit every requirement.
Let's look at the very common LM340-X series or the equivalent 78XX series. Firstly they come in a variety of voltage ranges from 5, 12 and 15V for LM340-XX and 78XX.
They also come in a variety of current ratings and package sizes. Common packages are TO-92, TO-5, TO-220 and TO-3. The first two, TO-92 and TO-5 are generally unavailable to the hobbyist because suppliers like to keep reduced stock lines and so tend only to stock the TO-220 and TO-3 types. In fact you can pay more for a TO-92 type (rated at 100 ma) than you would for a TO-220 type (rated at 1.5A)
When you have a requirement for a project of say 12V, or even 5V if it's a digital project, then these are the types you use. LM340-5, LM340-12 or 7805 or 7812 are the types.
There are of course negative voltage regulators with the numbers LM320-XX or 79XX which are substantially the same as those discussed here excepting they are negative. We will not consider them further.
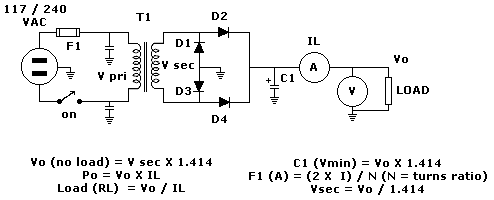
Assume your project calls for a basic fixed 12V D.C. to operate. Looking back to our earlier tutorial we apply all the same principles. Look at the original schematic.

Now the first thing I'm going to recommend for small projects, is discard everything to the left of the four diodes D1 - D4 and use a plug pack (wall wart in US). The ammeter and voltmeter I left in purely for illustration. In a normal small project you don't need them.
All we are after here is 12V D.C. @ 1A. The same principles apply to 5V. This current limit believe it or not, covers 90% of projects I have ever been involved with. Higher currents we will deal with later.
The type of regulator discussed here (LM340-12 or 7812 types) REQUIRE a minimum input voltage to function and there is a maximum they will accept. This gives you a little bit of flexibility.
In the case of the 12V regulator the minimum is 14.8V D.C. and maximum is 27V D.C. Whereas for the 5V regulator the minimum is 7.5V D.C. and maximum is 20V D.C. Please note these are DC voltages.
Also note if you use plugpacks, you can choose to buy the D.C. types and dispense with the diodes. If A.C. is all that is available then the diodes MUST go in. As is the case with many things it all depends upon what you can buy in your locality.
Just remember to buy a plug pack which will deliver at least the minimum required input voltage at your current requirement (don't buy without first scrounging around your relatives, friends and neighbours - recent statistics must surely indicate there are more plug packs around than there are people on this earth).
Hokay!, I just found a 15V D.C plug pack capable of 1A. Suits me fine for my project. I also have on hand a 4700uF / 25V electrolytic capacitor, this is also fine and I have a LM340-12 regulator of the TO-220 type as well. Here is how I connect it

Note: the pin connections for an LM340T12 when placed face up on the bench with the pins toward you, are left pin = input, middle pin = ground and, right pin = output. Always check pin outs of all devices you buy. In this case, the tab (top of IC with hole in it) is at ground potential. Unfortunately many other regulator IC's aren't.
F1 is a fuse and should be about twice the expected current to be drawn
at 12V. The switch might be optional depending on whether or not you are
going to switch on / off at the power point. The socket depicted is a panel
mount type to suit the plug pack plug, you could dispense with that by
bringing wires directly into project box but then your plug pack can't
be used for something else! ALSO PAY CLOSE ATTENTION TO POLARITY.
I'm NOT going to get into that because there are more problems here than there are in a can of red backs (black widows). Doing an exotic design, without actually building and testing it, is somewhat dopey to say the least and; as I don't have such a requirement I'm not about to spend the money on it (megabucks to say the least - and largely forget surplus computer power supplies because they create other problems).
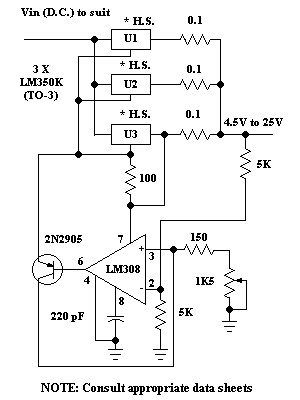
If you wanted say 3 amps then look at something like a LM350 type regulator (consult the appropriate data sheet) which also is happily; adjustable (just like the LM317 in Part 4 next). Diodes have to have a suitable rating of course and you won't get a plug pack at 3 amps so it's back to transformers which:
FOR SAFETY REASONS WITH INEXPERIENCED READERS I WILL NOT RECOMMEND
I don't have any control over my readers so I won't discuss the transformer
input half at all. You will have to make your own arrangements. If you
are experienced no problem, if not then find someone competent to help
you out.
Here is the broad schematic BUT you will have to consult the LM350K data sheet AND applicaion notes.

Down load the data sheet: http://www.national.com/pf/LM/LM350.html#Datasheet
Now if you are competent to build a 4.5V to 25V variable power supply capable of supplying 10 amps then the above information is all you need. On the other hand if the above leaves more questions than were answered then obviously you need more experience. The little schematic above, as a project, would run into hundreds of dollars to build. For experience, try the smaller project in the next section. It's a useful tool.
NEXT Part 4 - Variable voltage regulation A bench power supply project for you.
http://my.integritynet.com.au/purdic/
URL: http://my.integritynet.com.au/purdic/power3.html
![]() Email
to: Ian
C. Purdie
Email
to: Ian
C. Purdie
This site was entirely written and
produced by Ian C. Purdie*
Created:3rd March, 1999 and Revised:
28th October, 1999
****