
| Elliott Sound Products | Measuring Loudspeaker Parameters |
Rod Elliott - ESP
(With Special Thanks to
Brian
Steele)
There are several different ways to measure the Thiele/Small parameters of a loudspeaker driver. The method described here provides a way for the beginner and DIY enthusiast to measure the parameters without any expensive or specialised equipment.
Definitions:
| Re | Electrical resistance of voice coil |
| Fs | Resonant frequency of loudspeaker moving mass (in free air) |
| Qes | Electrical Q of loudspeaker |
| Qms ... | Mechanical Q of loudspeaker |
| Qts | Total Q of loudspeaker |
| Vas | Equivalent air volume of moving mass suspension |
Measuring Re, Fs, Qes, Qms and Qts
To measure these parameters using the method outlined below, you'll need to have the following items:
At resonance, the speaker impedance is pure resistance. As the frequency increases towards resonance, the impedance characteristic is inductive. Beyond resonance as impedance falls, the impedance characteristic is capacitive. Within the "linear" region, the impedance is again (almost) resistive, but at the speaker's nominal impedance. At the frequency where the inductance of the voice coil becomes significant, impedance is progressively more inductive as the frequency rises. It is common to add a compensation network to maintain an overall resistive characteristic at these higher frequencies, so that the performance of the crossover network is not compromised. This is not necessary with an active crossover.

Figure 1 - Loudspeaker
Impedance Curve
The multimeter should be capable of measuring frequency, as well as AC voltage and resistance. If it cannot, a frequency counter is highly recommended, since the frequency measurements are critical. The amplifier must be capable of reproducing from 10 Hz to 2 kHz with no variation in output voltage. It is imperative that it is insensitive to any load above 4 ohms. The audio oscillator must also produce a signal with relatively low distortion, and the output voltage must not vary as the frequency is adjusted.
Measure the resistance across the speaker
terminals to obtain Re.
Measure the exact resistance of the 5
Watt source resistor, Rs.
The loudspeaker driver should be suspended in free space, with no obstructions or interfering surfaces nearby. Any boundary closer than around 600mm (about 2ft) will affect the accuracy of the measurements
Connect the circuit as shown in Figure 2, with the audio oscillator to the input terminals of the amplifier, but with the multimeter across the amplifier output terminals instead of the resistor.
Set the oscillator to approximately 100 to 200 Hz (or at least 2 octaves above resonance).
Set the output of the amplifier to between 0.5V and 1.0V (this is Vs). You may need to experiment with different voltages, depending on the accuracy of your current readings (or calculations). Do not be tempted to use higher voltages, as the speaker may be driven outside its linear range, which ruins the validity of the measurements. The parameters being measured are "small signal", and it essential that a small signal is actually used.
Calculate the speaker current (Is), to make sure that you will have a reasonable current to work with. Check that the speaker is nowhere near resonance, by changing the oscillator frequency by 50Hz or so in either direction, and measure the voltage across the speaker. It should not change by any appreciable amount.
Is = Vs / (Re + Rs)Re-connect the circuit as shown in Figure 2, again using the alligator clip leads where necessary.
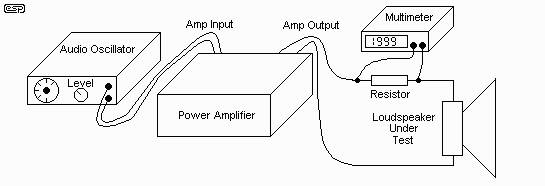
Figure 2 - Measuring
the Main Speaker Parameters
Adjust the frequency until the voltage
across the resistor reaches a null (minimum level). Without changing
anything, carefully measure the frequency and voltage across the resistor
...
| Frequency | Fs |
| Voltage across the resistor | Vm |
Calculate the following ...
| Speaker current | Im=Vm/Rs |
| Driver impedance at resonance | Rm=(Vs-Vm)/Im |
| r0 | r0=Is/Im |
| -3dB current | Ir=(Im*Is)^0.5 |
| -3dB Voltage | Vr=Ir*Rs |
Complete the measurements for Fl
and Fh, for which the
voltage across the source resistor is equal to Vr,
and as a sanity check (to ensure that your calculations and measurements
are accurate), calculate the resonant frequency based on these last two
measurements.
| Check that ... |
If the above checks out (within 1 or 2Hz), then Qes, Qms and Qts can be calculated as follows:
Qms = Fs *You can use the spreadsheet to perform the calculations automatically for you: ls_param.zipr0/(Fh - Fl) Qes = (Qms/(r0-1)) * (Re/(Rs+Re)) Qts = Qms * Qes/(Qms + Qes)
To measure Vas, use a good solid enclosure of known volume that is approximately a cube of the nominal speaker size. For example, a 300mm driver (12") needs a box of about 28 litres (1 cu ft). For reference, a cubic foot is 28.3168 litres, and one litre is contained by a cube of 100mm to each side.

Figure 3 - Setup for
Measuring Vas
Determine the total volume, including the speaker cut-out and that trapped by the cone with the speaker mounted on the outside of the box for easy access. Measure the resonant frequency in this situation, and use the free air space resonant frequency determined as shown above. Determining the volume trapped by the speaker cone is slightly tricky.
Use one of the following methods ...

Figure 4 - Determining
the Volume of the Cone
There is a flat cylinder (disc) that is formed by the outer area of the basket and the cutout in the enclosure. The triangular ring is formed by the cone itself, as shown above. Finally, the cylinder occupies the area over the dustcap. The depth of the cylinder should be an approximate average of the distance from the mounting surface and the dustcap.
The volume of cylinder and disc is given
by the conventional formula ...
Vcyl = ![]() * r2* h
(where r is the radius
and h is height), and
* r2* h
(where r is the radius
and h is height), and
Vdisc = ![]() * r2 * h
* r2 * h
The triangular ring's volume is given by
...
Vring =
((![]() * r2 * h)-Vcyl)/2
* r2 * h)-Vcyl)/2
The total speaker volume is simply the sum of the 3 volumes calculated above. Box volume is calculated as one normally would, taking great care to ensure that the measurements are accurate. The box may be braced, but must have no fibreglass or other sound deadening material inside. Make sure that the volume occupied by any bracing is accounted for in your calculations. Even a simple box will be sufficiently rigid at the frequencies of interest, so a completely acoustically dead cabinet is not required (although it won't hurt).
Vas = Vb((Fb/Fs)2-1)where Vb is the volume trapped by the speaker and box, and Fb is the resonance frequency of speaker and box combined. Fs is the free air resonance measured previously.
A "dummy" or test loudspeaker was described in another contributed article, and I have used a simulation of a similar speaker in the calculations shown. The equivalent circuit of the speaker is shown in Figure 5. This circuit was also used to create the impedance graph shown in Figure 1.
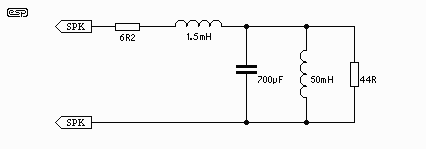
Figure 5 - Dummy Test
Loudspeaker
The following screen shot shows the values for the "speaker", and the only contrived (i.e. invented) value is for the resonance in the sealed box. It was necessary to invent a number here, as it is not possible to simulate it. The final figure shown is fairly typical of many such drivers, so is not too far from the truth either.

Figure 6 - Calculation
Example Using Spreadsheet
As you can see from the screen-shot, the
spreadsheet will calculate everything for you, including the cone volume
and Vas. Naturally,
you will get figures quite different from those shown, but the principle
is exactly the same.
| Copyright Notice. This article, including but not limited to all text and diagrams, is the intellectual property of Rod Elliott, and is Copyright (c) 2000. Reproduction or re-publication by any means whatsoever, whether electronic, mechanical or electro- mechanical, is strictly prohibited under International Copyright laws. The author (Rod Elliott) grants the reader the right to use this information for personal use only, and further allows that one (1) copy may be made for reference. Commercial use is prohibited without express written authorisation from the author. The formulae shown are used with the permission of Brian Steele. |