![]()

| WAH | FUZZ | SWITCHING | SUSTAIN | ATTACK/DECAY |
Introduction
These two projects , Wah and Fuzz, are the results of a modification to a Morley dual channel volume control pedal that one of my sons suggested I undertake as He had no use for the volume unit but thought I could modify the pedal into a Wah unit. I decided later to add a Fuzz circuit and combine the two into a single switchable unit as described further on.
Not being one to re-invent the wheel, I downloaded several circuits from the Internet and after breadboarding severals I chose the original Morley circuit as it had the best sound and was using an LDR/LED control which simplified its construction.
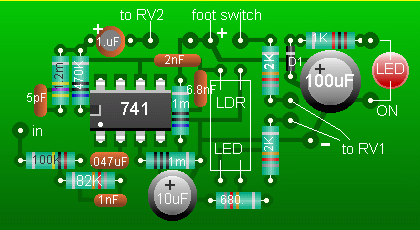
I then proceeded to modify the circuit by adding RV2 to control the output level , RV1 to provide a range adjustment to the wah and R8,R9 to provide limits for the LED current range . I dug into my junk box for all the parts but the LDR ( CDS Photocell ) which I bought from RadioShack Cat # 276-116 .
The input signal is filtered and fed to pin 2 of the 741 op-amp and amplified by the feed back combination of R5,R6,C3,C5 and C6.The output is taken from C7 to the volume control RV2.
The circuit being used in an AC configuration needs a common ground level which is supplied to pin 3 by the voltage divider made up of R3,R4 and C2.The Wah action is controlled by the activation of the LED shining on the LDR whose resistance varies depending on the LDR brightness which is controlled by RV1 . When the LED is off the LDR resistance one side of which is connected to the junction of C5-C6 has little effect on the feedback gain circuit but as soon as the LED is turned on with the foot switch SW1, the LDR resistance drops and shunt C5,C6 to ground through the LDR resistance boosting the gain and shifting the sound frequencies, thus the Wah effect.
The foot switch , SW1 , is a heavy duty push button momentarely SPST switch mounted on top of the case .
As mentionned I got the LDR in a package of five from RadioShack . No data is supplied . I needed to select the widest resistance range available of the five LDRs and used the schematic set-up to test each one. To prevent ambient light to reflect on the LDR I used a 1 1/2" length of black shrink tubing to accomodade the LDR in one end and the LED facing the LDR from the other end and connected the make-shift module as per the circuit details and proceeded to test for minimum and maximum resistance measured with my ohmmeter by varying RV1 and with power on/off. I then inserted the chosen one into the shrink tubing along with the LED. Make note which is the positive lead of the LED and rotate the LED so that the positive lead is situated in the tube as to match the future physical connection to R7 as shown on the PC module.
With the heat of a lighter or match slowly heat the shrink tubing to a tight fit making sure to pinch each end while still warm .
Resistors R8 and R9 may be soldered directly to the center and right tab of RV1 and one side of SW1 is connected directly to the other end of R9 , the other side of the SW1 is connected to the positive supply .
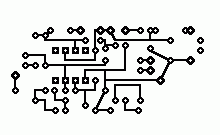
I would like to mention that I always use a socket , nobody is perfect and sometime a screw-up need not be a nightmare of desoldering and reinstalling a suspicious IC.I avoid making printed circuit for most of my projects, instead I have becomed skilled in using #26 or smaller bare wire in making connections as laid out on a piece of perforated board to the proper size. It looks good , it is rugged and can be repaired easily . Below is a suggested layout and tracing is also shown for those who whish to make Printed circuit board
All resistors are 1/4 W , capacitors miniature ,voltge rating @10 volts min. except for C8 which is rated 20volts.
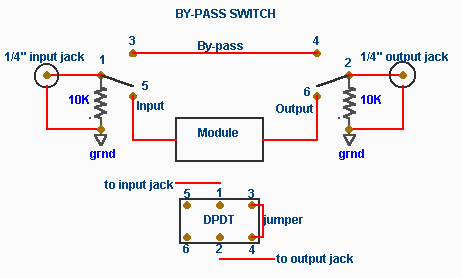
If you are going to use only the Wah system you are ready to insert the module into a strong enclosure either metal or plastic about 3" by 5" , large enought and deep enought ( about 1 1/2 " dept ) to accomodate the foot switches, SW1 and the by pass switch , the Wah module and a 9V battery ( use a battery clip ) and one of each input and output jacks on opposite sides . The small SPST ( SW2 )power switch ,RV1 and RV2 should be mounted on the side which will be facing you for easy access. The by-pass switch ( S4 )and SW1 as well as an LED power on indicator should also by mounted on top of the enclosure but the LED well away from and protected from the foot action.
Use shielded wire for all input and output connections to prevent hum noise and make sure the shield is connected to the negative or ground ( pin 3 ) side of the battery as well as the case ( if metal ) .
When using the Wah module without the wah action the signal is passed through but with a small loss of the higher frequencies which might not be objectionable to you. In that case to simplify construction and saving you may well decide not to install a by-pass switch. If you desire to install the by-pass switch , connection layout is shown below.
For more guitar effect two fuzz circuits are described on the next page followed by a complete description of the Wah and Fuzz system assembly on the switching page.
| WAH | FUZZ | SWITCHING | SUSTAIN | ATTACK/DECAY |
© Laurier Gendron, Burnaby, B.C., Canada. 1998