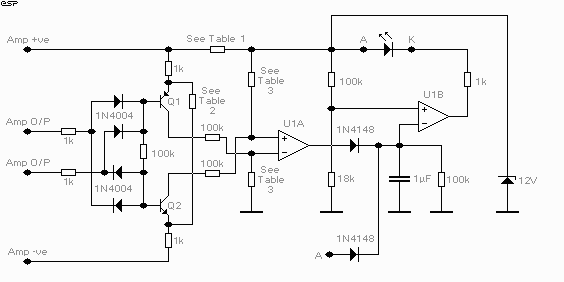
Figure 1 - The clipping Detector Circuit

| Elliott Sound Products | Project 23 |
At some stage, we will all find ourselves pushing hi-fi equipment just a little too hard, and if lucky, will just find that the sound has become "dirty". If this happens too often or is too severe, tweeters are the first to go - they are damaged by the excessive power generated by the harmonics created when an amplifier clips. The same may well happen to one's ears, but the effect is much more subtle (and cannot be fixed).
One of the problems is that short duration clipping is very hard to detect by listening alone, but is still capable of causing damage - especially to tweeters.
What is needed is a simple and reliable way of detecting that the amplifier is clipping (or so close that we have no margin for error). Well, search no more, because here it is.
Many clipping detector circuits have been published over the years, but so many of them rely solely on an attenuated (reduced) version of the output signal, supplied to a suitable comparator circuit.
This would be fine if the mains voltage stayed exactly the same at all times, and if the power supply had perfect regulation. The fact is that neither of these is true, and the amplifier's DC supply voltage can vary quite considerably from hour to hour, and even minute by minute.
The clipping detector shown here relies on one factor - how close to the supply voltage is the amplifier's output signal at any instant in time. If (when) the supply voltage varies, the detector varies along with it, and will detect even a very short peak that crosses the detection threshold. (See How It Works, below.)
Figure 1 shows the circuit of the detector. Although a simple circuit, it uses a principle of operation that will be new to many readers. Indeed, it is new to me as well, since this is a method of detection I have never seen published in any (even remotely similar) form.
Figure 1 - The clipping Detector Circuit
NOTE: A reader pointed that the
previous version of the circuit had an error - the third diode down on
the left was the wrong way around (oops !). This has been rectified (28/07/1999).
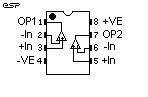 |
The pinout for a typical dual opamp is shown for reference. This is pretty much an industry standard, and nearly all dual opamps use this pin configuration. As always, I suggest that you download the data sheet for the device you intend to use to double check. The +ve supply in this circuit is from the 12V zener, and the -ve supply goes to earth. A dual supply is not needed in this application. |
Q1 and Q2 are the detectors, and we can examine the operation of Q1 (the positive peak detector) - Q2 is identical, and detects the negative peak.
During normal operation (not clipping), Q1 is turned on continuously. A reference voltage (typically 3 Volts) is created across the 1k emitter resistor by the resistor shown as "See Table 2". Now if the output of either channel rises close enough to the supply voltage to equal the reference voltage, Q1 is turned off by forcing the base voltage to be greater than the emitter voltage - no base current, so the transistor will not conduct. This is detected by the opamp U1A. This is connected in such a way as to detect either of the transistors turning off.
The "pulse stretch" circuit will detect a clipping period as short as 120us, but reliable detection will take place within 1ms with any program material. Because of the rapid response and deliberate sensitivity to supply voltage variations, this is possibly the most reliable and accurate clipping published to date.
The transistors must be rated for the supply voltage. For most systems (less than +/- 70V) BC639 - NPN (Q2) and BC640 - PNP (Q1) will work happily. They are over the top in power and current ratings, but we need the 80V rating. I do not know of suitable (readily available) devices for use at higher voltages, but can track something down if you are stuck.
There is no need to use fast comparators (you can if you want to), so U1 can be a very basic (and very cheap) LM1458 dual opamp or similar. Please refer to the link on the projects index page to obtain a data sheet for this device - this includes pinouts and other useful information.
| Supply Volts | Resistor Value | Power Rating |
| +/- 20 | 390 Ohm | 0.5 Watt |
| +/- 30 | 820 Ohm | 0.5 Watt |
| +/- 35 | 1k Ohm | 1 Watt |
| +/- 40 | 1.2k Ohm | 1 Watt |
| +/- 50 | 2.2k Ohms | 2 Watts |
| +/- 60 | 2.7k Ohms | 2 Watts |
| +/- 80 | 3.3k Ohms | 2 Watts |
Table 1 is used to select the value and power rating of the "dropper" resistor, based on the power amp supply voltage. Intermediate supply voltages should use the value for the next lowest supply voltage. A resistor with a higher rating than that shown will reduce temperature and increase reliability.
To calculate the value, I have chosen 20mA as the Zener + opamp current, so
Power (mW) = ( Supply Voltage - 12 ) ^ 2 / Resistor (k Ohms) [2]
From [2] Power = (45 - 12 ) ^ 2 / 1.65 = 33 ^2 / 1.65 = 1089 / 1.65 = 660 mW
| Supply Voltage | Resistor Value | Power Rating |
| +/- 20 | 12k Ohm | 0.25 Watt |
| +/- 30 | 18k Ohm | 0.5 Watt |
| +/- 35 | 22k Ohm | 0.5 Watt |
| +/- 40 | 25k Ohm | 0.5 Watt |
| +/- 50 | 33k Ohm | 0.5 Watt |
| +/- 60 | 39k Ohm | 0.5 Watt |
| +/- 70 | 47k Ohm | 1 Watt |
| +/- 80 | 51k Ohm | 1 Watt |
The table is fairly accurate for a 3V clipping reference, but some amps will not be capable of getting to within 3V of the supply (MOSFET types in particular). In these cases, the resistor value must be calculated.
Resistor (k Ohms) = ( ( Supply V - Reference V ) / Current (mA) ) * 2 [5]
Power (mW) = Current ^ 2 * Resistor [6]
From [5] Resistor = ( ( 45 - 5 ) / 5 ) * 2 = ( 40 / 5 ) * 2 = 16k Ohms
From [6] Power = 5 ^ 2 * 16 = 25 * 16 = 400 mW
| Supply Voltage | Resistance |
| +/- 20 | 33k Ohms |
| +/- 30 | 27k Ohms |
| +/- 35 | 22k Ohms |
| +/- 40 | 18k Ohms |
| +/- 50 | 15k Ohms |
| +/- 60 | 12k Ohms |
| +/- 70 | 10k Ohms |
| +/- 80 | 10k Ohms |
If the correct value is not used for the power supply voltage, the opamp comparator may hold its output high all the time, which will keep the clipping LED turned on. These resistors can be 0.25 Watt for all supply voltages.
Figure 2 shows (in red) the points of the output signal voltage that will trigger the detectors. +ve is the positive power supply voltage and ref+ is the positive reference voltage. The same is applied to the negative supply.
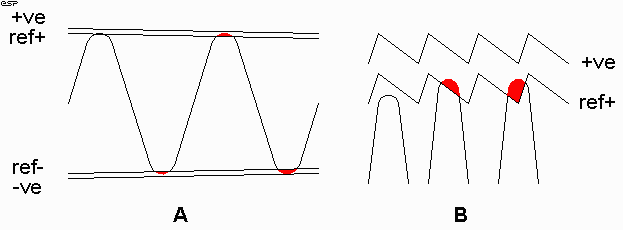
Figure 2 - Instantaneous
Voltage Detection
Figure 2A shows the effect as the power supply collapses under sustained load. If the signal drops to a lower level before the supply collapses, the circuit will not be triggered. 2B shows how even the ripple on the power supply is used as a part of the reference, and so will detect that the output signal is about to be clipped based on the supply voltage at any instant in time.
So, as you can see, the actual instantaneous value of the power supply voltage is used as the final reference - the output is measured against this by Q1 and Q2. If the power supply voltage rises or falls, if there is ripple on the supply, this circuit will still indicate if the output of either amp of the stereo pair comes within 3 Volts of the instantaneous value of the power supply voltage (or other value - use formulae 4,5 and 6 to calculate the reference voltage and required resistor values).
U1A operates as a dual comparator - if either transistor stops conducting, the output goes from around 0V to almost the full supply (12V - regulated with a simple zener). This voltage is applied to the inverting input of U1B, and the capacitor is used to "stretch" the pulse so that even momentary clipping will be seen. This opamp drives the clipping LED directly.
By using the input "A", additional separate amplifiers can be connected, so that in a home theatre system, all 5 (or 6) power amps can be monitored, and a single LED will indicate if any amp clips. This can also be done for bi-amped systems.
Note: It is vitally important that outputs from amplifiers with separate power supplies are monitored by their own transistor pair - this ensures that each amp is compared to its own power supply (as it should be). Do not be tempted to try to have one set of detector transistors for multiple separate power supplies.
Where a common power supply is used for multiple amplifiers (such as in a home theatre system), additional inputs can be added to the detectors - two diodes and a 1k resistor for each amp.
![]() Projects
Index Page
Projects
Index Page
![]() Home
Page
Home
Page
| Copyright Notice. This article, including but not limited to all text and diagrams, is the intellectual property of Rod Elliott, and is Copyright (c) 1999. Reproduction or re-publication by any means whatsoever, whether electronic, mechanical or electro- mechanical, is strictly prohibited under International Copyright laws. The author (Rod Elliott) grants the reader the right to use this information for personal use only, and further allows that one (1) copy may be made for reference while constructing the project. Commercial use is prohibited without express written authorisation from Rod Elliott. |