Long Loopstick Antenna
Wound on a 3 foot length of PVC pipe, the long loopstick antenna was an
experiment to try to improve AM radio reception without using a long wire
or ground. It works fairly well and greatly improved reception of a weak
station 130 miles away. A longer rod antenna will probably work better if
space allows. The number of turns of wire needed for the loopstick can be
worked out from the single layer, air core inductance formula:
Inductance = (radius^2 * turns^2) / ((9*radius)+(10*length))
where dimensions are in inches and inductance is in microhenrys. The inductance
should be about 230 microhenrys to operate with a standard AM radio tuning
capacitor (33-330 pF). The 3 foot PVC pipe is wound with approximately 500
evenly spaced turns of #24 copper wire which forms an inductor of about 170
microhenrys, but I ended up with a little more (213uH) because the winding
spacing wasn't exactly even. A secondary coil of about 50 turns is wound along the length of
the pipe on top of the primary and then connected to 4 turns of wire wound
directly around the radio. The windings around the radio are orientated so that
the radio's internal antenna rod passes through the external windings. A better
method of coupling would be to wind a few turns directly around the internal
rod antenna inside the radio itself, but you would have to open the radio to do
that. In operation, the antenna should be horizontal to the ground and at right
angles to the direction of the radio station of interest. Tune the radio to a
weak station so you can hear a definite amount of noise, and then tune the
antenna capacitor and rotate the antenna for the best response. The antenna
should also be located away from lamp dimmers, computer monitors and other
devices that cause electrical interference.
 Menu
Menu
Capacitor Discharge Ignition Circuit (CDI)
The CDI ignition circuit produces a spark from an ignition coil by
discharging a capacitor across the primary of the coil. A 2uF capacitor is
charged to about 340 volts and the discharge is controlled by an SCR.
A Schmitt trigger oscillator (74C14) and MOSFET (IFR510) are used to drive
the low voltage side of a small (120/12 volt) power transformer and a voltage
doubler arrangement is used on the high voltage side to increase the capacitor
voltage to about 340 volts. A similar Schmitt trigger oscillator is used to
trigger the SCR about 4 times per second. The power supply is gated off during
the discharge time so that the SCR will stop conducting and return to it's
blocking state. The diode connected from the 3904 to pin 9 of the 74C14 causes
the power supply oscillator to stop during discharge time. The circuit draws
only about 200 milliamps from a 12 volt source and delivers almost twice the
normal energy of a conventional ignition circuit. High voltage from the coil is
about 10KV using a 3/8 inch spark gap at normal air temperature and pressure.
Spark rate can be increased to possibly 10 Hertz without losing much spark
intensity, but is limited by the low frequency power transformer and duty cycle
of the oscillator. For faster spark rates, a higher frequency and lower
impedance supply would be required. Note that the ignition coil is not grounded
and presents a shock hazard on all of it's terminals. Use CAUTION when
operating the circuit. An alternate method of connecting the coil is to ground
the (-) terminal and relocate the capacitor between the cathode of the
rectifier diode and the positive coil terminal. The SCR is then placed
between ground and the +340 volt side of the capacitor. This reduces the
shock hazard and is the usual configuration in automotive applications.
 Menu
Menu
Low Voltage, High Current Time Delay Circuit
In this circuit a LM339 quad voltage comparator is used to generate a
time delay and control a high current output at low voltage. Approximatey
5 amps of current can be obtained using a couple fresh alkaline D batteries.
Three of the comparators are wired in parallel to drive a medium power PNP
transistor (2N2905 or similar) which in turn drives a high current NPN
transistor (TIP35 or similar). The 4th comparator is used to generate a time
delay after the normally closed switch is opened. Two resistors (36K and 62K)
are used as a voltage divider which applies about two-thirds of the battery
voltage to the (+) comparator input, or about 2 volts. The delay time after
the switch is opened will be around one time constant using a 50uF capacitor
and 100K variable resistor, or about (50u * 100K) = 5 seconds. The time can
be reduced by adjusting the resistor to a lower value or using a smaller
capacitor. Longer times can be obtained with a larger resistor or capacitor.
To operate the circuit on higher voltages, the 10 ohm resistor should be
increased proportionally, (4.5 volts = 15 ohms).

Menu
Power-On Time Delay Relay
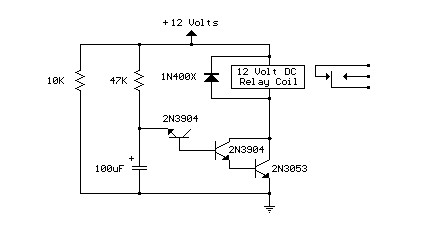
Here's a power-on time delay relay circuit that takes advantage of the
emitter/base breakdown voltage of an ordinary bi-polar transistor. The
reverse connected emitter/base junction of a 2N3904 transistor is used
as an 8 volt zener diode which creates a higher turn-on voltage for the
Darlington connected transistor pair. Most any bi-polar transistor may be
used, but the zener voltage will vary from about 6 to 9 volts depending on
the particular transistor used. Time delay is roughly 7 seconds using a
47K resistor and 100uF capacitor and can be reduced by reducing the R or
C values. Longer delays can be obtained with a larger capacitor, the
timing resistor probably shouldn't be increased past 47K. The circuit
should work with most any 12 volt DC relay that has a coil resistance of
75 ohms or more. The 10K resistor connected across the supply provides a
discharge path for the capacitor when power is turned off and is not
needed if the power supply already has a bleeder resistor.
 Menu
Menu
Power-Off Time Delay Relay
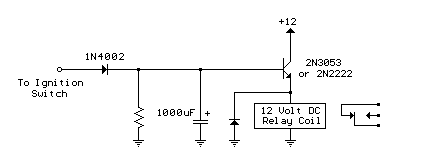
In the circuit below, a relay is immediately closed when power is applied
to the input and remains closed for a period of time after
power is removed. The circuit can be used in applications
such as switching off lights several seconds after turning off the switch.
When power s applied, the capacitor quickly charges through the diode and
the capacitor voltage is applied to the relay coil with the emitter follower
transistor configuration. When power is removed from the anode of the diode,
the capacitor slowly discharges through the base of the transistor, opening
the relay when the dropout voltage is reached. The relay I used was a 12 volt
DPDT variety with a 110 ohm coil that drops out around 2 volts. The delay
time turned out to be around 15 seconds using a 1000uF capacitor and no
resistor in parallel. A larger capacitor will yield a longer time, and the
time can be reduced by adding a resistor in parallel with the capacitor.
Menu
9 Second LED Timer and Relay Circuit
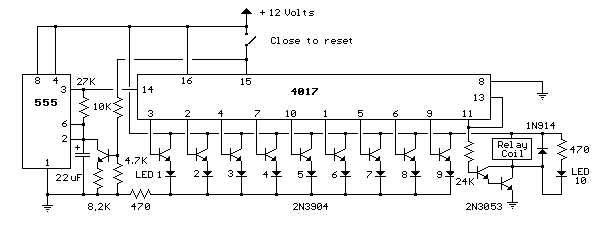
This circuit provides a visual 9 second delay using 10 LEDs before
closing a 12 volt relay. When the reset switch is closed, the 4017
decade counter will be reset to the 0 count which illuminates the
LED driven from pin 3. The 555 timer output at pin 3 will be high and
the voltage at pins 6 and 2 of the timer will be a little less than
the lower trigger point, or about 3 volts. When the switch is
opened, the transistor in parallel with the timing capacitor (22uF)
is shut off allowing the capacitor to begin charging and the 555
timer circuit to produce an approximate 1 second clock signal to the decade
counter. The counter advances on each positive going change at pin 14 and
is enabled with pin 13 terminated low. When the 9th count is reached, pin
11 and 13 will be high, stopping the counter and energizing the relay.
Longer delay times can be obtained with a larger capacitor or larger
resistor at pins 2 and 6 of the 555 timer.
 Menu
Menu
9 Second Digital Readout Countdown Timer
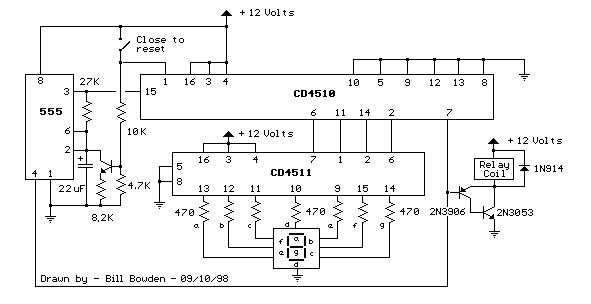
This circuit provides a visual 9 second delay using a 7 segment digital
readout LED. When the switch is closed, the CD4010 up/down counter is
preset to 9 and the 555 timer is disabled with the output held high.
When the switch is opened, the timer produces an approximate 1 second
clock signal, decrementing the counter until the 0 count is reached.
When the zero count is reached, the 'carry out' signal at pin 7 of the
counter moves low, energizing the 12 volt relay and stopping the clock
with a low signal on the reset line (pin 4). The relay will remain energized
until the switch is again closed, resetting the counter to 9. The 1 second
clock signal from the 555 timer can be adjusted slightly longer or shorter
by increasing or decreasing the resistor value at pin 3 of the timer.
The CD4510 is a CMOS Presettable BCD Up/Down counter which can
be preset to any number between 0 and 9 with a high level on the
PRESET ENABLE line, (pin 1) or reset to 0 with a high level on the
RESET line (pin 9). Inputs for presetting the counter (P1, P2, P3, P4)
are on pins (4, 12, 13, 3) respectively. The counter advances up
or down on each positive-going clock transition (pin 15) and the
counting direction (up or down) is controlled by the logic level
on the UP/DOWN input (pin 10, high=up, low=down). The CARRY-IN signal
(pin 5) disables the counter with a high logic level.
The CD4511 is a CMOS BCD to 7 segment latch decoder capable of sourcing
up to 25 mA which allows it to drive LEDs and other displays directly.
A LATCH-ENABLE line (pin 5, active low) stores data from the BCD input
lines. A LAMP-TEST input (pin 3, active low) can be used to illuminate
all 7 segments, and a BLANKING input (pin 4, active low) can be used to
turn all segments off. The LED display must be a common cathode type so
that the segments are illuminated with a positive voltage on their
respective connections.
Complete data sheets for the CD4510 and CD4511 can be obtained by
answer fax from
Harris Semiconductors (search)
Menu
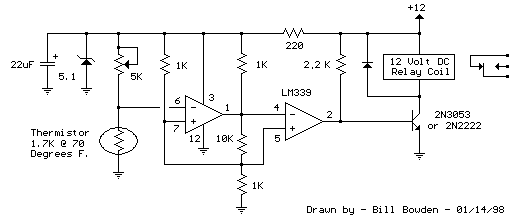
Electronic Thermostat and Relay Circuit
Here is a simple thermostat circuit that can be used to control a
relay and supply power to a small space heater through the
relay contacts. The relay contacts should be rated above the
current requirements for the heater.
Temperature changes are detected by a (1.7K @ 70F) thermistor placed
in series with a 5K potentiometer which produces about 50 millivolts
per degree F at the input of the LM339 voltage comparator. The two 1K
resistors connected to pin 7 set the reference voltage at half the
supply voltage and the hysteresis range to about 3 degrees or 150
millivolts. A larger range can be obtained by increasing these values.
In operation, the series resistor is adjusted so that the relay just
toggles off at the desired temperature. A three degree drop in
temperature should cause the relay to toggle back on and remain
on until the temperature again rises to the preset level.
The relay action can be reversed so it toggles off at the lower end
of the range by reversing the locations of the 5K potentiometer and thermistor.
The 5.1 volt zener diode regulates the circuit voltage so that small
changes in the 12 volt supply will not effect operation. The voltage across
the thermistor should be half the supply or about 2.6 volts when the
temperature is within the 3 degree range set by the potentiometer.
Most any thermistor can be used, but the resistance should be above
1K ohm at the temperature of interest. The series resistor selected
should be about twice the resistance of the thermistor so the adjustment
ends up near the center of the control.
 Menu
Menu
�


