Module 6-4
WINDOWS
©Copyright 1988 by The Center for Occupational Research and Development
All rights reserved. No part of this book may be reproduced in any form or by any means without permission in writing from the publisher.
The Center for Occupational Research and Development
601 C Lake Air Drive
Waco, Texas 76710
Printed in the U.S.A.
ISBN 1-55502-024-0
(1) During the Apollo (manned lunar exploration) space program, thousands of pictures were taken from inside the space vehicle of objects and phenomena on the moon and in outer space. These pictures constituted basic scientific data. From them, objects were identified, topography was mapped, courses were charted, phenomena were observed and records were maintained.
(2) The accuracy and validity of the data were, among other things, dependent on the windows’ ability to transmit images from outside the spacecraft to the inside for photographic recording without significant distortion. These windows also had to help to maintain a positive atmosphere inside the spacecraft. They had to prevent excessive solar radiation from entering and heating the vehicle, and withstand the intense heat and shock met on reentry to the earth’s atmosphere.
(3) This example of an optical window demonstrates that windows are precision optical components that must be selected, specified, and designed prior to construction and usage. Optically, a window should appear as though it were not there. Windows most commonly are used in these two classes of applications:
1. To retain a specific gas pressure or a partial vacuum in a tube or other enclosure.
2. To prevent dust, moisture or other particles from entering the system.
(4) Windows often are constructed to serve additional purposes. They act as filters, beam splitters, output mirrors, polarizers, lenses, or prisms.
(5) This module describes the desirable characteristics of optical windows and the principles for selection, specification and use of these components. For you to fully understand this description, you also will learn the characteristics, quality, and finish of optical materials used in windows.
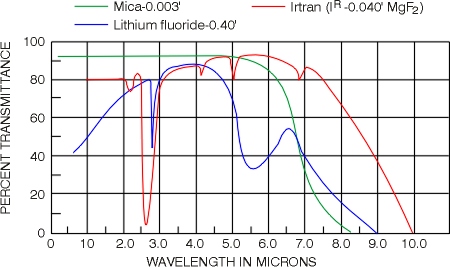
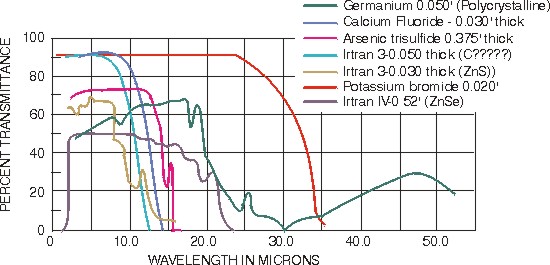
(6) Before you begin this module, you should have studied an introduction to lasers, especially laser safety. You also should understand geometric optics, types and properties of optical materials, limitations and testing of optical materials, and polarization.
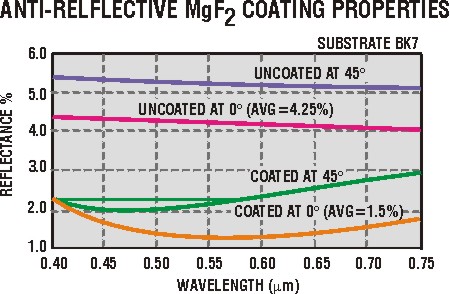
OBJECTIVES
(7) When you complete this module, you should be able to do the following:
1. Describe Fresnel reflection, and state the conditions under which it occurs. Using a sketch, show the incident and reflected rays, angles of incidence, reflection and refraction, and the interacting surface. Give the approximate values (in %) of the ratios of reflected to incident, and transmitted to incident light, for Fresnel reflection of a material with a refractive index of 1.5.
2. Explain, and illustrate with a sketch, Brewster’s angle. Give its relationship to the refractive index of the material, and its effect on the polarization of the reflected portion of the incident light. Include in the sketch the reflecting interface, the incident and reflected rays, Brewster’s angle, and the polarization of the reflected ray.
3. List five defects found within optical materials referred to in the Discussion.
4. List two defects found on optical component surfaces.
5. List five important characteristics of an optical window.
6. Using an intense, coherent light beam, visually examine optical surfaces of seven different materials. Evaluate their finish by observing scattered light.
7. Use a shop microscope and grazing incidence illumination to examine two surfaces to determine the nature and severity of surface defects.
8. Use an expanding beam of coherent light to test five windows for their effect on the intensity pattern of that beam.
9. Evaluate the surface flatness of five windows, using interference fringes produced between them and a master flat.
10. Determine which of two lenses has an antireflective coating.
Calculate the pressure differential that can be applied to a window before significant distortion occurs.
DISCUSSION
(8) A window could be deemed as a pane of glass or other transparent material used to transmit light with negligible distortion and to isolate the atmospheric and thermal environments on either side.
(9) One common example of windows used in a laser is shown in Figure 1. Here, the Brewster windows are the ends of a plasma tube for a helium-neon laser. The intracavity laser beam must pass through each of these Brewster windows twice during each round trip through the laser cavity. This is a very low-gain laser. That means that, if each Brewster window caused as much as one percent loss per pass to the laser beam, the laser would not operate.
Fig. 1
Brewster Windows on plasma tube of helium-neon laser
(10) Another application of windows in an electro-optical system is shown in Figure 2. Here, the window protects the output optics of a laser metal-cutting instrument from splattered, molten metal. The window is cleaned or replaced periodically.
Fig. 2
Window used to protect output optics in a laser metal-cutting operation
(11) The optical quality of a "perfect" window would be such that it would have no effect on a parallel, plane wavefront of an optical beam passing through it. Based on this "as if it weren’t there" concept, we can list the C desirable characteristics of an optical window.
1. Low absorption of transmitted light
2. Low reflection of light incident on the surfaces of the window
3. Low refraction (or bending) of the transmitted light rays
4. Minimum distortion of the transmitted beam due to imperfections in the optical material or the surface finish
5. Durable, not susceptible to damage by the laser, and an ability to withstand degradation from environmental causes. This may include strength, resistance to water vapor or temperature, and so on.
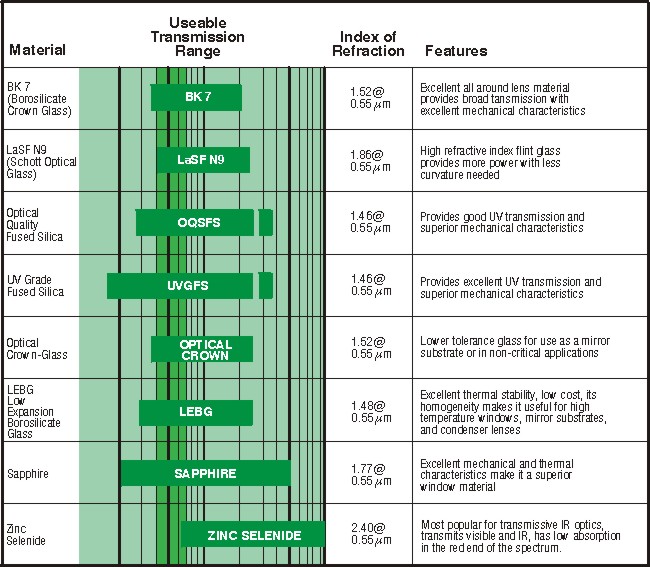
Table 1 lists several common optical materials used for windows and lenses. For each material Table 1 shows the usesable wavelength transmission range, the materials refractial index at a specified wavelength, and particular features which describe the attributes of the material. Note especially the features of BK7, fused silica, saphire and zince selenide, and the wavelength regions over which they provide good transmission.
Table 1
Overview of several common optical
materials
used for windows and lenses, showing transmission range,
index of refraction, and special features.
(adapted from Meller Griot 1997-198 Catalog)
(12) The discussion which follows will describe how to get these desirable characteristics for optical windows by proper material selection, fabrication, and component use.
Low Absorption
(13) You can achieve low absorption in a window by selecting the window material properly and by minimizing the window thickness. Light absorption in an optical material is dependent on wavelength of the light intensity, absorption characteristics of the particular material at that wavelength, and thickness of the material. Look at the window model in Figure 3. The relationship between incident light irradiance, Eo, and transmitted light, E, is given by:
|
Equation 1 |
| where: | a = Absorption coefficient of
the material at a particular wavelength. x = Thickness of the material. |
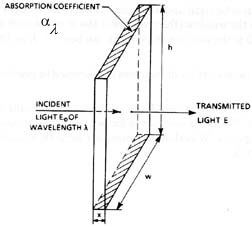
Fig. 3
Model of an optical window
(14) The ratio of transmitted to incident light is the transmissivity of the window (or percent transmission if it’s multiplied by 100%). You can rearrange Equation 1 to calculate percent transmission in the following way:
Percent
Transmission = |
Equation 2 |
(15) The curves in Figures 4a, b, c and d show percent transmissions through various optical windows in the UV, visible, and IR regions. Figure 4a shows internal transmittance curves for five glass materials over a range from 0.4 mm out to 2.1 mm. The materials labelled SFS, SF11, and K5 are certain types of glasses marketed by Edmond Industrial Optics. Those labelled BK7 and LaSFN9 are common to many glass manufacturers. Note for instance that these two are all also mentined in Table 1, which comes frm glasses marketed by Melles Griot. Internal transmittance refers to the transmission through bulk material without concern for reflective lenses at the front and near surfaces of the windows. Note that the five glasses shown in Figure 4a have excellent transmission in the visible region (0.4–0.7 mm) as well as values between 96% and 100% in the near infrared region (1.4–2.1 mm).
(16) The curves in Figures 4b, c, d show percent external transmittance (taking surface reflection into account) for various optical materials in the range 1–8 (Fig. 4b), 1–10 mm (Fig. 4c) and 1–50 mm (Fig. 4d.) The percent transmission, in accordance with Equation 1 is thickness dependent, so each of the curves shown in these figures is for the thickness specified in the legend of the Figure.
(17) Figure 4e shows how the reflection loses from the surfaces of BK7 windows are reduced from around 4-5% down to 1-2% after the BK7 is coated with a thin l/4 layer of magnesium fluoride (MgF2). All optics–windows, lenses, beamsplitter, prisims, etc.–are coated to reduce reflection losses. Mirrors, on the other hand, where high reflection is desired, are coated so as to enhance the reflectivity.
(18) Many infrared optical window materials are available for a wide variety of applications. Transmission curves for several of these materials are provided in Figure 4. Wavelength ranges for some IR window materials are given in Figure 5.
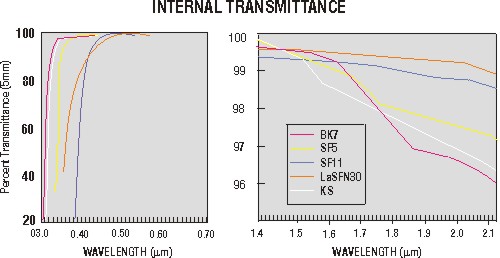
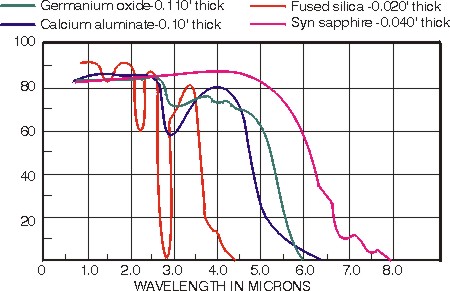
Fig. 4b
* Irtran is a registered trademark of the Eastman Kodak Company.
As one can see by examing Figures 4b, c, d, many optical materials are available to serve as windows (or lenses) in the near and far infrared regions of the electro magnetic spectrum. Knowing the specific application for a particular window (cost, transmission required, mechanical strength required, coefficient of expansion, fracture vulnerability) generally helps one select the optimum window material. For example, Tabled 1 would point to zinc selenide as a window material for use with CO2 lasers emitting light of 10.6 mm. Wavelength ranges for several IR window materials are provided in Figure 5.
(19) You should note the usefulness of certain IR optical materials—including sodium chloride, germanium, gallium arsenide, cadmium telluride, zinc selenide, Irtran 2, Irtran 4, and some of the alkali halides—for use as optical windows in CO2 and other infrared lasers. Some of the properties of IR window materials are shown in Table 2.
Table 2: Characteristics of Selected Infrared Transmitting Materials
|
Wavelength |
Refractive |
|
| Sodium chloride (NaCl) |
0.25 to 16 µ | 1.52 |
Useful because of range and low cost, stands thermal and mechanical shocks well; water-soluble; fogs slowly. |
| Potassium bromide (KBr) |
025 to 25 µ | 1.53 |
Useful with extended-range spectrophotometers; fogging does not seriously affect transmission; softer than NaCl; stands thermal and mechanical shock fairly well; water-soluble; fogs only a little faster than NaCl. |
| Calcium fluoride (CaF2) |
0.15 to 8 µ | 1.42 |
Insoluble in water; resists most acids and alkalides; one of the strongest crystal materials and particularly useful in high-pressure cells, doesn’t fog. |
| Barium fluoride (BaF2) |
0.13 to 13.5 µ | 1.46 |
Insoluble in water; good resistance to fluoride and fluorides; must be handled with care because it is easily cleaved by thermal or mechanical shock; doesn’t fog. |
| Cesium bromide (CsBr) |
1 to 37 µ | 1.67 |
Water-soluble; a light fog doesn’t affect transmission seriously; not resistant to oxidizing agents; soft and easily deformed; fogs slowly. |
| Cesium iodide.(CsI) | 1 to 50 µ | 1.74 |
Water-soluble; generally easier to handle than cesium bromide; fogs slowly. |
| Irtran - 2 (Zinc Sulfide) |
2 to 14 µ | 2.26 |
Especially useful for water solutions; attacked by strong oxidizing agents; stands thermal and mechanical shock well; high refractive index induces persistent fringes. |
| Polyethylene (high density) |
16 to 300 µ | 1.54 |
Needed for far-infrared; attacked by few solvents; difficult to clean thoroughly; very inexpensive. |
| KRS – 5 | 0.5 to 40 µ | 2.2 |
Not hygroscopie, wide wavelength range, toxic. Do not grind or polish. |
| Silver chloride (AgCl) |
0.4 to 28 µ | 2.07 |
Soft material, will cold-flow, darkens under intensive UV radiation; insoluble in water. |
| Silver bromide (AgBr) |
0.4 to 35 µ | 2.31 |
Attacks base metals; soft; will cold-flow; insoluble in water. |
| Germanium (Ge) | 1.8 to 23.0 µ | 4.00 |
Low absorption coefficient @ 10.6 µ; takes good optical polish; can be coated with hard, durable dielectric films; good for CO2 laser window or mirror at low power densities; relatively inexpensive. |
| Gallium arsenide (GaAs) |
1.0 to 11.0 µ | 3.12 |
Lower absorption coefficient than Ge @ 10.6 µ; much better thermal runaway characteristics than Ge; good for Co2 laser windows and mirrors at high power densities (ł 150 W/cm2); expensive |
| Zinc selenide (ZnSe) (Irtran 4) |
0.5 to 22.0 µ | 2.40 |
Transmission region facilitates inspection for internal flaws, allows system alignment with HeNe laser; lower absorption coefficient than GaAs; non-hydroscopic; good for high-power IR laser applications; expensive |
| Cadmium telluride (CdTe) |
2.0 to 25.0 µ | 2.80 |
Low absorption coefficient; high thermal runaway temperature; good for high-power IR laser windows and mirrors; expensive |
Low Reflection
(20) If a ray of light of any polarization strikes normal (perpendicular) to an interface (junction) between two optical materials of dissimilar indices of refraction (n1 and n2), a fraction of the incident ray will be reflected according to the relationship:
% Reflection
= |
Equation 3 |
(21) This type of reflection sometimes is called "Fresnel reflection." (See Figure 6.)
Fig. 6
Diagram of Fresnel reflection
(22) For parallel rays of visible light passing through a window, one medium probably will be air (n1 = 1.0). The other probably will be some other glass (n2 ~ 1.5). Using Equation 3, you can calculate a reflection of ~ 4%. This calculation is for one side of the window. When the rays emerge from the other side, another 4% reflection loss is encountered. In summary, we realize that a common window pane (example, glass) with air on either side would reflect approximately 8% of the light incident normal to the surface. For example, you see a faint image of your face when you look out a window.
(23) Optical theory shows that, if multiple reflections within a window are taken into account—as well as the first-surface reflection—the total theoretical external transmittance is given by:
|
Equation 4 |
|
where: |
 |
|
(24) So the total reflectance Rtot is 1 minus Ttot, or
|
Equation 5 |
|
where: |
 |
|
(25) In other words, Ttotal + Rtotal = 1. In Equations 4 and 5, zero absorption is assumed. Table 3 shows the total reflective loss theoretically expected from a variety of infrared window materials. The refractive indices given are approximate values over the range of general use of the material. If exact reflective losses are required, one must use the precise refractive index at the wavelength in question.
Table 3: Reflective Losses for Surfaces from Selected IR Materials
|
Approximate Index (n) Over Major Region of Use |
Percent Theoretical Reflection Losses From Two Surfaces |
| Kodak Irtran 1 (MgF2) Kodak Irtran 3 (CaF2) Barium fluoride Quartz Fused silica |
1.35 1.40 1.45 1.45 1.46 |
4.3 5.4 6.5 6.5 6.7 |
| Sodium chloride Potassium bromide Kodak Irtran 5 (MgO) Sapphire Silver Chloride |
1.50 1.52 1.65 1.70 1.98 |
7.7 8.2 11.3 12.6 19.5 |
| Kodak Irtran 2 (ZnS) Cadmium sulphide KRS-5 Arsenic trisulphide Kodak Irtran 4 (ZnSe) |
2.22 2.25 2.36 2.40 2.41 |
25.1 25.8 28.2 29.0 29.2 |
| Chalcogenide glass Kodak Irtran 6 (CdTe) Gallium arsenide Silicon Germanium |
2.60 2.67 3.25 3.42 4.00 |
33.0 34.3 43.8 46.1 52.9 |
(26) As an example, use n = 1.35 for the refractive index of a Kodak Irtran 1 window. Using Equation 5, we get for the percent total reflective loss:
% R =  ´
100%
% R = (1 – 0.9566) ´ 100%
% R = 4.34%
(27) These reflections can be substantially reduced by coating the surfaces with an antireflection layer or by positioning the windows at the Brewster angle (for TM polarized light). These two techniques are discussed in the following paragraphs.
1. (27.1.1) Surface reflections can be reduced to less than 1% by applying vacuum-deposited antirefiection coatings to each surface of the window. The coatings can be simply a thin film of a dielectric material (such as magnesium fluoride) selected because its index of refraction (n3) is close to the square root of the product of the indices of refraction of the two materials (n1 and n2).
(27.1.2) In other words,
|
Equation 6 |
where: |
t = Thickness of the film (assuming normal incidence). |
(27.1.3) You can determine by visual observation if a window is antireflection.(AR) coated. If you look at the reflection from a light source at a low grazing angle to the window, the light will appear to be somewhat blue-violet. Antireflection coatings are usually very "hard." They can be cleaned with alcohol and lens tissue without danger of scratching or otherwise damaging the coating.
2. (27.2.1) Brewster’s angle window—In the previous discussion, the angle between the incident light rays and the window was considered to be 90° (normal incidence). When the window is positioned at a different angle, the percentage of reflected light changes.
(27.2.2) Alignment of the window to the incident ray or optic axis usually is expressed by the angle, f . This angle is measured between the incident ray and a line normal to the plane of the window. (See Figure 7.) For normal incidence, the incidence angle is therefore f = 0°.
Fig. 7
Diagram of angle of incidence for a light
ray striking a window
(27.2.3) A light beam (which is an electromagnetic wave) is said to be linearly polarized if the amplitude of the corresponding electric field (called the "E-vector") varies in only one plane along the optic axis. If a linearly polarized light beam is transmitted through an optical window, the percentage of the beam that’s reflected at each surface varies with the incidence angle, f , according to the curves shown in Figure 8. Note that there are two curves. One is designated
E^ , and the other one is designated Ell. (See Figure 9.)
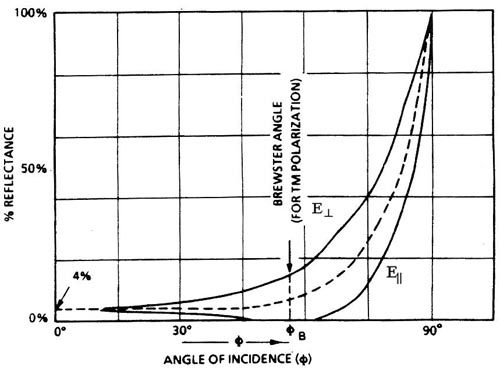
Fig. 8
Reflection of polarized light at an air/glass (n = 1.5)
interface
as a function of angle of incidence.
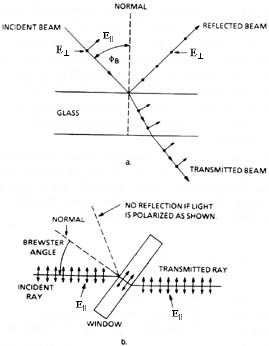
Fig. 9
Reflection and refraction of light at Brewster’s angle
(27.2.4)
This notation is the same as that introduced in Module 1-4, Course 1, on Properties of Light. To repeat, E^ refers to the E-component perpendicular to the plane of incidence (here the plane of the paper) and is shown by dots in Figure 9a. By contrast, Ell refers to the E-component lying in the plane of incidence and is shown in Figure 9a by the short arrows attached to the light rays. (Note that in some texts, what we refer to as E^ is called TM, and what we refer to as Ell is called TE.)At an angle of incidence equal to Brewster’s angle f B, the reflected ray contains no
Ell vector, only E^. If the incident beam were totally linearly polarized with Ell only, at Brewster’s angle of incidence, there would be no reflected light. All of the E^vibration would be refracted at the first surface and pass on through, as shown in Figure 9b. The transmitted beam is then totally Ell polarized.(27.2.7) Note that the
Ell parallel polarization curve in Figure 7 approaches zero reflection for an incidence angle of approximately 57°. This is called "Brewster’s angle." Many laser outputs are linearly polarized. So Brewster-angle windows often are used to eliminate losses due to air-to-glass surface reflections. Brewster angle is not always 57°. It will vary according to the ratio of the index of refraction of the window material to the index of refraction of the surrounding medium according to
|
Equation 7 |
where: |
|
(27.2.8) If the window is used in air, f B simply equals tan–1 nwindow.
Reducing Distortion Due to Refractive Effects
(28) This section describes techniques and specifications on gross dimensions of optical windows to minimize transmitted wavefront distortion due to refractive effects caused by the window. Refractive effects from material inhomogenieties or finish will be discussed in the last section.
(29) To prevent distortion of a transmitted wave, the two plane surfaces of the window must be reasonably flat and parallel. We can achieve flatness of 1/4 to 1/10 micrometer (µm) for a surface of several square inches without too much difficulty. This degree of flatness is probably enough to prevent the window from acting as a lens or from causing irregular bending of the beam due to refraction. Parallelism of the two surfaces to within 1-2 arc minutes is reasonable and probably adequate for several square inches of surface. If the surfaces are not parallel, the window will be a small wedge, bending the beam slightly. If you know the wedge angle accurately (and it can be measured with an autocollimator or laser), the bending can be compensated for. So it probably won’t cause a problem. If the surfaces of the window are allowed to cause reflections, a wedge in the window will cause multiple beams from the multiple reflections between the two surfaces. (The intensity of the first reflected beam will be less than 0.2% of the intensity of the primary beam.)
(30) You also should be aware of distortions induced in a window because of thermal gradients across the surface. Here’s an example. Assume that a round glass window five inches in diameter and 0.5 inch thick is being heated from absorbed sunlight or a transmitted laser beam. The primary source of heat loss to the window will be through the edges of the window to the frame. This will make the window hotter in the center and cooler on the edges. The hotter area of the window will expand more, causing the center to be thicker than the edges. In a thick window like this, the expansion can cause a serious distortion in the window. The window will look and act like a positive lens, focusing the rays of the transmitted beam.
(31) There’s also a distortion that can be introduced by a change in refractive index with temperature. This distortion can cause similar problems.
Window Distortion Due to Imperfections in
Optical Material or Surface Finish
(32) The undesirable properties of optical glass are as follows:
1. Striae—a series of fine, hair-like lines visible because of sharp variations in the index of refraction. These imperfections are caused by improper mixing or insufficient annealing of the glass during manufacturing
2. Stones, seeds or inclusions—tiny, solid, undissolved particles, not chemically united with the rest of the ingredients in a batch of glass. They are caused by an improper melting process or foreign particles contaminating the batch (from the handling equipment or the crucible). Point inclusions are common in glass.
3. Bubbles—air or gas pockets in the glass caused by improper stirring or insufficient annealing of the ingredients.
4. Cloudiness or milkiness—a lack of, or poor, transparency due to improper cooling (annealing) methods.
5. Strain—appears as light and dark streaks, not seen by the naked eye but revealed by polarized light. It is induced during manufacture by improper annealing. Strain also can be caused by mechanical stress when an optical element is improperly mounted in an instrument or holder.
(33) The defects in optical material surface finish are:
1. Scratches—any marking or tearing of the optical surface. Scratch types are identified as the following:
• Block reek—chain-like scratch produced in polishing.
• Runner cut—curved scratch caused by grinding.
• Sleek—hairline scratch.
• Crush or rub—surface scratch or a series of small scratches generally caused by mishandling.
The scratch number mentioned above refers to the width of the scratch in ten thousands of a millimeter. Thus a scratch indicator of 60 represents a scratch equivalent to a standard 6 mm wide scratch. The determination is generally subjective since it is made by visual inspection. Since the appearance of a scratch can depend on factors such as the glare material and coatings, a 60 standard scratch may not necessarily be 6 mm wide.
2. Digs—small rough spots on the polished surface similar to pits in appearance, generally caused by mishandling.
The dig number mentioned above refers to the diameter of small pits or craters on a polished optical surface. This number represents the actual size of the dig in hundreths of a millimeter. For non-circularly shaped digs, the diameter is taken to be one half of the length plus width of the dig. With this definition, the dig specifications given below follow:
10 dig = 0.1 mm diameter
20 dig = 0.2 mm diameter
30 dig = 0.3 mm diameter
40 dig = 0.4 mm diameter
50 dig = 0.5 mm diameter, and so on.In terms of scratch/dig defects, 8050 represents a commonly accepted cosmetic standard surface; 60/40, as mentioned above, a surface finish acceptable for research applications; and 10-5 represents a precise (and costly) standard for demanding laser applications.
(34) All of the defects in optical materials described in this section, with the exception of "strain," generally will tend to scatter light from the transmitting beam. In laser beams, this type of scattering will cause an inhomogeneous field, diffraction and streaks—effects similar to those caused by dirty or dusty optics. They also often act as initiating sites for laser-induced damage. Strain will cause more gross distortion in the beam due to bending of the light rays.
(35) It is beyond the scope of this module to try to train a technician to produce quality specifications for optical components. Moreover, it’s even more difficult to describe inspection tests necessary to determine if rigid manufacturing standards have been followed. It would be a good idea for the student to acquire and study two commonly used military specifications:
• MIL-0-13830A—General Specifications Covering the Manufacture, Assembly and Inspection of Optical Components.
• MIL G-174 - Optical Glass.
Mechanical Distortion of Windows*
————
* This discussion is based on an analysis presented in Catalog OP 101, Harshaw/Filtrone,
Solon, Ohio.
(36) A pressure differential applied to an optical window may cause distortion that is unacceptable in many applications. In extreme cases, the stress even could cause catastrophic failure. The maximum stress in a uniformly loaded window is given by,
|
Equation 8 |
where: |
Srnax = Maximum
stress, psi D = Diarneter of support t = Thickness (same units as D) K = A constant p = Load per unit area, psi |
(37) To avoid plastic deformation of the window, which in turn could cause significant optical distortion, we must keep the maximum load on the window below a threshold number called the "flexural apparent elastic limit" Fa. This limit is defined as the load point on the load versus deformation curve at which the material will deform at a rate 1.50 times the initial rate. So we can write
|
Equation 9 |
(38) For additional assurance that our window will not significantly deflect under an applied pressure differential, we can introduce an additional safety factor, SF, such that,
|
Equation 10 |
(39) Substituting into Equation 8 gives us a design equation based on the dimensionless ratio of window thickness to diameter,
|
Equation 11 |
(40) The value of the constant K in Equation 11 depends on the method of supporting the window. Two popular methods of support are shown in Figure.10. In Figure 10a, no motion of the edge of the window is allowed. If the window is supported by rubber O-rings or other flexible seals, the value of K in method job should be used.
(41) Typical values of the elastic limit Fa are given in Table 4. A summary of the equations for the deformation of a circular window and a rectangular window is given in Table 5.
Fig. 10
Two methods of supporting a window
Table 4: Elastic Limit Fa for
Some
Common Window Materials
Material |
Fa, psi |
| CaF2(1) | 5300 |
| Polytran® CaF2(5) | 8000 |
| BaF2(1) | 3900 |
| KRS-5(2) | 3800 |
| LiF(3) | 1580 |
| NaCl(6) | 350 |
| Polytran® NaCl(5) | 1600 |
| Kbr(6) | 160 |
| CsI(6) | 810 |
| MgF2(5) | 7200 |
(42) These design equations are for circular and rectangular windows that are either clamped or free at the edge. The equations assume a safety factor (SF) of 4.00.
Table 5: Design Equations for Circular and Rectangular Windows
Clamped |
Unclamped |
|
Safety Factor |
4 |
4 |
K |
Kc = 0.75 |
Ku = 3/2Kc = 1.125 |
Circular |
t/D
= 0.866 |
t/D
= 0.866 |
Rectangular |
t = 1.23b
|
t = 1.5b
|
where: |
t = Thickness p = Load per unit area, psi Fa = Apparent elastic limit, psi D = Unsupported diameter, for circular window b, a = Length and width of rectangular window c = b/a |
Example: Window Thickness to Prevent Optical Distortion |
|
|
You are constructing a large test chamber for laser-induced fusion. The pressure inside the chamber is essentially zero. Pressure outside is one atmosphere 14.7 psi). The windows will have a diameter of 12.0 inches and will be made from NaC1, held with rubber O-rings at the edge. |
|
Minimum thickness window that will prevent significant optical distortion. |
|
|
Maintenance and Durability of Optical Windows
(43) To select a material for an optical window and to determine its proper maintenance, you must consider the environmental conditions to which it may be subjected:
1. Thermal—Extreme heat or cold, or rapid changes in temperature, can cause temporary or permanent changes in the physical characteristics of the window. The critical material characteristics are melting temperature, coefficient of thermal expansion, and variation in thermal expansion along two orthogonal coordinates in the material.
2. Surface abrasion—The surface of the window can be altered by external abrasions in the form of scratches from other materials (even cleaning cloths), or from particles in the air (sand, grit, dust). The critical material characteristic in determining a window’s vulnerability to surface abrasion is hardness.
3. Chemical damage—The damage to window surfaces from a chemical stems primarily from the chemical’s ability to partially dissolve the window material. Examples are acetone on plastic windows, and water on infrared "salt" windows.
4. Laser damage—Very high-power lasers can damage windows either at the surface or internally. The subject of laser damage to optical components is beyond the scope of this module. It’s enough here for you to know that this damage mechanism exists and to seek additional information on the subject if the possibility of the condition exists.
5. Contamination—The surface of a window can become contaminated from its exposure to polluted atmospheres. This contamination can be in the form of dust, grease, chemical films, or moisture. You usually detect it by visual observations. Proper operation of an optical system depends on the technician recognizing conditions of contamination and performing periodic maintenance in the form of surface cleaning.
Flats
(44) An optical flat is a window of high-grade quartz glass with one or both surfaces flat to at least one tenth of the wavelength of light. It’s generally used in one of two ways.
(45) Due to their flatness, flats make excellent substrate material on which to put a desired coating. They can be used as the substrate material for first-surface reflectors, dielectric-coated beam splitters, or for coated windows.
(46) A more common use for an optical flat, though, is to test the flatness of other optical components. The flat is placed on the surface to be tested, then illuminated with monochromatic light. Interference banks appear, produced by variation in the optical path length of light going through different thicknesses of glass. The curvature of the interference bands with respect to the distance of the bands indicates the amount of flatness error. Study the interference patterns shown in Figure 15, in the Laboratory Procedure entitled "Interference Test For Optical Flat." Straight, parallel, and evenly spaced bands indicate that the work surface is accurately flat with respect to the master flat.
(47) Flats are versatile devices for measuring surface flatness of polished areas such as the surfaces of prisms, filters, or optical windows.
EXERCISES
1. Describe Fresnel reflection. State the conditions under which it occurs. Use a sketch to show the incident and reflected rays, angles of incidence and refraction, and the reflection surface. State the approximate values (in %) of the ratios of reflected to incident, and transmitted to incident light, for Fresnel reflection of a material with a refractive index of 1.5.
2. Explain Brewster’s angle and illustrate it with a sketch. State its relationship to the refractive index of the reflecting material and its effect on the polarization of the reflected portion of the incident light. Include in the sketch the reflecting interface, the incident and reflected rays, Brewster’s angle, and the polarization of the reflected ray.
3. List five defects found within optical materials referred to in the discussion.
4. List two defects found on optical component surfaces.
5. List five important characteristics of an optical window.
6. The following is an interference pattern obtained by comparing a sheet of glass to a master flat. What is your interpretation of the flatness of the glass tested?
7. Describe the visual difference between a lens with an antireftective coating and a lens without a coating.
8. A flat glass plate has an index of refraction of 1.52. If light is to strike the plate at normal incidence, what percent of the light will transmit through the plate?
9. Consider the same plate as in Exercise 8. Assume now that we will apply a single-layer AR coating to one surface. Ideally, what will be the index of refraction of the coating? If we’re going to illuminate the plate with a HeNe laser, how thick should the single-layer AR coating be?
10. Find Brewster’s angle for TM polarized light striking an interface from air into water. (nwater = 1.33.)
11. A 10.0-cm-diameter window, fabricated from LiF, is designed to withstand a 15.0 atmosphere pressure differential without suffering significant optical distortion. Assume that the window is clamped around its circumference and that we will allow a safety factor of 4.0. How thick should we make the window?
12. Repeat Exercise 11, but this time allow a safety factor of 2.50 and allow free movement of the window’s edges.
13. A rectangular window, 4.00 ´ 5.00 cm on a side, is fabricated from Polytran KCI. The window is held with flexible rubber O-rings along its perimeter, and has a uniform thickness of 6.00 mm. Assuming a safety factor of 2.00, what pressure differential can be applied to the window before it begins to suffer significant optical distortion? Express your answer in atmospheres of pressure.
MATERIALS
Optical windows
Borosilicate crown glass
Quartz (fused)
Sapphire
Plexiglass or similar plastic
Ordinary glass (window pane, microscope slide, etc.)
Irtran
Germanium
HeNe laser, 1 mW
Optical flat, l /10 or better
Mercury vapor lamp, high intensity
Green filter (gelatine or glass)
Diffuser (ground glass, translucent paper, etc.)
Shop microscope
Diverging lens, focal length –2 to –4 cm
Ordinary plate glass, 1/8" to 1/4" thick, about 3" square
Supports and mounts for lens, windows, filter and glass plates
Lens, antireflection coated, any size or focal length
Lens, without coating, any size or focal length
PROCEDURES
Surface Condition of Windows
Visually examine the windows for cleanliness, surface condition, and the presence of antireflection coating.
1. Clean all surfaces that are contaminated. Use high-purity ethanol, methanol or Kodak lens cleaning fluid, with clean lens tissue. Set cleaned windows on a fresh piece of lens tissue. Cover them with another piece to avoid further contamination.
2. Set up the HeNe laser, with a diverging lens in the beam. Examine each surface using this source of illumination.
Use Extreme Care. Avoid directing the reflected beam into your own or others’ eyes.
Rotate the test piece as shown, to use various angles of incidence. The intense beam will readily reveal dirt and scratches, by scattering light. More intensity is available in the narrower part of the beam. Moving the test piece closer to the diverging lens provides this, and makes the test more revealing. As a final check, remove the diverging lens and inspect the piece with the full intensity of the narrow beam. Hold the piece nearly perpendicular to the beam path. Again, be careful of the direction of the reflected beam!
Fig. 11
Inspecting surface with divergent beam.
3. Record your observations of each surface. Note scratches, hazy appearance, and any other defects. Identify the piece with the best surface polish.
4. Use the microscope to examine one or two of the worst surfaces. Use illumination at a large angle of incidence, as shown in Figure 12.
Fig. 12
Microscopic examination of surface.
Internal Defects in Window Materials
Visually examine the effect on an expanded HeNe beam that has passed through the window.
1. Mount window and diverging lens to project a spot several inches in diameter onto a sheet of white paper, as shown in Figure 13.
Fig. 13
Testing the quality of a window by examining the expanded transmitted beam
2. Carefully examine the projected spot for any local variations in brightness. To confirm that any variations are not due to either the laser itself or the diverging lens:
a. Remove the window and compare results.
b. Rotate the lens, while observing spot variations. Those caused by the lens will follow lens movement.
Interference Test for Optical Flats
Evaluate the flatness of the surfaces by comparison with a master flat of known accuracy. Use the viewing arrangement shown in Figure 14 to display interference fringes.
1. Very gently lay a test piece onto the master flat. Use care not to slide it across the flat.
2. While you observe the pattern as shown above, gently slide the window around over the flat until 5 to 10 fringes are visible. A clean toothpick, tongue depressor, or a pointed kitchen match makes a good tool to manipulate the test piece. This will allow most of the air between test piece and flat to escape, broadening and reducing the number of fringes. (If this doesn’t happen, carefully remove the piece and reclean both it and the flat.)
Fig. 14
Viewing arrangement for interference test.
3. When only two or three fringes are visible, compare one of them to a straightedge held over the center of each end of one fringe. See Figure 15.
Fig. 15
Examples of fringe patterns in interference test.
Since two successive fringes mean that a variation of the optical thickness between the surfaces of the master flat and test piece equal to a half wavelength has occurred, the curvature of the fringe shown in Figure 15c indicates that the test piece varies by approximately l /2 from whatever flatness the master plate possesses. To determine if it’s concave or convex with respect to the flat, simply lower your eye toward the piece. If convex, the fringes will appear to spread out. If concave, they will move closer together.
4. Test and record the deviation of both surfaces of each window.
Identification of Antireflection Coating
Examine the two lenses and determine which has the antireflection coating.
REFERENCES
Catalog OP 101, Crystal Optics, Harshaw/Filtron, Solon, Ohio, 44139, (216) 248-7400.
Harshaw Optical Crystals, Harshaw Chemical Co., Crystal & Electronics Products Department, Cleveland, Ohio.
Kodak Irtran Infrared Optical Materials. Eastman Kodak Publication U-72, 1971.
Kruse, P. W., and L. D. McQuistan. Elements of Infrared Technology. Chapter 4, John Wiley, 1962.
Mauro, J. A. Optical Engineering Handbook, 1966, General Electric Company.
MIL-G-174 Glass, Optical, US Government Printing Office.
MIL-0-13830A, Optical Components for Fire Control Instruments, General Specification Governing the Manufacture, Assembly and Inspection of, 11 September 1963, US Government Printing Office.
SPIE, Basic Optics and Optical Instruments, Vol. 1, 1965, Nortronics Division of the Northrop Corporation.
Walker, Bruce. "Anti-Reflection Coatings," Optical Spectra, October 1972.
Waugh, John. "Component Testing by Interferometry," Optical Spectra, June 1973.
Wolfe, William L., editor. Handbook of Military Infrared Technology. Office of Naval Research, 1965. Department of Documents, US Government Printing Office, Washington, DC.
Zanoni, Carl A. "Specifying and Measuring Optical Glass Homogeneity," Electro-Optical Systems Design, February 1973.