Touch Activated Alarm System
by Tony van Roon
Parts List
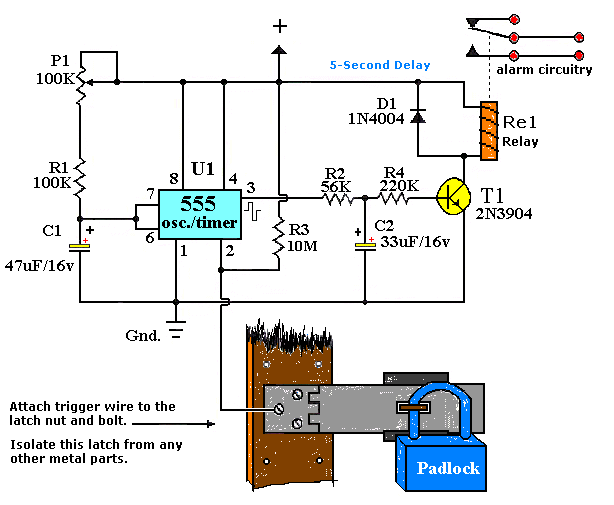
R1 = 100K D1 = 1N4004 U1 = 555 Timer
R2 = 56K C1 = 47uF/16V**
R3 = 10M C2 = 33uF/16V**
R4 = 220K T1 = 2N3904, or equivalent
P1 = 100K Re1 = Relay***
Additional Notes
Not much to tell here as the circuit speaks for itself. *The 555 can be a LM, NE, or MC(cmos) type, they
are all pin-compatible. **C1/C2's working voltage should be increased to 25V if you decide to go with a
12V power source. Rule of thumb: the working voltage of capacitors are at least double the supplied voltage,
in other words, if the powersource is 9Volt, your capacitor(s) is at least 18V. Transistor T1 can be any
approximate substitute. ***Use any suitable relay for your project and if you're not tight on space,
use any size. I've build this particular circuit to prevent students from fiddling with the security
cameras in computer labs at the University I am employed. I made sure the metal casing was not grounded.
But as the schematic shows you can basically hook it up to any type of metal surface. I used a 12-vdc
power source. Use any suitable relay to handle your requirements. A 'RESET' switch
(Normally Closed) can be added between the
positive and the 'arrow-with-the-+'. The trigger (touch) wire is connected to pin 2 of the 555
and will trigger the relay, using your body resistance, when touched. It is obvious that the
'touching' part has to be clean and makes good contact with the trigger wire. This particular
circuit may not be suitable for all applications. Just in case you wonder why pin 5 is not listed in the
schematic diagram; it is not really needed. In certain noisy conditions a small ceramic capacitor is placed
between pin 5 and ground. It does no harm to add one or leave it out.
NOTE: For those of you who did not notice, there is an approximate 5-second
delay build-in before activation of the relay to avoid false triggering, or a 'would-be' thief, etc.
AGAIN, make sure the latch is not touching anything 'ground' or the circuit just keeps resetting itself and
so will not work. My shed has wooden doors so works fine. If you can not get yours to work, check the trigger
input, verify there is some sort of signal coming from output pin 3 play with the value of R3.
If you are interested in a short tutorial about the 555 Timer/Oscillator IC or find yourself having some
problems understanding some of the pin functions, please check here: 555 Tutorial
Back to Circuits Page
Copyright © 1995 - Tony van Roon