Building LRLs
by Carl Moreland
Each of the devices presented here are very simple to build and range in cost from zero to about $20. The electronic LRL (project 4) is the only one which requires any electronics assembly skills. If you decide to build one or more of these devices, I warn you not to get lulled into a false sense of success by using the typical sloppy testing of dowsing proponents, or to believe for a moment that you will ever find any treasure with one of these. You will not. As the psychic hotlines say: they are for entertainment purposes only.
LRL1: Basic Dowsing Rod
The first unit we will build is the traditional L-rod, often used to locate water and buried pipes. It will cost you nothing to make as it requires only two metal coat hangers. First, use large wire cutters to cut the "neck" of the coat hangers off, just below the twist as shown in Figure 1. Straighten the wires, then bend them into an "L" shape with the short end about 5" (12.5 cm) long and the long end trimmed to about 16-18" (40-46 cm). They should look like the one in Figure 2. You are done.
 |
 |
Most people who try this exercise usually get a response from the rods, and so it is often touted as evidence for dowsing skills. If the rods did not cross as you walked over the hose, do not worry. This is an exercise in autosuggestion and the ideomotor response, not dowsing. The length and weight distribution of the rods make them very sensitive to gravity and thus make them difficult to hold exactly level. The slightest movement of your wrists will cause the rods to swing. By my telling you that they are supposed to swing as you cross the water hose (autosuggestion), you have subconsciously fulfilled that prediction without realizing it (ideomotor response.) If you cut the rods shorter, hold them in a downward position, or add a counter weight to the back, they are much less likely to swing. We can also attain more accurate results by using a slightly better test.
Again, stretch the hose out in a straight line, but this time make sure the open end is not visible so that you cannot tell whether the water is on or off. Placing the end in a storm drain or in a wooded or natural area should probably work. Now have a friend operate the spigot. Without touching it, make 10 or so passes over the hose with the dowsing rods and try to determine whether the water is on or off. For each attempt, your friend should randomly choose whether to turn the water on or off and record his choice. You should also record your finding after each pass. It is best if you do not have visual contact with your friend, and vice-versa.
At the end of 10 passes, compare your results with your friend's choices. You will likely see a success/fail ratio that is roughly equal to random chance, 50% in this case. If you were significantly more successful than this, then repeat the test. If you continue to be successful, you are possibly cueing off some subtle clue such as being able to hear the water (try earplugs) or being able to see your friend (try setting up an opaque screen). This is certainly not an adequate double-blind test and its many flaws leave open the possibility of error. A better LRL test is described in my formal double-blind procedure.
LRL2: Counter-balanced Brass Rod
Many dowsing advocates will immediately find fault with the choice of a coat hanger for our rod material. Most commercially available rods are made of brass, with a few using telescopic radio antennas which are also typically (chrome-plated) brass. The choice of brass, we might be told, is that it does not have the natural reaction to magnetic fields that steel does, for whatever reason this matters. It is conductive, though, and thus can receive the electromagnetic energy emanated from the desired target while ignoring the earth's magnetic field. It is no wonder that our coat hanger rods failed. Besides, as a treasure hunter you want to convey a professional image and bent coathangers just don't do that.
 Figure 3 - Parts for one L-rod
|
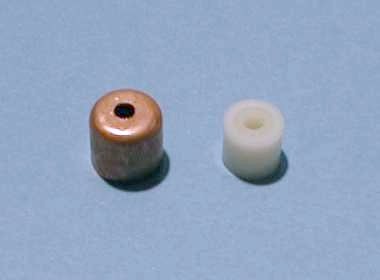 Figure 4 - End cap and bushing detail
|
 Figure 5 - Ready for assembly
|
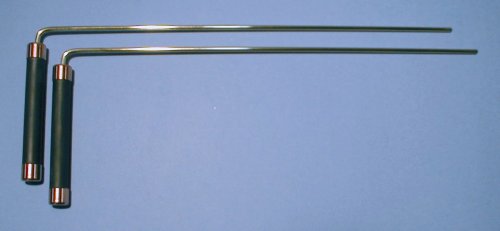 Figure 6 - Completed L-rods
|
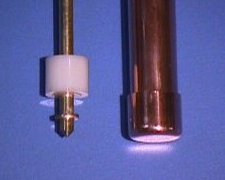 Figure 7 - Retaining washer
|
When you are done you can run the test as before and you will very likely see the same results. To show the effect that gravity is having on our device, and the effect that electromagnetics or psychic energy or whatever is not having, let's add a counterweight to the backs of the rods. I also mention this option because it is something we can try on any L-rod design, even a "commercial" unit. The result of this action is always the same - a counter-balanced rod, no matter what type, will cease to swing. For the counterweight, we need to use something nonconductive so that it cannot possibly interfere with the supposed electromagnetic response of the rod. One technique is to insert a small (say 1/4") wooden dowel into a small block of wood, then use plastic zip ties to fasten them to the rod as shown in Figure 6. Slide the counterweight forward or backward until the rod is perfectly balanced at the handle. Now try the water hose test again. No response? No surprise.
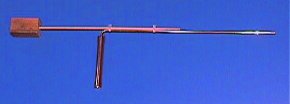 Figure 8 - Counterbalanced rod
|
LRL3: Chambered Rod
In an effort to legitimize the basic dowsing rod for use in locating treasure, manufacturers began adding a witness chamber to the rod (Figure 7). The user places a sample of what he wants to find in the witness chamber - gold, for example - and the rod will only respond to that type of treasure. In some cases the users of these rods do not put an actual sample in the witness chamber; instead, they write the name of their desired target on a piece of paper and put the paper in the chamber. [A very humorous twist on this technique was used by the Quadro drug-finding dowsing rod.] Of course, the witness chambered rod has not produced widespread wealth among its users.In some cases, manufacturers add an additional load chamber which is said to contain a specially energized material that is claimed to enhance the response. This type of chamber is usually sealed so the user cannot see what is inside, and manufacturers do not reveal its composition. This mysterious substance is said to last several years and for a fee, they will recharge the rod after it has run down.
We shall use one of our brass rods from LRL2 for this experiment. Most manufacturers of chambered rods use a conductive chamber so we will use copper. Obtain two 3/4" copper end caps and a short piece of 3/4" copper tubing, say 2" (5cm) long. Drill 3/16" (5mm) holes in the center of the caps such that the rod will slide through with a tight fit. Figure 9 shows the necessary additional parts.
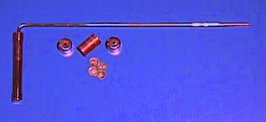 Figure 9 - Chambered rod parts
|
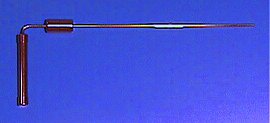 Figure 10 - Chambered rod
|
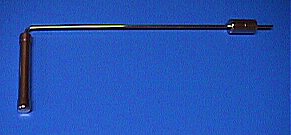 Figure 11 - Alternate chamber placement
|
LRL4: Electronically Enhanced Rod
Science marches on and psuedoscience must keep up, so once the chambered dowsing rods had run their commercial course manufacturers had to come up with something else that would solve the "empty hole syndrome" and turned next to electronics. The current "high-tech" LRLs utilize signal transmitters and sometimes have receiving circuitry connected to the rods. This topic is so advanced that it deserves its own page, so go to "Build an MFD" for details on how to make your own high-tech dowsing rod.
LRL5: Map Dowsing Pendulum
Under Construction
No discussion of dowsing is complete without looking at map dowsing. The normal method of dowsing with L-rods is done on-site; that is, the dowser is in the same environment as the treasure being sought. But with dowsing, you do not have to be at the location to find the target, you can be anywhere. All you need is a map or a photograph of the area and a map dowsing instrument. You can dowse the map to locate the treasure, then travel to the site and simply dig it up! Sounds far-fetched doesn't it? Yes, it certainly does.While an L-rod can be used for map dowsing, it is a bit clunky and requires a BIG map to get any reasonable resolution. Most map dowsers use a pendulum, which can be as simple as a nail on a string. Like the L-rod, a pendulum that contains the element being sought will give a better response. Thus, we will build a professional dowsing pendulum that has a witness chamber.
 |
 |
|
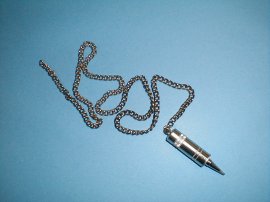
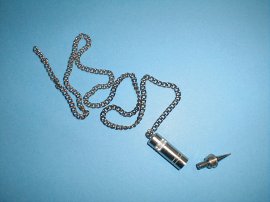
Figure 13 - Chambered pendulum
|
|
At this point you should have an unmodified barrel, a completed screw-on tip, and a piece of chain. The chain needs to be fastened into the cable (non-screw) end of the barrel piece, and exactly how you do this depends on what type of chain you have and possibly on how your headphone jack barrel is made. The inside of the barrel of my jack is slightly tapered at the open end. A #8 washer precisely fits inside the barrel but stops at the taper, so I inserted the chain in the washer hole and spread open a link to keep it from pulling out, then slid the chain and washer into the barrel and neatly applied epoxy to keep it there. See Figure X.
Once you have completed the pendulum place in it a sample of the type of treasure you wish to find. The chamber is small so whole coins do not fit; you will need to get filings, flakes, or small nuggets. In the spirit of true dowsing you can also write the name of the desired target on a piece of paper, then slip the paper into the chamber. According to many dowsers, this does just as well as a real sample.
With your map spread out on a table, rest your elbow on the table and suspend the pendulum by holding the chain between your thumb and index finger. If there is a treasure in the area of the map the pendulum will begin a slight swinging motion along a straight line in the direction of the treasure. If you move the pendulum off to the side of that line it will begin swinging in another direction towards the treasure. In this way you can quickly triangulate to the location of the treasure. If you happen to suspend the pendulum directly over the treasure location then it will swing in a circle.
The map can be of any type and any scale. The pendulum will always respond to the largest treasure available, so you can even start with a state map to get a rough location of the largest treasure in the state, then a county map, then zoning maps, etc. Don't worry about picking up non-buried objects such as a person's jewelry or coin collection - just mentally focus on buried treasure and that is all the pendulum will indicate. Also, don't be concerned will obtaining accurate maps - even a rough hand-sketched map will do. For example, you can sketch the layout of a property including the house, outbuildings, fences, major trees, etc., then dowse away.
As a final note, many dowsers ask questions of the pendulum as they are using it. For example, you might ask the pendulum "Is there any buried gold in the area of this map?" Pendulums are very intelligent devices and have the answers to almost any questions you wish to ask, but the answers will always be "yes" or "no". The pendulum will swing in a clockwise circle for "yes" and a counter-clockwise circle for "no" for some people, and a counter-clockwise circle for "yes" and a clockwise circle for "no" for other people. In fact, the direction of rotation can vary from day-to-day for a given person, and sometimes even from question-to-question! This is apparently due to varying geomagnetic quantum spin properties that affect the pendulum. So be aware that although the pendulum never lies, it is often difficult to figure out what the answer actually is. And if you dig lots of empty holes, it is probably due to the fact that you are misinterpreting the motion of the pendulum and not because pendulum dowsing does not work.
The Future
No matter how many empty holes are dug some people refuse to believe that dowsing simply does not work. It only takes one or two success stories (and they do happen, but not because of dowsing) to rejuvenate someone's interest in LRLs and get them to consider the next latest-and-greatest LRL technology. And, of course, there is always the newcomer to LRLs who has not dug hundreds of holes looking for that elusive cache who will gladly buy into one of these scams. Once the MFD has worn out its welcome with treasure hunters and is determined to be a non-solution, what is next? You only need to look at scientific developments to find out.Quantum mechanics and biotechnology are two leading edge scientific fields which are ripe for this kind of fraud. I predict that one of the next "technologies" will be a quantum locator which somehow uses a target sample to set up a quantum link to the target. And how does biotechnology fit in to dowsing? Already there is one person who contends that dowsing failures are due to "earth sickness" - that is, when a foreign object like a treasure is buried the earth tries to reject it because it is not natural, much like the human body attempts to reject foreign substances. This rejection then causes close-in dowsing problems. So perhaps we will see a new dowsing device which contains a "Rejection Syndrome Nullifier" chemical, something that eliminates the earth sickness interference!
In any case, as long as there are people who can be fooled (and everyone can be) there will be frauds out there who are eager to take their money. In this day and age it is more important than ever for people to use critical thinking skills to filter through the miriad of false advertising and rip-offs that permeate our society. Federal and state governments simply don't have the resources to keep up with and pursue every case, so it is largely up to individuals to protect themselves. Unfortunately, many people have not been taught even basic critical thinking skills, a failure of our schools. With LRLs, two questions to ask are: "Does this device (or technique) sound reasonable (i.e., too good to be true)?" and "Why are dealers willing to share this device with the public instead of keeping it to themselves?"
Conclusion
At this point I hope you have built and tested some of the described LRLs. They are fascinating devices, not in the sense that they can locate remote buried treasure - which they cannot - but in the effect they can have on the psychology of the user. One who is not aware of the subtle mental and muscular forces being employed to effect a response from the rods will swear they are moving on their own. That is why it is so important to (A) understand what is actually going on and (B) to use thorough and unbiased testing to evaluate LRL performance.Copyright © 1999 Carl W. Moreland, all rights reserved.