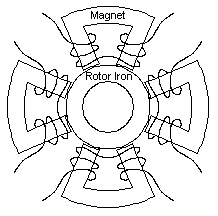
Figure 1: Magnetic bearing composed of four discrete horseshoes
Example: Radial Magnetic Bearing
(Nonlinear Magnetostatics)
David Meeker
September 11, 1999
http://members.aol.com/dcm3c
dcm3c@aol.com
This example refers to the example file brgmodel.fem
Introduction
Magnetic bearings are used to in lieu of rolling element or fluid film journal bearings in some high performance turbomachinery applications. Specific applications include pumps for hazardous/caustic fluids, precision machining spindles, energy storage flywheels, and high reliability pumps and compressors.
Magnetic bearings yield several advantages. Since there is no mechanical contact in magnetic bearings, mechanical friction losses are eliminated. In addition, reliability can be increased because there is no mechnical wear.
Besides the obvious benefits of eliminating friction, magnetic bearings
also allow some perhaps less obvious improvements in performance. Magnetic
bearings are generally open-loop unstable, which means that active electronic
feedback is required for the bearings to operate stably. However, the requirement
of feedback control actually brings great flexibility into the dynamic
response of the bearings. By changing controller gains or strategies, the
bearings can be made to have virtually any desired closed-loop characteristics.
For example, flywheel bearings are extremely compliant, so that the flywheel
can spin about its inertial axis--the bearings serve only to correct large,
low-frequency displacements. Conversely, magnetic bearings in machining
spindles must be extremely stiff and have a very broad bandwidth so that
tool position is accurately controlled. In each case, the dynamic response
is a result of the controller used to stabilize the bearing, rather than
a consequence of the bearing's physical design.
Typical Bearing Geometry
Conceptually, the typical magnetic bearing is composed of four of horseshoe-shaped electromagnets. This configuration is shown in Figure 1. The four magnets are arranged evenly around a circular piece of iron mounted on the shaft that is to be levitated. Each of the electromagnets can only produce a force that attracts the rotor iron to it, so all four electromagnets must act in concert to produce a force of arbitrary magnitude and direction on the rotor.
Figure 1: Magnetic bearing composed of four discrete horseshoes
For structural strengh and manufacturability, this sort of magnetic bearing is manufactured with iron connecting the horseshoes, so that the stator iron is one monolithic piece. This geometry is shown in Figure 2.

Figure 2: Eight-pole magnetic bearing.
There are N turns of wire around each leg of the bearing. So
that the bearing behaves functionally like a bearing composed of discrete
horseshoes, sets of adjacent coils are connected together in reverse series,
just as pictured in Figure 1.
Flux Density and Force from Circuit Theory
This type of magnetic bearing is amenable to analysis via magnetic circuit theory. Assuming negligible leakage and fringing and neglecting the small reluctance of the iron parts of the flux path yields the following magnetic circuit:
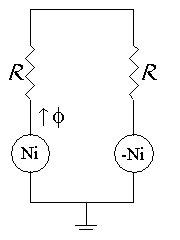
Figure 3: Magnetic circuit for a horseshoe.
Figure 3 looks just like an electric circuit with batteries and resistors. However, instead of current, there is flux f , and instead of resistance, there is reluctance R. Rather than voltage sources, there are magnetomotive force (MMF) sources of strength Ni and -Ni. In terms of the geometry of the bearing, the reluctance is:
![]()
where g is the nominal airgap between the rotor and the tip of each leg of the bearing, a is the cross-sectional area of each leg, and mo is the permeability of free space (1.2566e-6 Tesla*Meter/Amp). One can solve for the flux in the circuit:
![]()
The flux density, B, in the airgap is the flux divided by the area of the airgap:
![]()
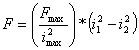
We can now use Maxwell's Stress Tensor to figure out the force. For each horseshoe, the force in terms of flux in the gap is, from the Stress Tensor:
![]()
Subsitituting in the expression determined for B yields:
![]()
In addition, the flux density obtainable in the gap should be limited by the flux that can get down the legs of the bearing. Say that the core material saturates at a force of Bsat. Then, the maximum force that can be produced by the a particular bearing geometry is:
![]()
For the purposes of bearing design, useful corollary results are the maximum current required in a horseshoe:
![]()
and the inductance of a horsehoe:
![]()
Control Via Bias Current Linearization
Now, consider two opposed horseshoes, as pictured in Figure 4, working together to produce forces along one axis of the bearing. Rearranging the above expressions for force and current a bit yields, when both currents are taken into account and the rotor is centered in the bearing:
For control purposes, this form is not so good. It is highly desirable to have a linear relationship between the input and the resulting force, so that the usual controller design tools can be applied.

Figure 4: One axis of a horseshoe-configured bearing
Fortunately, the relationship can be converted into a bilinear form with a change of variables. The currents i1 and i2 can be thought of as being composed of a constant "biasing" component that doesn't produce any force, in combination with a "perturbation" component that is proportional to the desired force:
![]()
![]()
To get the maximum load capacity out of the bearing, one sets
![]()
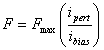
With this choice of bias, when the maximum force is being produced by one horseshoe, no force at all is being produced by the opposing horseshoe. Substituting the new definitions for current into the expression for force yields:
With a little more algebraic manipulation, it is possible to linearize the force about the centered position to get the dependence of the force on position as well, when the above bias current linearization scheme is employed. The result is:
where x represents the distance that the rotor is displaced from
the centered position. The same analysis can be applied to the two horseshoes
that produce vertical forces as well.
Design Verification with Finite Element Analysis
The above equations provide a basis for the rough preliminary design of magnetic bearings. However, there are several effects that we have neglected in favor of obtaining simple, approximate design equations:
Example Geometry
As an example, consider the nominal geometry listed in Table 1:
| Air Gap Length | 1 mm (0.04") |
| Pole Width | 1 cm (0.4") |
| Axial Length of Core | 4 cm (1.6") |
| Turns per Leg | 80 turns of 18 AWG |
| Max. Airgap Flux Density | 1.2 Tesla |
Table 1: A nominal magnetic bearing design
The above design formulas can be applied to these parameters to predict
the bearing's performance. The estimated performance results are compiled
in Table 2.
| Maximum Force | 460 N |
| Maximum Current | 12 A |
| Bias Current | 6 A |
| Open-Loop Stiffness | -460,000 N/m |
| Inductance per quadrant | 6.4 mH |
Table 2: Estimated performance from design equations.
To make a valid geometry for analysis, a few more details about the bearing must be specified. It is also assumed that:
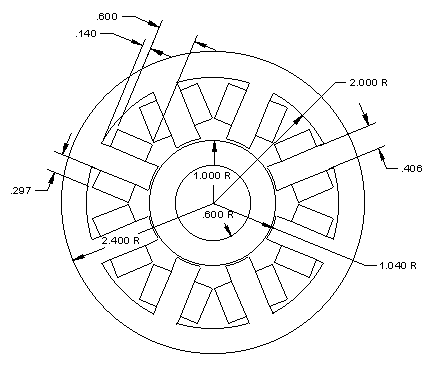
Figure 5: Actual bearing geometry to be analyzed (dimensions in inches)
The case of interest in the example simulation is the production of the maximum design vertical force. Currents in the left and right quadrants are chosen to be half the maximum current (the bias current level). Current in the top quadrant is chosen to be the imax, and current in the bottom quadrant is chosen to be zero.
The results of the simulation are pictured in Figure 6.
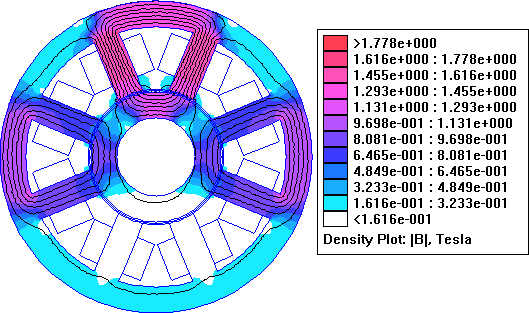
Figure 6: Simulation results for maximum upward force.
For the purposes of computing the forces, additional arc segments have been drawn in the model running down the center of the airgap. Forces are obtained by integrating the magnetic force along this line, which yields more accurate results than integrating directly on either the pole face or rotor surface. Multiplying the per-meter result by the axial length of the machine yields a force of 391 N.
This result is only 85% of the force predicted by the design equations. However, a careful examination of the results shows the cause of the difference. Looking at Figure 6, one can see that flux levels are higher in the middle of the legs that at the pole tips. By switching into "Point" mode and looking at the flux values at the middle of the either of the upper legs yields values in the neighborhood of 1.59 Tesla, and the relative permeability of the iron is only about 350. In the center of either of the upper airgaps, the flux is 1.1 Tesla rather than 1.2 T. The implication here is fringing flux is causing undesirable premature saturation. The legs are saturating, making less total flux go down the legs per unit of coil current than occurs at lower current levels. However, even though the flux is a high 1.59 T in the center of the legs, the flux level is only 1.1 T in the gap, because a substantial portion of the flux (the fringing flux) exits the sides of the legs, rather than at the pole tips.
Conclusions
This example demonstrates one of the more valuable uses of finite element analysis--validating and refining a design obtained by simpler analytical formulas. This particular example represents the application of the Finite Element Method Magnetics program to a nonlinear problem in magnetostatics.