INSTALLATION
An additional wire must be installed on U6 pin 11, and routed to the new divider board, to provide a "reset" signal to the divide - by - 360 counter. Another wire must be installed on U9 pin 6, ( output of the calibration 1 - shot ) and routed to the input of the ANTI - JITTER circuit, on the COUNTER board.
The voltage regulator IC ( U27 ) normally runs very close to its "thermal overload" point, and needs a heatsink. No damage will result if it overheats, but nothing will work. I used a TO-220 heat sink, with ( approx. ) 3 square inches of surface area, and that seems to be adequate. The regulator is mounted at the edge of the PC board, so it may be possible to anchor it to the enclosure, which will serve as a heat sink. ( my enclosure was plastic, so I needed a separate heat sink )
CLOCK MODIFICATIONS
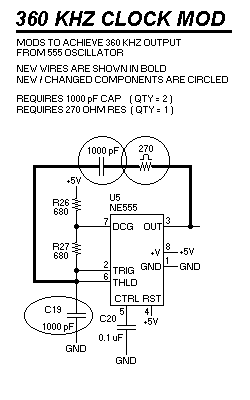
Reason would dictate that the capacitor should be reduced by dividing its present value by 45, ( to 2200 pF ) which should cause the oscillator frequency to increase by a factor of 45. In fact, this did not prove true. Apparently, the basic 555 oscillator circuit is only capable of operating to around 300 KHz, and a "mod" was required, to achieve 360 KHz, as shown below :

I have now built about a half dozen of these, ( September 2001 ) and I find that the clock circuit ( shown in the schematic above ) is a "problem", and usually requires some extra attention to make it work properly. It seems that the 555 chip simply doesn't like to work "as advertised" at frequencies above 200 to 250 KHz, so the component values shown in the schematic must ( generally ) be adjusted to achieve proper operation.
In particular, the 555 malfunctions by generating irregular - shaped pulses in a series of "bursts", instead of a uniform series of identical pulses. This will not be obvious with a frequency counter, and can only be detected with a scope... a counter may indicate 360 "average" KHz, but the display will "jitter" wildly, because the clock frequency is unstable.
I have managed to make the circuit shown above work on all the units I have made, but I must usually replace the 270 ohm resistor with a 10K trimpot, and adjust it to achieve the desired result, ( observed on a scope ) then replace it with a fixed resistor, of equal value.
I have also found ( twice ) that the fall time of some 555 chips is too slow ( running at 360 KHz ) to provide reliable triggering of the divider chips on the COUNTER board. I added a 470 ohm resistor from pin 3 of the 555 to ground, and that fixed the problem.
DISPLAY ROTATION
Unfortunately, there’s no "trick" way to do the same thing with the digital readouts.... in order for the digital reaout to work properly, the antenna input labeled "090" MUST be connected to the antenna installed at the "3 o’clock" position... if this antenna was previous wired to the "270" input instead, ( and the display LED’s were mounted on the solder side of the board, to achieve proper display rotation ) then the display LED’s must be removed and re-installed on the component side of the board, to make everything work properly. ( assuming the original display is still used )
DISPLAY ROTATION WITH OTHER TYPES OF DOPPLERS
Another way to "reverse" the direction of ( electrical ) rotation would be to invert ALL the data bits in the bearing counter of the original DF, using a 74LS04 inverter, or a similar chip... by inverting ALL the data bits, an "up-counter" ( 0,1,2,3, etc. ) becomes a "down-counter". ( 7,6,5,4, etc. ) If these inverters are installed DIRECTLY AT THE OUTPUTS of the original bearing counter chip, it will allow the original ( LED circle ) display to be used along with the digital readout... the calibration might need to be re-adjusted, but that should be the only "side effect".