Listen to AMATEUR RADIO Signals!

You can build your own radio receiver!
The receiver-construction information given below is extracted from the booklet "Secret Listening" published by the New Zealand Association of Radio Transmitters Incorporated, P.O. Box 40 525, Upper Hutt, New Zealand.
It has been written to encourage new entrants to Amateur Radio.
Permission is given for it to be freely copied for the purpose of providing a single personal copy to persons interested in radio communicating and in amateur radio, provided:
that it is not used for any commercial purpose or promotion, and,
it is copied in its original form, in its entirety and without deletion, addition or amendment.
( 1998 The New Zealand Association of Radio Transmitters Incorporated.
The booklet "Secret Listening" is ISBN 0-473-05140-0, NZART, March 1998.
For a copy of the complete booklet "Secret Listening", send $3.00 to
NZART Headquarters, P.O. Box 40 525, Upper Hutt, New Zealand
Phone/Fax: +64 4 528 2170.
INTRODUCTION
There are signals in the air and space around you. You can listen to these signals with simple equipment, equipment you can make yourself. No licence is required to listen. This booklet shows how you can make a simple receiver to listen to Amateur Radio signals.
This booklet also brings information about AMATEUR RADIO, information to help you to understand the signals you hear.
A receiver can be made by you for about $50. All component parts are available. It will take you about 5 to10 hours to make. Its success will depend upon the care you take. Read this booklet and decide! You will have countless hours of fun and enjoyment from listening. All kinds of activities are taking place around you - a whole new world will open up!
Further reference information
The NZART Callbook and Radio Reference is published each year. It contains information useful to radio listeners and essential to radio amateurs. Copies are available for $15 post-paid from NZART Headquarters.
Make contact!
There are radio amateurs near you and a club too. Radio amateurs are keen to help newcomers and to answer your questions. We are a friendly group! You will find that AMATEUR RADIO opens up new things for you, new challenges, new things to learn!
Build your own Special Radio Receiver
- and listen to Amateur Radio signals!
Fun to build ... fun to use ... and inexpensive too!
This simple but great-performing receiver is safe and easy to build by constructors of any age, a 'hands-on' introduction to Amateur Radio. It is developed for the New Zealand (ZL) new entrant to amateur radio listening and who is new to home radio-construction.
Battery-powered, it covers the popular amateur radio 80 metre band 3.5 to 3.9 MHz including the 3.525 to 3.625 MHz 'Novice band'. It brings the excitement of listening to amateur radio signals, live, as they happen - alive-oh! Phone signals, both single-sideband and amplitude-modulated, and Morse code signals (continuous wave - CW) can be copied.
Its features are great sensitivity, simplicity and low cost, presentable in appearance and comfortable to use. It requires light-weight stereo headphones (real communicators use headphones!) and a length of wire as an antenna (or aerial). The batteries last for ages.
It can be made at home using common hand tools, while learning about components, soldering, wiring, tuned circuits, antennas and listening to radio communication on-air. A great way to learn about radio and to listen to HF amateur radio communications - with a receiver that you yourself have made!
How does it work?
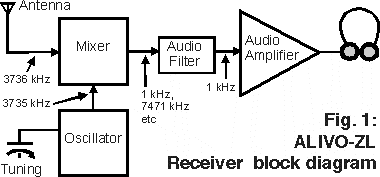
This part may at first seem complicated - skip it if you wish and come back to it later!
The outline block diagram is in Fig.1, a direct-conversion receiver. A steady carrier signal at a frequency of (say) 3.736 megahertz is fed to a mixer. (3.736 MHz is 3736 kilohertz, kHz). The local oscillator at 3735 kHz will beat with this signal and produce various output frequencies, such as the difference between the two signals: 1 kHz (1000 Hz), and the sum: 7471 kHz.
The output from the mixer is passed to an audio filter. The 1 kHz signal passes through and is amplified by the audio amplifier. The 1 kHz sound is heard in the phones. Changing the frequency of the oscillator with the tuning control - as the receiver is tuned across the band - will change the pitch of the audio signal you hear. SSB (single-sideband - speech) and CW (continuous wave - Morse code) signals can be 'tuned in' by careful adjustment of the tuning control.
The circuit diagram
The circuit is shown in Fig 2. Integrated circuit IC1 acts first as a radio frequency amplifier and then as a mixer, with L3 and various capacitors as the oscillator. It is followed by IC2, an audio amplifier.
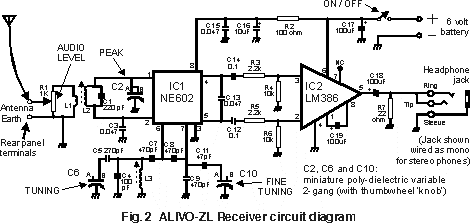
The potentiometer R1 in the receiver input circuit is an attenuator. At one end of its travel it earths the antenna. At the other end it feeds the incoming signal from the antenna direct to the primary coil L1, coupling from there into the tuned circuit L2 and C1 (with C2) and to pins 1 and 2 of IC1. So R1 controls the level of signal through the receiver and the loudness of the audio heard at the headphones. C2 is peaked for maximum signal.
The audio filter is between pins 4 and 5 of IC1 and pins 3 and 2 of IC2, with the audio output lead from pin 5 of IC2 to the headphone jack (socket). A single capacitor C19, between pins 1 and 8 of IC2 sets the audio gain.
The positive lead of the 6 volt battery connects through the on/off switch to pin 6 of IC2 and to pin 8 of IC1. Pin 3 of IC1 goes to earth and pin 4 of IC2 is also earthed, completing the d.c. path through each IC. The battery negative lead is also connected to earth. 'Earth' and 'chassis' mean the same thing here. Both terms mean the common metal front panel and the copper of the circuit board.
Pin 7 of IC2 is not connected (nc) to anything.
How to go about it ...
All components for this receiver can be purchased new from electronics parts suppliers. Some may be found in 'junk boxes' but be sure to use only good quality items. Many other parts can be substituted.
Three variable capacitors are required, for the Tuning C6, for the Fine Tuning C10, and for the Peak control C2. These are miniature two-section 140/160 pF poly-dielectric models which can be purchased new or taken from discarded broadcast AM transistor radios. They come complete with a thumbwheel which is used in this receiver as a conventional knob - a cost-saving!
There are distinct stages in construction:
1. Prepare a metal front panel and a wooden baseboard, the 'chassis' on which to build the receiver.
2. Mount components on the front panel.
3. Prepare and wire the electronic components on a piece of printed circuit board.
4. Screw the circuit board to the baseboard and connect it to the front panel components.
5. Simple setting-up tests follow.
6. Make a cover to enclose the unit, attach some rubber feet or felt pads.
The receiver is complete and ready for service.
The physical construction
The design shown in Fig. 3 is cheap to duplicate. The construction shown is easy for anyone to build with a minimum of tools and there is still access to every component for experimenting.
The finished receiver must look the part, so take time preparing the front panel. The panel is a piece of flat sheet aluminium, 195 mm by 90 mm. The thickness can be about 1.2mm (18 gauge). Your local plumber will have some scrap ... but make sure that it is flat!

The front panel decal in Fig. 4 can be photocopied. Glue one copy to the front panel and use it as a drilling template. For a professional appearance, a second copy can be laminated in clear plastic and glued on the finished front panel. If you want a neat fresh copy, send a large A4-size self-addressed envelope with 80c stamp to NZART HQ, P.O. Box 40-525, Upper Hutt, New Zealand. Ask for the 'ALIVO-ZL' decal.
Carefully check the physical position of each component mounted on the front panel. Check the size of hole required for each item by measuring from the component itself - before you drill! Do all the drilling and filing and finish the front panel metalwork before any components are mounted. Take care and do a neat job.
Mount the three variable capacitors with care. You may need to space them back from the panel with a spacer. Fail to do this and the capacitor mounting bolts may project too far into the interior of the capacitor and damage it. Shape a paper-clip into a U as shown in Fig. 5. Place it between the panel and the capacitor. Check the length of your mounting bolts and the thickness of your panel. You may need a spacer that is thicker or you may not need one at all!

The two built-in trimmer capacitors inside each variable capacitor should be set to mid-value. On the back face of each capacitor are two screws. Rotate each so that the trimmer capacitor (seen through the plastic) is half-meshed (at about mid-capacity). This is important to get the correct tuning range for the receiver during the setting-up.
The baseboard is a piece of wood 195 mm by 100 mm and about 15 mm thick. Select a piece that is clean with neat edges and cut it to size. Compressed particle board is ideal. Paint it with several coats. Screw the front panel to the baseboard with self-tapping screws.
The antenna and earth terminals are mounted on an aluminium panel, 50 mm by 35 mm, screwed on the back edge of the baseboard.
The Tuning dial
The main dial operates the oscillator tuning capacitor C6. The pointer is made by unwinding a wire 'glide' type paper clip, and making a needle as shown in Fig. 5. One end is formed into a spring to grip the hub of the thumbwheel knob (which comes with the tuning capacitor). This makes the needle adjustment easy. The other end is flattened between a hammer and a hard surface to make a precision blade pointer!
Set the needle to point to zero when C6 is fully anti-clockwise.
Preparing the circuit board
Start with a piece of blank printed circuit board stock, 75 mm by 50 mm as shown in Fig. 6. This is insulating material with a sheet of copper bonded on to one side. File all the edges and corners to make them clean and smooth. Drill the mounting holes as shown. Polish the copper with a scrap of steel wool, make it clean and bright. Hold the board by its edges to keep it free from finger-marks. Spray it with clear polyurethane from a spray can, a very thin covering - a quick swiping flick of paint spray. Leave it for 24 hours to dry hard. You can solder through this paint layer and it will keep the board looking bright.
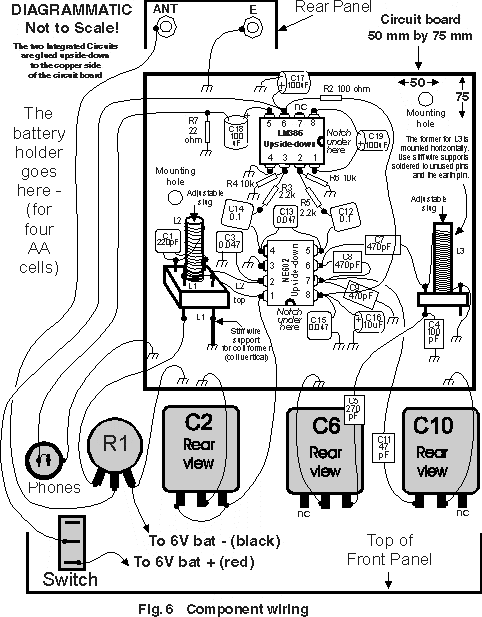
Mounting the integrated circuits
The IC's lie on their backs on the board in 'dead-bug' fashion. They must be spaced well apart so that other components can be positioned between them. The positions of many components on the board are dictated by the pin numbering of the integrated circuits. Remember to keep leads short and to place bypass capacitors close to the pins. You have very little choice in component placement and will have to place them as generally shown in Fig. 6.
Scrape the paint on the circuit board at the places where the IC's are to be positioned, exposing the copper. Put a blob of glue at each of these places on the bright copper. Then position each IC in turn, legs in the air, on each blob of glue. Check the type number of each IC before placing it (you cannot read the label after it is positioned!) Use a magnifying glass! Be very sure that you position each IC so that the location 'notch' identifying the start of the pin numbering is correctly aligned!
Put the board aside until the glue has set. It is then ready for wiring.
Wiring the board
Cut the component leads to length and shape them, fixing each component into position by soldering, one at a time. Use a fine-tipped soldering iron. Keep leads short. Be neat. You can solder through the paint on the board to get the various 'earths' (to the copper) for the components.
Soldering for the first time? Try some other scrap components for practice first. Read about soldering techniques in amateur radio reference books.
Each IC has one pin which is earthed. Use scrap wire discarded from a component lead to connect the earth pin of each IC to the copper board.
Take time and be patient when wiring the board. Be careful when using the soldering iron and avoid overheating components. Heat the joint not the solder. Apply the solder to the joint when the joint is at the right heat. Be sparing with the solder. Clean the tip of the iron frequently, grab it with a clean rag folded several times to avoid burning yourself!
Do not twist or wrap the component leads around the IC pins. A component lead has to only touch the pin and the solder will do the rest. Bend the component lead so that a 1 mm (say) length of the lead is making contact with the pin, then solder it.
Resistors can be soldered in place any way around. The same applies to capacitors except for electrolytic capacitors which must be correctly polarised. The diagrams show the positive lead for each electrolytic, four of them, C16, C17, C18 and C19. The component itself usually has the negative lead marked, and it is usually slightly shorter.
Note that there are three 'mid-air joints' between components - the junctions between C14 and R3, C12 and R5, and C18 and R7. Ensure that these joints are clear of the board surface. You may find it more convenient to make these joints first then shape and attach the assembled components to the IC's.
Add R2 last, wired so that it takes the short path across the top of the two IC's. Strip two pieces of insulation off some hook-up wire and use it as 'spaghetti' (insulated sleeving) on each end of R2. Push it on to the resistor fly-leads as insulation.
Winding the coils
There are three coils to wind, on two coil formers. There are many different types and sizes of coil-former and slug, so it is impossible to provide winding details for more than one type here. The following detail applies to coil formers 7 mm in diameter with a 6mm diameter slug 16 mm long. These formers should be obtained to make the construction and setting-up easy.
Start with L2 and L3 which are each made by winding 30 turns of 0.4mm (26 or 30 SWG) enamelled copper wire on two separate slug-tuned formers. Other near-size wire can be used. Scrape the enamel from about 5 mm at the end of the wire to expose the bare copper. Twist it around a wire tie-point on the coil former. Solder the joint. Wind the coil for the full 30 turns. Bring the wire down the outside of the coil and repeat the clean and soldering task. Attach that wire to another tie-point, then cut off the surplus.
L1 is 6 turns of the same wire scramble-wound over the 'cold' (i.e. earth) end of L2 (the end that goes to C3). The coil end nearest to the tie-points should be adopted as the 'earth' or 'cold' end of the coil. The coils L1 and L2 must be isolated, there must not be a direct short-circuit between them.
The coil former L1/L2 is mounted vertical by soldering the L1 earth coil-former pin to a scrap piece of heavy-gauge stiff copper wire. That wire is then soldered to the board as shown in Fig. 6. Keep the two leads from L2 to IC1 short.
Coil L3 is mounted in a similar way - using stiff wire as stand-offs to hold the coil horizontal. It must be mounted so that it is firm and rigid, without any loose movement. Brace it with a stay too. The frequency stability of your receiver depends upon this. Run some glue along L3 to keep the turns in place.
The adjustable ferrite cores, 'slugs', inside the coil formers L1/L2 and L3 will be positioned at various places through their tuning lengths during setting-up. Make up a 'slug adjusting tool' from an old plastic knitting needle. File one end to shape so that it fits neatly into the hole or slot in the slug. Be careful with these adjustments and do not use any force. Slugs are brittle!
Later when you have the slug in the coil formers L1/L2 and L3 finally peaked, you can fix the slug in place in the coil. One method is to drop a strand of sewing cotton down the hole and wind the slug back in to its final position. If the correct size of cotton is used, the slug will still be adjustable but firmly wedged. Take care! The slugs must not be loose inside the coils!
Check the board!
Is each component correctly placed? Are the electrolytic capacitors correctly polarised (negative and positive leads to the correct places)? Check and re-check the IC pins, are the correct ones earthed? Does each pin have the correct components attached? With a magnifying glass, examine each soldered joint. Is it a solid connection? Are there any 'dry joints'? Are there any solder bridges shorting any pins? Take time, you have to get it right!
Board-mounting and panel-wiring
The battery-holder goes at the left end of the baseboard (looking from the front). The battery holder is held on the baseboard with two screws, or alternatively, four small nails, two each side, bent over to form hooks, with a heavy rubber-band clipped over the top.
The circuit board must be positioned so that the leads to the front panel tuning controls C2, C6 and C10 are kept relatively short. Fig. 6 shows the connections.
Use stiff tinned-copper wire (0.7mm) for the front panel wiring where possible. Floppy wires could cause undesirable frequency shifts. Be sure to keep the leads to the variable capacitors short and rigid.
Lightweight stereo headphones work well with this receiver. Choose them with care, some are more sensitive than others. The phone jack automatically connects stereo phones as mono, the tip and the ring contacts are joined.
Wiring the variable capacitors
These capacitors have two sections of unequal capacity connected to three connecting lugs. Looking at the end of the shaft as shown in Fig. 5, the centre lug is the common (earth) connection with the larger capacity section B, the lug clockwise from the earth lug. Different connections are used on each capacitor.
The Fine Tuning
The main dial C6 gives coarse frequency control. The presence of a signal can be identified but the actual 'tuning in' is done by the Fine Tuning control C10.
Stick a piece of paper (from a sticky label is suitable) to the C10 thumbwheel knob as a pointer. Set it to point horizontally to the left when the knob is fully anticlockwise.
Aerials and earths ...
Some twenty metres of wire, suitably suspended, is a suitable antenna and will work well. Almost any type and length of wire is suitable. Run it out the window to a tree or building. A length of rope or cord at the distant end will act as an insulator and halyard. Suspend it high so it is not a hazard to passers-by. Keep your wire well away from power lines. Take care!
An earth connection to this receiver may improve reception (by noise reduction). Try it when you have the receiver operating! If you decide that an earth improves reception, drive a scrap length of metal water-pipe into the ground as a separate earth spike for your own use. Use an electrician's 'earth-clamp' to connect the earth wire to the pipe.
Getting it going ...
Check all the wiring - again! Make sure that the battery switch is 'off'. Be certain that the wiring polarity for the battery connector is correct. Connect the batteries.
The setting-up adjustments ...
Using your adjusting tool, set the slug in L1/L2 to about one-third of its length projecting out the bottom. Set the Slug in L3 to be away from the front panel with about one-third of its length inside the winding L3. Connect the antenna. Plug in the headphones.
The time of the great event has arrived. SWITCH ON! Some checks have to be done before you can listen to amateur radio stations. Remember to switch off when you make changes to the wiring!
Setting the dial
The dial scale shown in Fig. 4 has a 'logging scale' and the frequency calibration marks are already entered for the type of tuning capacitor used.
The 'Cal' (calibrate) position on the scale shows the frequency of ZLXA, the AM station of the Radio Reading Service at Levin, on 3.935 MHz. It is a convenient calibration marker station! Use it to check the dial at any time when that station is operating.
Setting up the oscillator
The aim is to get the Tuning capacitor C6 to cover the frequency range 3.5 to 3.9 MHz and with the correct dial readings. Access to a calibrated communications receiver or transceiver for the setting-up tests can make the calibration job easy - but there are other ways too! Each receiver requires individual attention. It is not difficult - just a little patience is required. You can listen to stations to judge 'where you are' with the calibration process. The objective is to get ZLXA located at the dial position shown.
Check that the dial pointer is correctly mechanically set at the zero end of the dial and then set it at the Cal position on the dial. Set the Fine Tuning capacitor C10 pointer to vertical and leave it fixed at that position until the setting-up process is complete.
Run the slug L3 through its length. You should identify an AM signal with speech (or sometimes music). You will hear howls as you tune across the signal! If you can tune it in and identify it as the Radio Reading Service, your task is done! Patience is needed but is rewarded! ZLXA seems to give good coverage across New Zealand. At night, the presence of other signals may make the task confusing but correct adjustment is still possible.
The L3 slug position is sharp and critical. The slug must be finally fixed in position so that it does not move - try the cotton method described earlier.
You can make another check. Use a 'transistor radio' which tunes across the AM Broadcast band. Connect a lead from your receiver antenna terminal to the external aerial connection of the AM radio. With the AM radio set to about 856 kHz on its dial, its oscillator will be at 1311 kHz (being 856 plus 455, its IF frequency). The third harmonic of 1311 is 3933 kHz and you should hear it whistle on your newly-constructed receiver at the Cal position. You can use this method to check your C6 dial at other points too (3500 kHz is 711 on the AM dial).
The objective is to get your oscillator to cover the 3.5 to 3.9 MHz band with the dial setting correct. Careful adjustment of the slug in L3 should make this possible. If the frequency calibration settings are not near enough, changing C5 will alter the 'spread' and adjusting the appropriate trimmer (on the back of C6) can help too.
Setting up the input circuit
The aerial input circuit is easy to set up. With an antenna connected, noise (or an incoming signal), can be used for this setting-up test. But first check that the Level control R1 is set to its minimum attenuation position - i.e. full clockwise, maximum signal, the aerial goes direct to L1.
The 'peak' in the noise level (or signal level) heard as the Peak control C3 is swung through its range will be distinct. Adjust the slug in L2 to be sure that with the Tuning set (on the dial) at the low end of the frequency range (below 3.5 MHz), that the Peak control shows a definite peak in noise, and will peak again with the Tuning set at the high end of the frequency tuning range (about 3.95 MHz). Fix this slug in position too.
With an aerial connected, you should now be receiving signals - depending on the time of day!
The cover
A discarded cardboard carton with thick solid sides can be used to make a cover! Measure up and cut it out with shears or a sharp knife and a straight-edge, fold it, and give it a couple of coats of paint. Attach it to each end of the baseboard with screws. The finished receiver looks like a bought one! You can choose any colour you like!
Add some self-adhesive rubber feet or felt pads to your receiver, and prepare to enjoy listening!
Operating Your Receiver
CW (Morse code) reception:
In Fig. 1 we saw how signals are processed by direct-conversion from the original radio frequencies down to audio frequencies. Consider a Morse signal (CW - continuous wave) being sent on 3736 kHz. This will be heard as a 1 kHz note in the phones (the difference between the incoming signal and the receiver oscillator - which is at 3735 kHz). As the transmitting Morse key is operated to form the elements of the Morse code characters, the 1 kHz note heard by you will respond accordingly.
If your receiver oscillator is now tuned to 1 kHz lower in frequency - to 3734 kHz - the 1 kHz note you hear will increase to 2 kHz (being the difference between 3734 and 3736 kHz). So as you tune your receiver across an incoming carrier signal, you will first hear a signal as a high pitch note. This note will decrease to zero and will then increase again to a high pitch as you tune across the signal. When the oscillator is at the same frequency as the incoming signal, you will hear nothing - this is position is called 'zero beat'.
At each side of zero beat, you can hear the signal as a 1 kHz note, in this example when the oscillator is at either 3735 kHz or at 3737 kHz.
The receiving characteristic of this receiver can be described as a 'double-sideband effect'. With the oscillator set at 3735 kHz, signals at 3736 and at 3734 kHz will each produce a 1 kHz tone in the phones (this is 3735 kHz, the oscillator frequency, plus and minus 1 kHz, to give you these incoming signal frequencies). This characteristic can be likened to a superheterodyne receiver with its bfo (beat frequency oscillator) set in the middle of its pass-band.
So the effective 'radio frequency pass-band' of the receiver is twice that of the pass-band of the audio filter shown following the mixer in Fig. 1. In practice, the real limit may be twice your personal hearing 'limit of audibility' - twice the highest frequency note that you can hear!
This characteristic can be used to advantage. It gives you a choice of 'two spots' that you can choose for the reception of a CW signal - you can tune your oscillator to above or below the incoming signal and still get a suitable tone for reception of the wanted signal. One spot may have an interference advantage over the other by changing the pitch of an adjacent and unwanted signal whilst keeping the pitch of the wanted signal the same. Try it!
SSB (Single-sideband) reception:
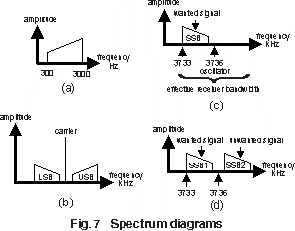
To explain SSB reception, we first consider the audio (speech) input to a typical SSB transmitter to be from 300 Hz to 3000 Hz as shown in Fig. 7(a), the diagrammatic 'wedge' symbol. The 'low end' of the wedge represents the 300 Hz end, and the 'high end' of the wedge represents the top end of the speech range, 300 to 3000 Hz. This diagram is for purposes of explanation only and should not be taken to represent the voice energy distribution in actual practice. It is usually the other way around - the low notes contain most of the voice energy whilst the high pitch notes are weak but are very necessary for speech recognition purposes.
An 'amplitude modulated' (AM) transmission can be shown as diagram 7(b) using this diagrammatic 'wedge' symbol. Here is a carrier signal with two adjacent 'sidebands' - the wedges shown above and below the carrier - each indicated here as USB (upper sideband) and LSB (lower sideband). The energy of the AM signal is contained in these three components - the lower sideband, the carrier, and the upper sideband. Remember: with no input speech to the AM transmitter there are no output sidebands - but the carrier continues on unchanged.
In a SSB transmission, only one sideband is radiated - both the carrier and the other sideband (of AM) are suppressed. Remember: with SSB, with no input speech, no signal at all is transmitted.
On the 80m band, it is customary for amateur stations to use the lower sideband for a SSB transmission. Amateurs use the (suppressed) carrier frequency when referring to the frequency of a SSB signal. So the diagram 7(c) applies. The position for the 're-inserted carrier' (your receiver oscillator), which is needed as the reference to restore the signal during demodulation in your receiver, is shown in this diagram as 3736 kHz.
Note that the LSB signal appears 'inverted'. The 300 Hz component of the speech is now the higher frequency component in the transmitted signal at 3735.7 kHz, (3736 kHz minus 300 Hz). The 3000 Hz component is at 3733 kHz, (3736 kHz minus 3000 Hz).
You can resolve this SSB signal by carefully setting your receiver oscillator to 3736 kHz. You will hear the 300 to 3000 Hz range of the transmitted audio in the phones.
However, at times you may also hear an interfering signal. If there are two quite separate but adjacent SSB signals - shown as SSB1 and SSB2 in Fig. 7(d) - and you are listening to the lower frequency one, you will hear the higher frequency one as 'inverted speech'. The 3000 Hz component of that higher-frequency SSB signal will be heard by you as a low-pitch audio signal and its 300 Hz component as a high pitch! Fortunately this interference is almost indecipherable by the human ear. Your ear will tend to discard it as noise and will receive and listen to the 'natural-sounding' wanted signal. Of course this ear-discrimination characteristic also depends upon the relative levels of the two signals.
AM reception:
Listening to an amplitude modulated (AM) signal - Fig 7(b) - on this type of receiver, requires the oscillator to be tuned very carefully to carrier 'zero beat'. A slight shift from true zero beat will show a low-speed warble effect on the audio signal that you hear. Two-thirds or more of the radiated energy of an AM transmission is in the carrier (which carries no intelligence) and the rest of the energy is divided between the two sidebands. This shows up on reception during tuning, with a very loud squeal from the beat with the carrier until zero beat is reached and with much weaker audio from the sidebands.
You will soon learn how to 'tune in' a SSB and other signals. This receiver is very good for demodulating the CW and SSB signals which predominate on the 80m band. AM is not frequently used today but can be received.
The 'eighty metre band'
Bandplans for all amateur radio bands and the operating privileges for each licence grade are given in the NZART Callbook. General Licensees may operate in the '80 metre band' from 3.5 to 3.9 MHz and Novices between 3.525 and 3.625 MHz - which is marked on your dial, see Fig. 4.
The International Radio Regulations allocate the band 3.5 to 3.9 MHz to the Amateur, Fixed and Mobile Services in Region 3. Amateurs share these frequencies with 'commercial' stations. So expect to hear signals from stations of other services. Overseas stations playing Asian music can sometimes be heard.
Expect to hear CW signals from amateur stations anywhere in the band - they do appear throughout. Phone is found above 3.55 MHz.
This receiver can monitor AREC (Amateur Radio Emergency Communications) activities on 3.9 MHz.
Above the 80m band, the AM station ZLXA of the Radio Reading Service, at Levin, on 3.935 MHz, acts as useful calibration marker point. You will find the programmes interesting.
Below 3.5 MHz there are stations with Aeronautical Mobile functions but their transmissions are brief and infrequent.
The monthly NZART Official Broadcasts from ZL6A are on 3.9 MHz. Refer to the Callbook for the days and times, generally on the last Sunday in the month at 8 p.m. and again at 9 p.m.
The Australian (VK) amateur band is split into 3.5 to 3.7 MHz and 3.794 to 3.8 MHz. The VK Novice band is the same as ZL, 3.525 to 3.625 MHz.
From time-to-time you may hear speech signals around 3.5 to 3.6 MHz which you cannot clearly resolve. Your neighbours may have a cordless telephone operating just above 1.75 MHz and you may be hearing the second harmonic! Tell them that others can hear everything they say - it may be enough reason for them to upgrade their unit to a more modern one and your interference problem may go away!
Performance - and can it be modified?
The receiver will receive all that 'communications' receivers receive. Overseas stations will be regularly copied.
Many tests and experiments are possible with this receiver. Part of the fun of amateur radio is redesigning and modifying! Keen experimenters will develop improvements!
An Audio Filter
A simple external audio filter suitable to use with this receiver is given in Reference 2 in the Reading List.
Learning the Morse code ...
A new monitoring dimension is opened up when you start listening to Morse code signals. The signals carry information in the internationally-used language, abbreviated English, so signals from foreign stations too are easily read. If English is your first language you are already on the way! The time soon comes when you suddenly realise that you too can understand these transmissions!
A knowledge of the code will enhance and enrich your listening pleasure. Find out who is communicating with who and what they are saying, a lot goes on which you can soon learn to monitor. A little time spent will bring rewards by extending your listening skills, widening your understanding of the radio traffic being passed and can lead to a Novice Licence.
The Novice licence requires 6 words-per-minute competency, both sending and receiving. This is about 1 character in two seconds. An MS-DOS computer program is available through NZART and is recommended. Audio tapes can help you too.
The tuning range of this receiver includes regular evening 'Morse practice' nets which are fun to monitor.
73
73 is an expression used in Morse transmissions. It means 'best regards'. You will enjoy this receiver project - enjoy the thrill and satisfaction of listening to signals on a radio that you yourself have constructed. On the basis of the fun per dollar and the time spent, you are assured of a good return.
73 from your NZART friends.
Further reading ...
1. 'The ALIVO Receiver', Break-In September 1996 pp 4-12.
2. 'A Simple Audio Filter', Break-In May 1997 pp 12-13.
'Break-In' is the monthly official journal of NZART. You will receive it and the annual CallBook after you join.
Enquiries to: NZART, P.O. Box 40 525, Upper Hutt 6415 New Zealand.
Phone/Fax +64 4 528 2170.
Parts List for the ALIVO-ZL Receiver
Resistors (all 1/4 watt or smaller)
| Value | Number |
| 22 ohm 100 ohm 2.2 k 10 k Potentiometer,1 k, panel mount |
1 1 2 2 1 |
Fixed capacitors (ceramic OK) low working-volt
| Value | Number |
| 47 pF 100 pF 220 pF 270 pF 470 pF 0.047 uF 0.1 uF |
1 1 1 1 3 3 2 |
Electrolytic capacitors, 10 volt working or more
| Value | Number |
| 10 uF 100 uF |
1 3 |
Other Construction Pieces
| Value or Description | Number |
| Variable capacitors, miniature, double-section, 60-160pF with thumbwheels | 3 |
| Integrated circuit NE602 | 1 |
| Integrated circuit LM386 | 1 |
| Coil formers 7 mm dia with 9mm square base | 2 |
| Slugs 6 mm diameter by 16 mm long | 2 |
| Battery-holder for 4 AA cells | 1 |
| Clip lead for battery-holder | 1 |
| Phone jack, 3.5 mm panel mount, stereo 1 | 1 |
| Knob, small, for potentiometer | 1 |
| Terminal red (for antenna) | 1 |
| Terminal black (for earth) | 1 |
| Switch, miniature toggle, on/off | 1 |
| Circuit board, blank, 75 mm by 50 mm | 1 |
| Baseboard, wood, 195 mm by 100 mm | 1 |
| Panel, 1.2mm aluminium, 195 mm by 90 mm | 1 |
| Panel, 1.2mm aluminium, 50 mm by 35 mm 1 | 1 |
| Bolts to mount tuning capacitors, M2.5 x 6 mm | 6 |
| Screws, self-tapping, 4g x 10mm | 12 |
| Paper clips (glides) | 4 |
| Wire for coils 0.4mm (26 SWG enamelled) | about 2m |
Solder, cored, a short length, as required
Small pin nails & rubber band (if required)
Hook-up wire, tinned-copper wire etc., scraps, as required
NZART Headquarters can guide you if your local supplier is out-of-stock.
The above receiver construction information is extracted from the booklet "Secret Listening" published by
The New Zealand Association of Radio Transmitters Incorporated (NZART), P.O. Box 40 525, Upper Hutt, New Zealand, Phone / Fax: +64 4 528 8313.
A copy of the complete booklet can be obtained, postage-paid, by sending $3.00 to that address.