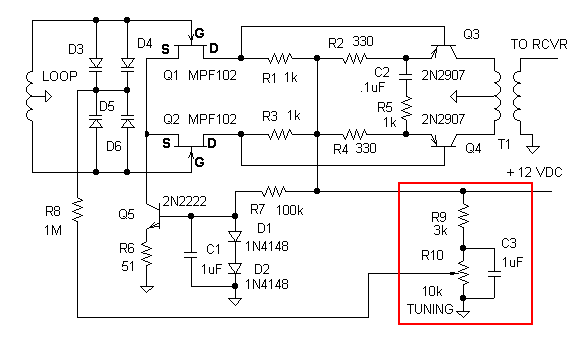
I've been meaning to put this balanced preamp schematic and details of the new loop construction on my web page for a long time. Unfortunately, when I put things off too long I forget some of the details of the circuit, like how many turns on what kind of core on the output transformer. The details given here are based on my best recollection of the transformer construction. When the preamp was modeled using MicroSim DesignLab, I used a value of 3.6 millihenries for the total inductance of the transformer primary, and 100 microhenries for the secondary. I believe the actual preamp uses an Amidon FT-50-J core with 18 bifilar turns (36 turns total) on the primary and 6 turns on the secondary. Actual values are not critical; the transformer is untuned and serves only to improve the impedance match between the transistor collectors and a 50-ohm receiver input. If the preamp were to be used primarily on MW frequencies, the number of turns could be reduced, or the transformer could be wound on lower permeability cores like FT-43 material.

The preamp circuit was designed for use with a center tapped loop. I prefer that arrangement because it provides a low-impedance path to ground at low frequencies, reducing the possibility of static damage to the input FETs. Theoretically, a center-tapped loop is not necessary for proper circuit operation as long as a DC return path is provided between the loop and the circuit ground (see the important note below). For use with an untapped loop, 100 k resistors can be added from each side of the loop to the preamp ground. It may also help to connect a 0.01 uF capacitor from the common connection of D3 through D6 to ground.
Important note: In areas with strong AM broadcast stations or strong 60-Hz fields in the vicinity of the loop, the preamp can be overloaded by common mode signals if the loop doesn't have a low impedance path to ground. The best way to avoid these problems is to always use a center tapped loop with the balanced FET preamp. If the loop is wound in a flat "pancake" configuration and it isn't obvious where the electrical center of the loop might be, simply make a best guess. The spot with an equal numbers of turns from the center tap to each side of the loop is close enough.Diodes D3 through D6 are MVAM108 or MVAM109 tuning diodes. Note: MVAM108 and MVAM109 tuning diodes are becoming increasingly difficult to find. They are listed in the RadioShack.com 2000 catalog, but have been discontinued. One possible source is Dan's Small Parts. Bill Bowers informs me that the NTE618 will work in the circuits and actually has higher Q than the MVAM series of diodes. The NTE618 is available from Hosfelt Electronics, Mouser Electronics and Circuit Specialists for the same price ($2.50) as Dan's Small Parts is asking for the MVAM109. The Siemens BB112 tuning diode is another possible substitute, and at one time was available from Alltronics for a little over a dollar apiece. This preamp is intended for use with a remote tuning control. The components shown enclosed in the red box would normally be located in the shack, although there is no reason why you can't mount the tuning components in the same box as the preamp for portable or mobile use. For remote operation, at least two additional wires are required besides the coax from the preamp to the receiver. One wire is needed for the +12 volt supply, and one for the tuning voltage. The coax shield provides a ground connection, although I would normally include a third wire in the control cable as a ground wire.
Q1 and Q2 should be fairly closely matched. If the voltages on their drains are within 0.25 volts of each other, that's probably close enough. I lucked out; the first two MPF102s out of my junkbox gave almost identical collector voltages. Resistor R5 is used to set the gain. If the value of R5 is too low, the preamp may oscillate. Mine did. In many locations where the ambient noise level is high, this preamp will have more gain than needed even if R5 and C2 are omitted.
There are other balanced preamp circuits which are much less complex. A resistor can be used in the sources of Q1 and Q2 rather than the current source formed by Q5 and the associated components. However, the constant current source provides a much better dynamic balance of the FET stages than a simple resistor arrangement. One thing I've been meaning to try is a constant-current diode such as the 1N5309 from RadioShack.com. Although the constant-current diode is more expensive than the parts it replaces (Q5, R6, R7, D1, D2 and C1), it would make the circuit a lot simpler. It is also possible to take the output from the drain of either Q1 or Q2 and use a single-ended bipolar buffer with no transformer, as discussed later.
The LF loop I use with this preamp is 8 feet across and was built on the same form used for my old "spider-wound" loop. However, the turns do not lie in the plane of the loop, but are now in a plane parallel to the axis of the loop. In other words, your basic box loop, but with 6 corners instead of 4. The loop is wound with 16 turns of #26 AWG wire. My choice of wire size was based on the biggest spool of wire in my junkbox. Larger wire would give better Q and slightly higher efficiency -- probably the optimum is around #20 or #22. Much larger, and the loop would be quite heavy and cumbersome to wind. There seems to be more than adequate sensitivity even with #26 wire, and that's in a location that is much quieter than average. To predict the performance of the loop I used Reg Edwards' RJELOOP3 program, with a turns spacing of 4 mm. Since I didn't have a good metric ruler in the workshop, the actual turns spacing is 5/32 inch. To secure the windings, I made six rectangular "combs" about 3 inches wide by 2 inches high, cut from 1/8-inch plexiglas. Sixteen saw slots about 1/4 inch deep and 5/32 inch apart are cut into one wide face of each of the rectangles to hold the windings. Each "comb" has two mounting holes drilled in it, and is attached to the wooden spokes of the loop support with stainless steel sheet metal screws. A picture here would be worth a thousand words, but I haven't yet acquired a digital camera and never seem to finish a roll of film.
Despite the relatively small wire size used in the loop, the tuning is very sharp. In fact, I used a 10-turn pot to allow better fine tuning. This wouldn't be necessary for normal listening. In my case, I was trying to obtain signal strength comparisons between the local LowFERs, and the tuning with a single-turn pot was a little too touchy when trying to find the exact peak. There is only one small-town AM broadcast station within 30 miles of me, so it's hard to judge what kind of intermod performance the loop/preamp combination has. However, it does have good enough selectivity and overload performance so that I can tune to non-directional beacons while the LEK LowFER transmitter is running about 100 feet away. There seems to be very little "de-sensing" above 200 kHz; the only problem is that the key clicks are pretty bad within 20 kHz of LEK's frequency.
Any well-constructed box or "Hula-Hoop" type of loop should work with the balanced preamp. I suggest using the RJELOOP3 software by Reg Edwards to predict the loop performance. With the 16-turn, 8-foot hexagonal loop using #26 wire and roughly 4 mm spacing, the tuning range is from about 150 to 500 kHz. Wider spacing would be needed with larger wire in order to provide the same tuning range. It might be a good idea to use another two turns so that the loop will tune to the 136 kHz region. I have to hang a parallel capacitor on my loop to get it to tune down that far. Because the efficiency of a loop increases so dramatically with increasing frequency, the upper end of the tuning range doesn't matter too much. I find that my loop works fairly well even at 1 MHz and above, even though it only tunes to 500 kHz. The preamp circuit has a relatively flat tuning response, and should work quite well with an appropriate loop for medium-wave DXing.
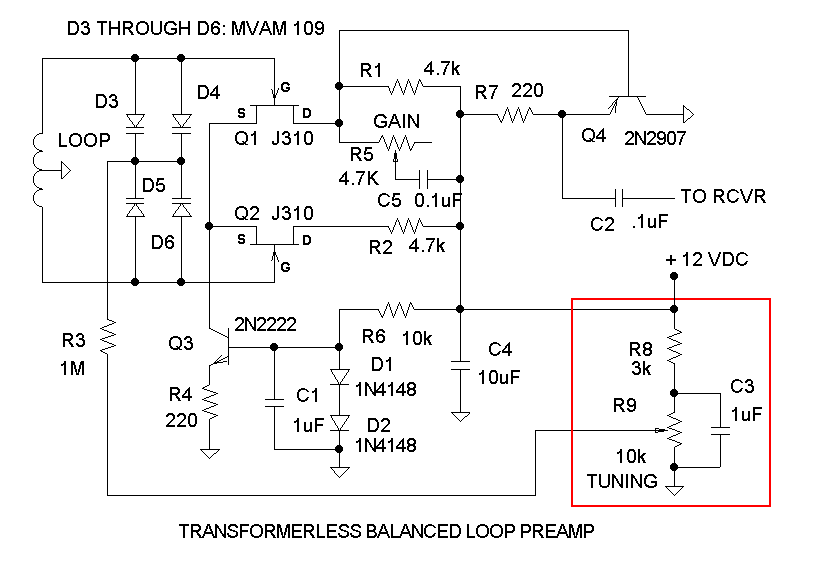
Transformerless version: For those who hate winding toroid transformers, the circuit shown below will provide almost the same performance as the one with the output transformer. The transformer version seems to have slightly better overload characteristics, but otherwise I can't tell any difference. I used J310 FETs (available from RadioShack.com and many other sources) in place of MPF102s in my version of this preamp. Supposedly the J310 parameters are a little more tightly controlled, although I expect that MPF102s will work just fine. Exact matching isn't required, but I recommend checking the supply current. It should be between 25 and 35 milliamps; if it is significantly higher or lower, it probably means there is a mismatch between Q1 and Q2. As discussed earlier, 100k resistors can be added from each FET input to ground if a loop without a center tap must be used. However, a center tapped loop is strongly recommended. A trimpot (R5) is used to set the gain of the preamp to an appropriate value for your particular loop and receiving location. Gain increases as the value of R5 is increased. Many people find that my preamp designs have much more gain than they can possibly use in their locations. I suggest that the gain should be adjusted so that there is plenty of receive audio when the band is very quiet and the receiver bandwidth is set to the minimum available. Most receivers will have enough dynamic range to accomodate the signal variations when the noise level or bandwidth is increased. As with the transformer version of the balanced preamp, the tuning potentiometer and associated components shown in the red box can be located in a remote site; usually in the shack next to the receiver.
