FAST AND EASY WAY FOR MAKING
SEXY PANELS
I use this basic process for the front panels of my L/C
Meter IIB. Transparency film directly onto plastic. I have some over two
years old that show no signs of deterioration. The example is for my version
of the "poor man's spectrum
analyzer" which I will use to test a new Digital Center Frequency
Display and Marker Generator designed for that kit.
Materials required
- Computer with graphics program.
- high resolution laser or ink jet printer.
- One of these must be capable of flipping the image horizontally
- Colored shelf paper (from local hardware store) OPTIONAL
- Mine had red, green, lite blue, dark blue, yellow and
white
- wood tones are also available (flowered prints too, if
you're into flowered print front panels).
- Shelf paper is mearly to give a colored front panel.
The process is applicable to plastic and painted surfaces without the shelf
paper.
- Laser or ink jet transparency film
- Elmers spray adhesive (from local hardware store)

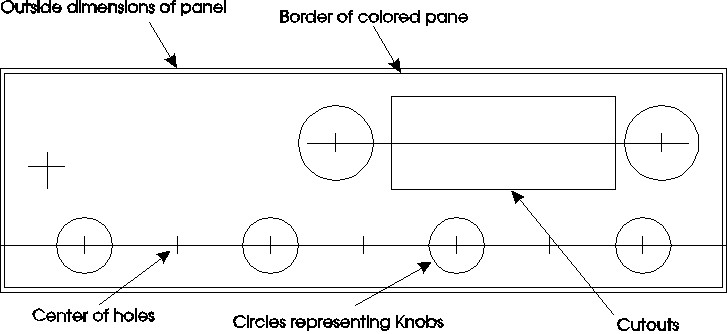
Figure 1, Begin by laying out the panels physical dimensions.
- Locate the centerlines of all controls and cutouts.
- Put circles to represent the actual size of the knobs
- Print out a copy of this.
- Use it to center punch the locations on the actual panel.

Figure 2, Add the desired labels
- I have not tried this with ink jet printer and ink jet
transparency film but assuming it works and you have a color printer you
could really go wild.

Figure 3, Delete the dimensional data

Figure 4, Flip the panel horizontally (this puts the ink
on the back side)
- Most graphics programs have a "Flip Horizontal"
or "Mirror Horizontal" function to do this. (I use Corel Draw)
- If your's doesn't then several image processing packages
do have.
- Print it out on Laser Transparency Film (or ink jet transparency
film)
- if you can't print on transparency film, xerox a copy
onto the film.
- Trim it to the dimension of the colored pane.
Assemblying the panel
- Clean surfaces are necessary for best results
- As I say, I have not tried ink jet but I suspect that
it would be best to let the ink dry throughly before proceeding.
- Using the template of figure 1, drill and machine all
holes.
- Using hobby knife and metal ruler
- Trim some colored shelf paper to the size of the colored
pane
- locate the colored pane on the panel and stick it down
- buff down with a soft cloth.
- Using a sharp hobby knife, cut holes in the shelf paper
to match the holes in the panel.
- Using hobby knife and metal ruler
- Trim the transparency film to match the colored pane
or entire panel
- Spray Elmers Spray Adhesive on the BACK of the transparent
film (side with the ink on it) .
- Spray a UNIFORM amount. Don't have to overdo it.
- If you have a WINDOW in the panel (as in the example)
don't spray the film, spray the panel.
- If you are covering the entire panel, or mask the panel,
you can spray the adhesive on the panel instead of the film.
- Stick it down to the colored pane.
- Buff it down with a soft cloth.
- Using a sharp hobby knife, trim holes in the film to
match the holes in the panel.
- Allow the panel to dry a few hours before mounting controls.
- ALWAY USE FLAT WASHERS UNDER NUTS THAT HOLD THE CONTROLS
- This will help prevent wrinkling the film when tightening
the nuts.
- NEVER SPRAY WINDOW CLEANER DIRECTLY ON THE PANEL.
- This can seep under the edges of the transparency and
stain the glue an ugly brown.
- Spray the cleaner on the cloth or paper towel and use
it to wipe the panel.

Figure 5, The finished panel
( picture is a bit fuzzy, limited by the resolution of
my camcorder)
Removing the panel label
- You can remove the panel, in case you screw up or change
your mind, by lifting a corner of the transparency with a hobby knife and
pealing it off.
- This will leave most of the ink and most of the glue
on your panel.
- Use a product similar to "goo-gone" (available
at your hardware store) to remove the glue.
- I've heard that WD-40 will do this although I have not
tried it.
- Wash the panel using liquid dish detergent and rinse
throughly. Dry with soft cloth.
- This could ruin the shelf paper so you may have to remove
it and clean its glue off as well.
Back to AADE Homepage


