 |
Glenn Elmore, N6GN 550 Willowside Road, Santa Rosa, California 95401 Kevin Rowett, Originally published in Ham Radio |
 |
Glenn Elmore, N6GN 550 Willowside Road, Santa Rosa, California 95401 Kevin Rowett, Originally published in Ham Radio |
Note: Check the following link for the method I used to
modulate the Alpha Gunnplexer at 10 Mb/s:
http://www.k3pgp.org
We'd like to tell you about some inexpensive antenna, radio, and computer interface hardware which allows communication of digital data at rates up to 2 megabaud (1 megabaud = 1 million bits per second) on an Amateur Radio band. In addition to the data link, an analog voice channel is provided. It requires only an external microphone and speaker for simultaneous full duplex audio communication. The link operates in the 10-GHz Amateur band and uses an inexpensive commercial parabolic antenna along with a Doppler radar transceiver module to provide medium range communications at low cost. We'll discuss modifications to surplus networking interface cards that let you use this high speed data in Amateur Radio service with IBM-style personal computers.
The Amateur accustomed to conventional AX.25 packet operation might wonder why anyone would want to go to the trouble of building a digital radio approximately 1000 times as fast as the 1200-baud systems prevalent on the VHF bands. Although many metropolitan areas are experiencing severe congestion on some of the packet channels, it's also true that many keyboard-to-keyboard QSOs are taking place. A great deal of traffic is also being handled on the worldwide bulletin board systems using today's equipment. The success of AX.25 packet radio has suggested the need for faster systems to improve current performance and has spawned some fundamentally new ideas for Amateur Radio.
A whole spectrum of new user applications and the possibility of a nationwide or even worldwide digital Amateur network are two major areas made possible by faster hardware.
Packet has been regarded as a way for two stations' computers to communicate, allowing keyboard-to-keyboard QSOs, but the potential for far greater applications exists. Almost any information which can be transmitted by analog means can also be transmitted digitally, making digital audio, facsimile, graphics, and even digital TV feasible on the Amateur bands once sufficient data speed is available. The concept of repeaters for a variety of modes is conceivable, when combined with the ability of each Amateur station to serve as a relay of data to and from other stations.
Amateurs will also be able to share resources. A station with an interesting database will be able to make it available to others. On-line call directories, QSL information, and technical data -- not to mention computer programs and even the computers themselves -- can be shared. It's possible for one Amateur to actually run programs and applications on someone else's computer as though it were located in his own shack. Remote control of equipment and remote sensing are other possibilities. Remote digital control of repeaters or even complete stations, including audio or video uplinks and downlinks, can be supported. Conventional voice repeaters (analog) may be replaced by digital hardware for completely digital round tables. Since this data can be transmitted anywhere the network permits, there can be multistate, national, or even worldwide voice nets. If the data rate permits, all of these different applications could conceivably be going on at the same time.
The possibility of an Amateur network is just as exciting as the variety of applications that high data rates can support. To date, groups of Amateurs have used limited networks for traffic handling and sharing information among members. A high speed digital network can provide these same services, as well as new applications, over very broad geographical areas on a full- time basis. A nationwide network capable of transmitting data quickly and with little delay could be beneficial to Amateur Radio public service and emergency operations. Data and resource sharing on a nationwide or worldwide network offers great potential in ushering the information age into Amateur Radio. The diversity of Amateur interests -- DX, ragchewing, technical, and public service -- could all be greatly enhanced by such a network. A network might also entice a great many potential and computer literate candidates into getting their tickets.
The link we'll describe was designed to help further the applications and networking made possible by high speed data exchange. It was built as an initial step in providing a moderate speed digital Amateur network in northern California to be used with a fledgling TCP/IP radio network.
This was necessary to support some of the applications previously described. It was also built to help advance Amateur use of the microwave spectrum.
Fortunately, microwaves and high speed communication fit together very well. In fact, if the data rate is increased significantly it is absolutely necessary that wider and wider bands be used. As frequency is increased, antennas of reasonable physical size are better able to focus the transmitted beam without wasting signal in different directions. The Amateur microwave bands, through 24 GHz, offer the best available performance and cost for such communication. In order to be widely useful our link needed several attributes:
In addition to the problem of building radio hardware which the average Amateur could feel comfortable installing and maintaining, there are problems with the digital interface hardware portion of such a link.
At these speeds the data is too fast for normal serial ports on most computers, for the internal bus operations of many computers, and for TNCs. Similarly, the software to process data at these speeds can no longer operate on a character -by-character basis. Any solution we developed for these problems also needed to work with commonly available hardware, most notably the IBM PC and its clones.
Microwave hardware, propagation, and high speed data are new ground for many Amateurs. This means that any high speed link hardware needs to be relatively easy to work with.
Previous successes using 10-GHz Gunn diode oscillators as local oscillators and transceivers for narrowband weak signal work, brought to mind the possibility of using these inexpensive units for higher speed digital data transmission. In addition to being inexpensive, these units -- which are commonly used for motion detection (door openers and burglar alarms), speed measurement (police radar guns), and microwave receivers (radar detectors) - have all of the microwave circuitry self-contained. This is important because it makes the equipment more attractive to non microwave users. The system block diagram in Figure 1 shows the operating principles.

The two ends of a link operate "split." One transceiver oscillator typically operates on 10,450 MHz while the other end is 105 MHz lower, on 10,345 MHz. The difference between the two transmitter frequencies corresponds to the receiver first IF frequency. The receiver first IF on each end is generated when the remotely transmitted signal (frequency modulated by the data to be transmitted) is mixed with the local transmitter. Each end uses its own transmitter as a receiver local oscillator, and each unit transmits continuously. Therefore, each receiver sees the same IF. This is the same full duplex arrangement used for many years by Amateur microwave enthusiasts. The transmitters run 5 to 10 mW of output power. The transmitter is frequency modulated as its bias supply is varied and the frequency voltage dependency of the transceivers is used for tuning. This same technique was used previously to phase lock such oscillators1. The 2-foot dish shown here has a gain of about 33 d8, or 2000 times at 10.5 GHz. When driven by the microwave transceiver, the effective radiated power (ERP) is about the same as that of a 10-watt 2-meter radio driving a quarter-wave whip. We selected 105 MHz for the receiver first IF, with provision for tuning +/- 10 MHz to accommodate differential frequency drift with time or temperature of the free-running microwave transceivers. Using an IF in this range also lets you do some simple troubleshooting and testing with commonly available commercial FM broadcast receivers. No correction is necessary if both ends drift in the same direction because the IF doesn't change. Automatic Frequency Control (AFC), implemented by tuning the second LO nominally at 150 MHz, is provided to keep the receiver tuned correctly. This conversion produces the second IF at the point where detection takes place at 45 MHz in a Motorola MC13055 FSK receiver chip. This chip is specified to operate at data rates up to 2 megabytes per second (Mbps), but has actually been used as high as 10 Mbps.
Automatic frequency control circuits keep each receiver correctly tuned, even when the first IF deviates from 105 MHz. A search oscillator is also provided to allow the receiver to "find" the incoming signal when the link is first powered up, or if you lose signals temporarily. The searching is controlled by the Data Carrier Detect (DCD) circuitry. Once the signal is found, the oscillator is shut off and the AFC tunes the receiver correctly. Because the data is digital, an appropriate offset is introduced to the tuning depending on whether the data is a "0" or a "1" We added the audio channel as an afterthought. It provides for human communication, particularly while debugging the link and operating it with digital data the first time. An electret microphone produces the transmit audio signal. This is amplified and limited by high and low pass filters before modulating the transmitter. Levels were selected to provide only small deviation compared with that of the digital channel. This allows the audio channel to operate without significantly interfering or degrading the digital data. A volume control and speaker amplifier sufficient for driving headphones or a small speaker are provided on receive.
An analog meter displays strength as carrier-to-noise (C/N) ratio or discriminator output to aid when manual frequency control (MFC) is used. The MC13055 FSK receiver hip has a built in logarithmic amplifier which can give a pretty accurate measure of C/N. A switch lets you select manual or automatic frequency control.
The microwave transceiver, modulator, and receive Preamplifier are mounted together in a box located at the Prime focus of the parabolic antenna. A horn antenna was designed to illuminate the dish antenna efficiently so that ear maximum gain could be obtained. The rest of the receiver, as well as circuits for the audio channel, are located ,a separate enclosure. This lets you place the antenna and microwave hardware a considerable distance from the receiver for tower or mast mounting.
We used Emitter Coupled Logic (ECL) for incoming and outgoing data. These are differential lines and can be used even when there is considerable line length -- for example, when the microwave portion is high on a tower or the receiver is located some distance from the host computer. A standard 15-pin connector is used as the interface to the radio hardware. Those familiar with Local Area Networks (LANs) may recognize this connector and pin out as identical to that of a Media Access Unit (MAU), the device used to link a computer to a coaxial cable connecting a building or area wide network. You need just 12 volts DC at approximately 350- mA data input and data output to operate all the radio link hardware.
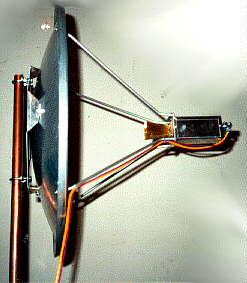
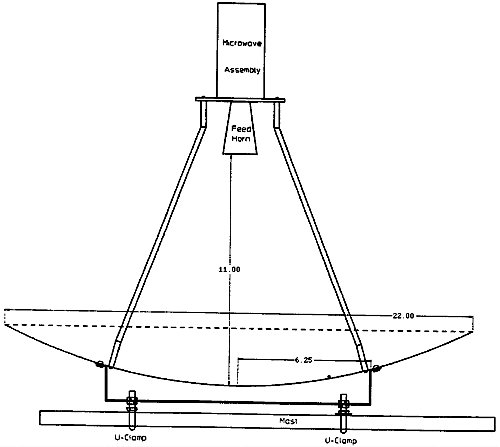
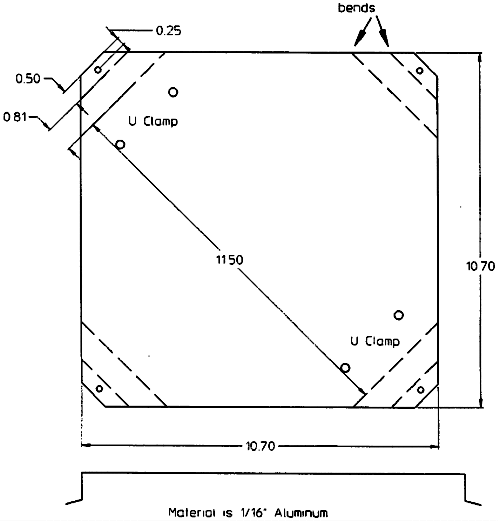
The antenna is mounted to a mast with a rear mounting bracket. This plate is cut from sheet aluminum and folded to produce four "feet" which attach to the dish. Mount the plate to the mast with U clamps. For minor elevation steering of the antenna, add two extra sets of nuts to the clamps. This lets you adjust the spacing between the mast and plate. Less spacing on the top than on the bottom clamp points the dish upward; more spacing points it downward. Because the antenna has less than a 4-degree half-power beamwidth, you may need to make this adjustment -- particularly when the two ends of the link are at different elevations and not very far apart.
The horn feed and microwave assembly attach to a plate and are held at the dish focal point by four 1/4-inch diameter struts made from soft aluminum rod. We found this material at a local home supply store. First cut the aluminum rod to length; then drill and tap it at each end. Use a tubing bender to shape the rod properly. Figures 2A, 2B and Figure 3 show the mounting bracket and feed support struts, respectively.

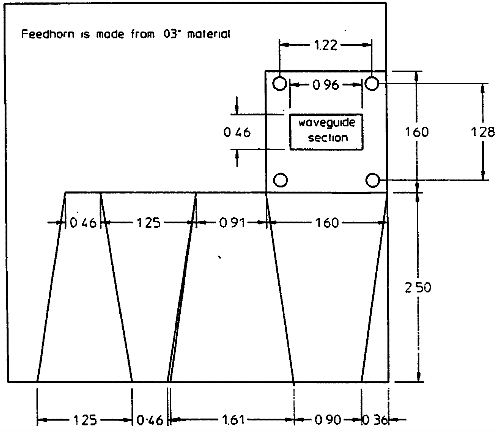
To construct the feedhorn, first cut the sides and flange from copper or brass shim stock as shown in Figure 4. Because the material is so thin, you may want to begin by tacking the whole assembly together using a medium sized soldering iron and complete your soldering after everything is in place.
The feed/microwave assembly is shown in Photo A.
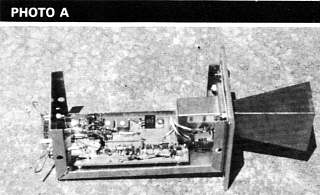
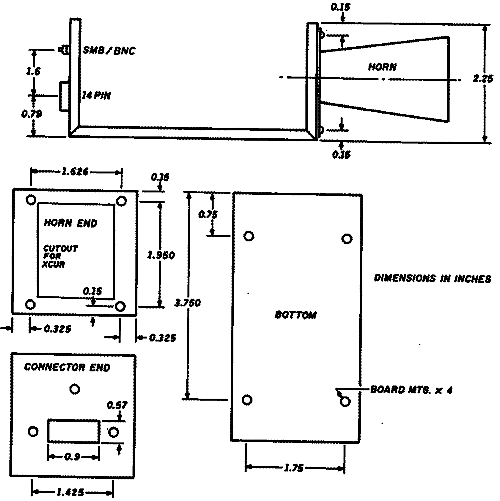
The mounting plate has a short section of waveguide at its center. The feedhorn and transceiver mount on opposite sides and a small Bud box encloses the electronics. Make the waveguide section by milling (or drilling) and fitting a 0.40 by 0.90-inch rectangle in the plate. Great precision of construction for either the feed or the mounting plate isn't necessary to obtain good performance. Figure 5 shows the feed mounting plate.

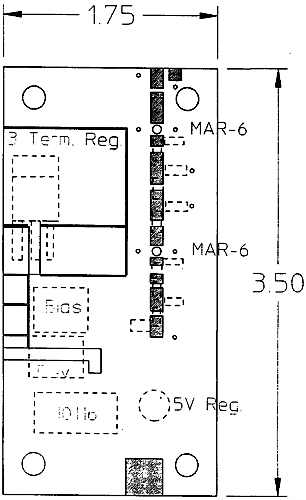
Because the microwave transceiver is self-contained, the RF electronics aren't particularly critical or difficult to assemble. The receive preamplifier is probably the only sensitive circuitry, and because this uses MMICs, short lead length and good grounding are the only prerequisites. If you use pc board material, you can make the entire board using a file and small hobby knife. Fifty ohm transmission line is used to connect to and from the MMICs. Try making this line by filing 0.005 to 0.010-inch slots 0.1 inch apart. The line can then be cut into short sections and the components soldered directly to it. Holes drilled in the board allow the MMIC packages to sit flush with the lines. Holes are also drilled for all component ground leads, and the leads are soldered on the top and bottom of the board. The regulator and modulator circuits aren't critical and the ECL IC may be "dead bug" mounted on top of the board. You can mount the board to the aluminum box with short spacers. Use a twisted pair made from hookup wire to connect to the mixer diode on the transceiver. Figure 6 shows an approximate board layout. (See Figure 7 for enclosure dimensions.)
Receiver assembly construction also isn't critical. See Figures 8A, 8B, and 8C for details. Use ground plane as much as possible on the component side of the board and keep traces to the 45-MHz filter and discriminator reasonably short. Otherwise, no special precautions need be taken. All ICs may be socketed for convenience. (PC layout or circuit boards may be available by press time. Contact the authors for further information. Ed.)
We chose the IBM PC as the initial platform for developing and testing faster packet hardware. The IBM PC is generally available and affordable, with sufficient capability and adaptability. The IBM PC is the de facto standard for people pursuing higher speed packet. The bus architecture is well known, and there are a large number of experts to consult should you encounter problems.
The original system design called for standard off-the- shelf Ethernet(TM) adapter cards. Normally Ethernet(TM) lets a number of computers intercommunicate within a local area at a data rate of 10 Mbps. N3EUA suggested we use the same widely available cards and the associated IEEE 802.3 protocol with the adapter card clocks slowed to 1 Mbps. Using a standard Ethernet(TM) adapter gives you access to an existing range of networking software, including NetBios/PC Network and TCP/IP implementations. It's an interface familiar to the general ham community, one that the advanced packeteer probably already knows and works with.
Stock Ethernet(TM) cards can't be slowed from 10 to 1 Mbps without extensive reworking. The serial data interface portion of the cards must produce a clock rate within 0.001 percent of 10 Mbps to conform to the IEEE 802.3 specification. By the time we discovered this we had working "RF bit pumps:' but found ourselves without a suitable digital interface.
Several years ago IBM produced a digital communications adapter known as the PCLANA or SYTEK 6120. This adapter was designed to communicate using FSK signals transmitted on a coaxial cable at a 1-Mbps rate. The card implemented Ethernet framing with a NetBios interface directly on the card. The card consists of a local ÁP (80186), an Ethernet chip (82586), custom 802.3 serial data interface, RAM, ROM, PC bus interface, and an RF modem. While the RF modem is interesting, it was unnecessary for this project and was disconnected.
We discovered that this card had all the right pieces: 1-Mbps Ethernet frames, defined PC interface, and because 10-Mbps Ethernet was displacing these cards, good availability on the surplus market -- sometimes just for the asking.
To use the PCLANA card, we needed to gain access to the TTL signals directly (before modulating the RF modem), build an adapter card onto the PCLANA for converting TTL to differential ECL, generate DCD, and route Transmit Data (Txd) and Receive Data (RxD). You'll need a software driver if you want something other than a NetBios interface. A schematic of the card is shown in the IBM PC Technical Reference Manual, "Options and Adapters" section.
A "daughter" adapter (Figure 9) is fitted to the PCLANA to take the TTL TxD, RxD, DCD, and RTS. It produces a valid interface to the microwave RF modem, including power and differential ECL interface.
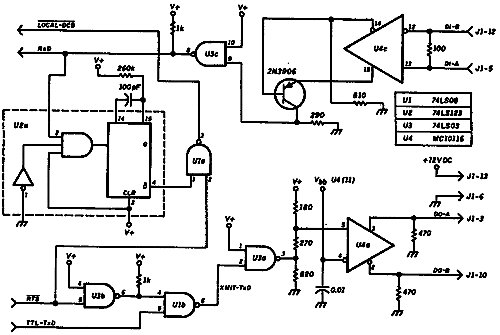
The microwave modem interface closely matches the IEEE 802.3 MAU which normally connects the digital interface to a coaxial cable. A MAU is also known as an Ethernet transceiver (XCVR). We chose this interface because it allows long (120 foot) cable runs, good common mode noise immunity (0.6 volts), and a standard interface.
TxD is converted to differential ECL levels with an open collector (OC) NAND gate and a resistor totem pole. This produces the right voltage level for one end of an MC10116 differential line driver input. The other differential input is tied to the MC10116 Vbb. The output of the MC10116 is differential ECL. Because the ECL drivers are open ended, each line is pulled to ground with a 470-ohm resistor. The polarity of ECL lines to the pins of the DB15 connector is important. Switching these lines will result in a bit sense inversion.
RxD is converted from differential ECL to TTL using the differential drive from an MC10116 biasing the base emitter junction of a 2N3906 PNP transistor. This drives a standard TTL NAND input.
TxD is qualified by Ready to Send (RTS) from the PCLANA (U1b). This is necessary because the SYTEK SIC doesn't clamp the TxD line to logical zero when RTS goes false.
The SYTEK SIC interface chip is designed to work on a cable with multiple stations. It monitors the DCD line, and if it finds that it has been true too long, the SIC declares the cable jammed. Because the microwave RF modem provides continuous DCD with or without data, we used a retriggerable one shot (U2a) connected to the incoming RxD signal to generate an appropriate non continuous DCD. On the first low-to-high transition, DCD will be asserted and the one shot will start timing. Each low-to-high transition in the incoming data will retrigger the one shot and keep it from expiring. When data stops and the RxD line clamps to a low, the DCD will fall to a zero when the one shot expires. Because each end of the link expects to hear itself, the DCD is ORed with the local RTS (U1a).
Adapter card construction is straightforward and can be completed quickly with IC sockets, perfboard, and point-to-point wiring. The entire circuit runs at baseband speed, so layout isn't important. (Contact the authors if you want a pc board layout.)
The PCLANA modification can be simple or time consuming, depending upon how elegant you want the finished project to be. The adapter daughter board must be mounted on the PCLANA. The best place to do this is over the long metal cover housing the actual RF modem. Decide on a place and prepare your mount.
You might consider removing enough of the RF modem components to make room for the daughter adapter board. If you do, be aware that the RF modem reports to the onboard ÁP (80188) as to the validity of the -12 volt DC power line (for historical reasons). If you remove the RF modem without connecting this signal, the ÁP will report an error whenever you attempt any operation. Locate Q20 and R121 on the left side of the pc board next to the lower left corner of the RF modem cover (if it's still installed). The left end of R121 is tied to the base of Q20. Cut the trace to the right end (or unsolder R121) and reconnect it directly to -12 volts DC on the board (bus pin B7).
You need four signal lines to connect the daughter card to the PCLANA. They are: TxD, RxD, DCD, and RTS. You also need three power lines: +5 volts, +12 volts, and GND.
You'll find the connection to ground underneath the screw holding the mounting bracket to the rear of the card. Positive 5 volts DC is taken from a trace leading to edge connector Al (component side of the card, on the right). Positive 12 volts DC is also taken from a trace leading from B9 (solder side of the card, on the left). This trace also "comes through" to the component side of the card and is easier to solder to. The current demand is low, so you can make contact by cleaning a portion of a wide trace, tinning it, and soldering to it.
Make signal connections to the SYTEK SIC chip by bending pins up out of the socket and soldering to them. Find IC U16 in the upper left of the board. It's designated SIC and is a wide 28-pin device. Pin 1 should have a red dot and be on the lower left. Remove the device carefully; you probably won't be able to find a replacement easily. Bend pins 12, 13, 17, and 18 up so they won't make contact with the socket when the IC is reinserted, and so you can solder to them. Reinsert the IC. Connect the daughter board signal leads directly to the exposed leads. Pin 12 is RxD, 13 is DCD, 17 is RTS, and 18 is TxD. It's a good idea to use shrink tubing on each lead. Be careful not to heat the device unnecessarily while soldering.
With the daughter card mounted on the PCLANA and all seven interface lines hooked up, measure the resistance from the +5 and +12 lines to GND. Find the cause of any reading less than 700 ohms before installing the card in the PC.
If everything checks out, install the board in a PC bus slot and power up the computer. If the microwave hardware isn't attached to the 15-pin daughter board connector, the PC will delay for about 15 to 45 seconds during the boot cycle. It may display an error 3015.
To complete testing, install a similarly modified card in another PC, connect the microwave hardware, power up both computers, and check to see that both FSK receivers show DCD. It may be necessary to reboot the PC by selecting ctl-alt-del after DCD has been established. When the PC is booted, the PCLANA runs through a series of diagnostics which include frame loopback. The loopback will fail if the microwave hardware doesn't have DCD. Depending on the PC, the PCLANA card will declare itself inoperative until you run diagnostics again.
If you have a copy of the IBM PC network program, you can now start it on both machines and share disks. Playing with the network can provide lots of creative fun. With the link running to a fellow ham, you can access each other's hard disks. Suppose you just finished some nice graphics and you want to show them off. Instead of reaching for your An/ camera, bit dump the screen image to disk and do a DOS copy file from your disk to your friend's. Your friend will be able to see your work in seconds. A driver is also available to provide packet interface support for Phil Karn's (KA9Q) TCP/IP package for the PC. (Contact the authors for further information.)
Unless you have a 10-GHz microwave signal generator available, you should build these units as a pair -- although two dishes aren't necessary for short range use or testing. You should build the microwave assembly and set the bias voltage from the three-terminal regulator' to approximately 6.3 volts before connecting to the transceiver. Verify that the deviation control can be set to give 0.25 to 0.5-volt variation when the ECL line receiver is toggled between states. Once the biases are correct, hook up the transceiver. Most transceivers as shipped will be close to 10,525 MHz. With two transceiver/horn assemblies pointed at each other and separated a few feet, hook a frequency counter or general coverage receiver to the preamplifier output. Leaving one unit's tuning unchanged, tune the second unit while monitoring the IF frequency with a counter or listening for it in a general coverage receiver. Turning the mechanical tuning screw further into the cavity will reduce frequency. As the unit is tuned 70 MHz (or more) lower, you should be able to read the difference in frequency with a counter. You should be able to "walk" the two units lower in frequency into the hamband using this technique and space them 105 MHz apart. If you get "lost" and don't know the absolute frequency, try using a local supermarket door opener as an approximate 10525-MHz reference. If a microwave frequency indicator is available, adjustment is trivial.
Once the two ends are operating 105 MHz apart, you can align the receivers. Select MFC and midrange control setting, and use a counter or 2-meter receiver to monitor the VCO frequency. Set it to 148 to 150 MHz at midrange. You should be able to tune several MHz on either side of this center with the manual tuning control. You can use AFC to tune it even further once the other circuits are operating. Tune the VCO to 45 MHz above the previously measured frequency of the microwave IF and adjust the 45-MHz bandpass coil for maximum C/N reading. It may be necessary to separate the units or use conductive foam material to keep the signal strength reading on scale. Once the receiver is peaked on a 45-MHz IF, tune the discriminator coil to center the detector output voltage on pin 10 or 11 of the MC13055. With the squelch control set to maximum resistance of 5 k, a 0.35-volt change on pin 12 corresponds to 10-dB change in signal strength. Keeping the receiver tuned to center with MFC, adjust the position and absorbers to produce about 10 dB of C/N. Then adjust the squelch control so the DCD light just extinguishes. Measure the squelch control resistance again and calibrate your C/N reading by calculating sensitivity:
V(p12) = 0.070 * Rsquelch (1)
Rsquelch = squelch resistance in kilohms.
V(p12) = voltage change at MC13055 pin 12 in volts for
        10-dB change in signal.
Adjust the discriminator output sensitivity to give full scale on your meter as you use the MFC to tune across the incoming signal. Finally, verify that the search oscillator runs when you select AFC and that there's no incoming 105-MHz IF signal. This should appear as a sawtooth oscillation on the VCO tuning line.
The audio channel should work without further adjustment. Some background noise may be audible even when signal strength is high due to the phase noise of the microwave oscillators, but the level shouldn't be objectionable.
Use an oscilloscope to verify data throughput and correct transmitter deviation setting. Monitor the discriminator output with the scope and set the scope sensitivity to give full screen display as you use the MFC to tune through a signal. When you reach this stage, the transmitter may be modulated with data and the deviation adjustment may be used to set the discriminator output to slightly less than full screen. It may be necessary to iterate with the bias setting to keep the transceiver bias centered on 6.25 volts.
At this point, both the transmitter and receiver should be functioning properly and may be used for audio or digital communications. When units are separated by a great distance, or signals are otherwise weak, it may be beneficial to monitor the audio channel as an aid to link adjustment. Audio communication will be possible even when noise is causing excessive errors on a data channel.
Getting data to flow on the bench led to a couple of surprises. While debugging the software drivers, we learned new elements of timing relationships. Since this is point to point, and the only start-up delay is software latency (no hardware TXDELAY), data frame ACKs arrived from the other end before we'd finished processing the send request. Pieces of software that were just fine at lower speeds had to be rethought and streamlined to achieve throughput.
Aligning the microwave dishes requires some skill. If you haven't done this before, allow plenty of time for alignment, have solid mounts, and don't expect it to be like 2-meter work. Use the audio channel to listen for receiver quieting and get a feel for the narrow beamwidth. Don't try to hand hold the antennas at both ends; both must be pointed correctly before either end hears anything. It may be useful to use manual frequency control at first. If you can put one end of the link at a high elevation temporarily, you can power the other end from 12 volts DC in your car and drive around to see what microwave communication feels like. The experience you gain doing this will help to make you a good judge of final locations for the digital link. Because these are low budget systems, line-of-sight transmission is probably necessary for anything other than fairly short links. An exception would be if a good planar reflector were located close to one end and used as an efficient mirror. You can try this technique to keep the hardware at ground level using a mast or tower-mounted "billboard" reflector. This has environmental advantages for the hardware, too.
Measurements indicate that the unit passes data with a low bit error rate (BER) down to signal strengths below 15-dB C/N. It's important to use direct paths; severe distortion can occur when multiple paths exist between the ends of the link. Such multipath conditions can cause link failure, even with very large C/N. This sensitivity should provide low error data transmission on a line-of-sight path of more than 40 miles with well-stirred air. In many locales, marine air layers and other causes of fading and ducting may require shortening the path to guarantee high linkup time.
With the link installed at two locations 13.5 miles apart in northern California, C/N measurements show that there is at least 10 to 15 dB more signal strength than the minimum necessary. This indicates that more than 40 miles should be possible with this hardware as shown. However, because longer paths are more likely to experience propagation anomalies and heavy rain could decrease signal strength temporarily, it's desirable to use slightly larger dishes for longer paths. The audio link has proved useful in system troubleshooting too.
As with any ham project, there's certainly room for improvement. Because the original RF design was for a 2-Mbaud link, you should be able to improve DX by optimizing the receiver detector bandwidth. If you operate with a mast, the equipment needs to be waterproofed for all- weather use. As an alternative, you could mount a coax waveguide adapter to the feedhorn and locate the microwave circuitry remotely in a more protected environment. Use low loss semi- rigid coax cable for connecting to the antenna if you do so. A suitable coax waveguide adapter was described in an earlier article.2
If you want to use them, almost any of the surplus radar detector, motion detector, or burglar alarm Gunn transceivers should work well. M/A-COM Gunnplexers(TM), although somewhat more expensive, will work too. They have built-in electronic tuning that permits modulating at higher rates for full 10-Mbaud data links or An/ uses. It should be possible to frequency modulate them by driving the electronic tuning input from the ECL output, properly scaled and offset with a resistor network.
The first prototype of this link was built using 24-GHz radar transceivers and metal lamp reflectors for antennas. This arrangement works very well. Because of the modular system design, you may substitute these microwave assemblies for the 10-GHz ones described here without making any other adjustments. The higher gain available for a given dish antenna size at 24 GHz can actually provide better performance over some paths.
You can use a larger antenna for greater DX or more difficult paths. If you use something other than a 0.5 F/D reflector, you'll need to design a new feedhorn to produce maximum performance. Other diameters are available from the indicated supplier.
Ham radio has often made use of surplus and obsolete gear. Many have designed and built their own equipment. This project is no exception. By the time you read this, there will be a PC card (designed primarily by K3MC) capable of two-channel, full-duplex 2.5-Mbps operation. You'll be able to split the channels into four half duplex if you wish. The card will have a V40 ÁP, RAM, and Zilog 85C30 SCC devices, plus the usual glue logic. Bit rate will be software selectable. The card will have enough capacity to run as an IP router, allowing the PC to perform other functions while continuing to provide network access.
We are also working to build inexpensive 250 to 500-Kbaud 900 and 1200-MHz radios to give the individual user access to other hams and to a "backbone:' using this higher speed microwave hardware. We hope to have a fledgling moderate speed network in place in northern California and Colorado by the time this article goes to press. As the hardware is put into place, the platform for some really exciting applications and a whole new era of Amateur Radio becomes a reality.
The authors would like to thank WN6I, N3EUA, K3MC, and N6TTO for their encouragement and perseverance during testing. We'd also like to thank our XYLs, Sharon and Lynn.
Most of the components for this project should be available
from:
Digi-Key Corporation
701 Brooks Avenue South
Thief River Falls, Minnesota 56701-0677
(800) 344-4539
The antennas are available from:
The Antenna Center
505 Oak Street
Calumet, Michigan 49913
(906) 337-5062
The microwave transceivers shown are NEC ND751AAM, which may
be available from:
California Eastern Labs
3260 Jay Street
Santa Clara, California 95054
(408) 988-3500
You should be able to substitute many other transceivers, like those made by M/A-COM or Solfan and various types available at flea markets.
REFERENCES
1. Glenn Elmore, N6GN, "Designing A Station For The
Microwave Bands. Parts 1-3," Ham Radio Magazine, February,
June, and October 1988.
2. Glenn Elmore, N6GN, "Designing A Station For The Microwave Bands. Part 2," Ham Radio Magazine, June 1988, page 35-37.
Home You are visitor number