When you have your printed plain-paper artwork it needs to be copied to the photo-quality (shiny side) paper.A visit to most any local store will have a photo copier. Just ask them to set the copier to use a dense setting. When you reach this stage you are already half-way there!
Transfering the design:
Laser printer owners can omit the above. You simply print directly to the photo-quality paper with a 39% image reduction. (See 'Resizing Your Artwork).
The first thing we need to do is give the copper a GOOD clean. This means removing any fingerprints, dirt and grease, etc. It's a relatively easy process but a few minutes spent at this stage preparing the board will save a lot of frustration later down the road... For this I use a polishing block (availible from most any component suppliers). Don't worry if you haven't one of these because a 'Brillo' scouring pad will do the job just as good. Work the board in one direction making sure to remove all traces of gunk. When you're satisfied with this, wash the board with soap under running water checking that all dirt, etc. has been removed. If you have any doubts then give the board another taste of the scouring pad to be doubly sure. When you are happy with this stage, dry the board with a CLEAN, dust-free cloth before moving on. When you're satisfied the board is clean we can proceed to the fun part...
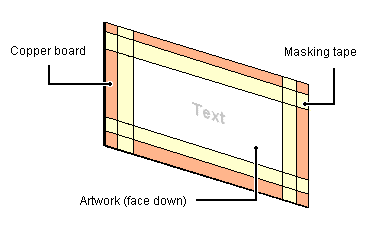
Now is the time to stick the photo-quality artwork face down to the copper side of the board. You'll notice how the reverse-printed text appearing through the paper now has the correct orientation. Looking at the above pictorial you can see that the artwork has been taped to the copper-clad board with masking tape. I usually trim my boards to leave an edge of 3mm - 5mm on each side.
Using your household clothes iron on a hot setting, run the heat over the whole paper surface. Take your time doing this - there's no need to rush things. After a few minutes you'll see the artwork starting to show through the paper. This is about when the board is ready for the next process...
While waiting for the board to cool, fill a sink or bowl with hot water. Do NOT be tempted to lift the masking tape or paper at this stage! When cool, place the board in the hot water and leave.
Check every five minutes that all is OK. After about twenty minutes you may notice that the paper will start to disintegrate. Now is the time to remove it from the water and dry with a paper towel. Carefully peel away the masking tape and remove the gloss paper. Presto! - Your masterpiece is transfered to the copper board!
Now we move on to the next stage:- Etching Your PCB's...
Best Regards... Pete
http://www.keirle.fsnet.co.uk