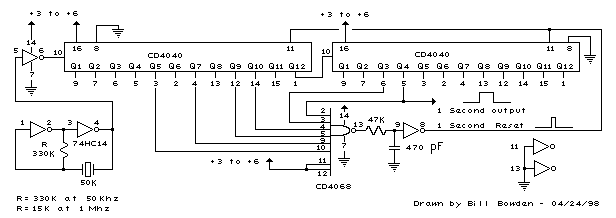
1 Second Time Base From Crystal Oscillator
The schematic below illustrates dividing a crystal oscillator signal by the crystal frequency to obtain an accurate (0.01%) 1 second time base. Two cascaded 12 stage counters (CD4040) form a 24 stage binary counter and the appropriate bits are gated together to produce the desired division. Using a crystal of some even multiple of 2 is desirable so that one stage of the counter automatically toggles every second which eliminates the need for the NAND gate and reset circuitry, however the circuit below illustrates using a crystal which is not an even multiple of 2 and so requires additional components.
Using a 50 Khz crystal, a count of 50000 is detected when the appropriate counter bits that add up to 50000 are all high. This corresponds to bits 15 (32768) + 14 (16384) + 9 (512) + 8 (256) + 6 (64) + 4 (16). Bits 14 and 15 are the 3rd and 4th stages of the second counter, bit 0 is the first stage of the first counter (Q1, pin 9). To use a 100 Khz crystal, each bit would be moved one to the right so the total would be (65536 + 32768 + 1024 + 512 + 128 + 32 = 100,000). Using a 1 Mhz crystal, the following bits would be needed:
Bit 19 - Right counter - Q8 - pin 13  -  Decimal value = 524288
    18                    7        4                     262144
    17                    6        2                     131072
    16                    5        3                      65536
    14                    3        6                      16384
     9 - Left counter  - 10       14                        512
     6                    7        4                         64
                                                       ---------
                                                       1,000,000
At 1 Mhz, the 330K resistor in the oscillator circuit will need to be
reduced proportionally to about 15K.
When the terminal count is reached, a 7 uS reset pulse is generated by
the Schmitt Trigger inverter stage that follows the NAND gate. The 47K
resistor and 470 picofarad capacitor sustain the output so that the
counters are reliably reset to zero. This is less than one clock cycle
at 50Khz and does not introduce an error but would amount to 7 cycles at
1 MHz which would cause the counters to lose 7 microseconds of time
per second. It's not much of an error (7 parts in a million)
but it would be there. The minimum reset pulse width for the 4040 CMOS
counters is about 1.5 uS, so the reset pulse cannot be made much shorter.
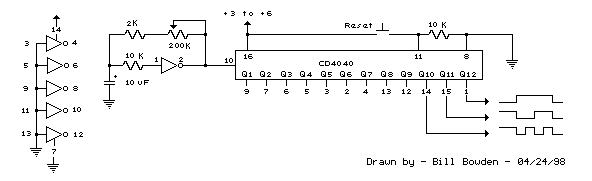
Generating Long Time Delays
Generating long delays of several hours can be accomplished by using a low frequency oscillator and a binary counter as shown below. A single Schmitt Trigger inverter stage (1/6 of 74HC14) is used as a squarewave oscillator to produce a low frequency of about 0.5 Hertz. The 10K resistor in series with the input (pin 1) reduces the capacitor discharge current through the inverter input internal protection diodes if the circuit is suddenly disconnected from the supply. This resistor may not be needed but is a good idea to use.
The frequency is divided by two at each successive stage
of the 12 stage binary counter (CD4040) which yields about 1 hour
of time before the final stage (Q12) switches to a high state.
Longer or shorter times can be obtained by adjusting the oscillator
frequency or using different RC values. Each successive stage changes state
when the preceding stage switches to a low state (0 volts), thus the
frequency at each stage is one half the frequency of the stage before.
Waveform diagrams are shown for the last 3 stages. To begin the delay
cycle, the counter can be reset to zero by momentarily connecting the
reset line (pin 11) to the positive supply. Timing accuracy will not be
as good as with a crystal oscillator and may only be around 1 or
2% depending on the stability of the oscillator capacitor.
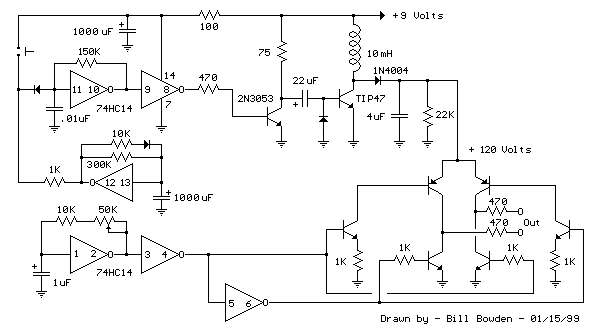
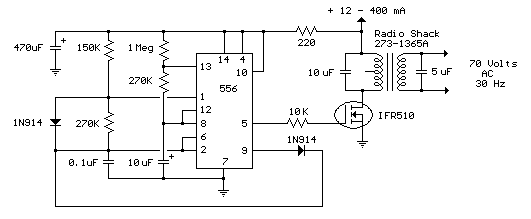
Telephone Ring Generator Using Switching Supply
The two 470 ohm resistors connected to the output serve to limit the current in case the output is shorted. I never tried shorting the output to see how effective the resistors are, but I did lose a couple transistors and then decided to add the resistors. They should limit the surge to around 120 mA which should be low enough to prevent damage. The circuit draws around 250 mA when the ring signal is present so if you want to operate it from batteries, six 'D' type alkaline cells are recommended. It probably won't work with a small 9 volt battery.
Telephone Ring Generator Using Small Power Transformer
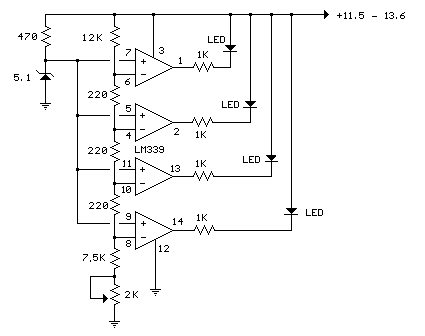
LED 12 Volt Lead Acid Battery Meter
In the circuit below, a quad voltage comparator (LM339) is used as a simple bar graph meter to indicate the charge condition of a 12 volt, lead acid battery. A 5 volt reference voltage is connected to each of the (+) inputs of the four comparators and the (-) inputs are connected to successive points along a voltage divider. The LEDs will illuminate when the voltage at the negative (-) input exceeds the reference voltage. Calibration can be done by adjusting the 2K potentiometer so that all four LEDs illuminate when the battery voltage is 12.7 volts, indicating full charge with no load on the battery. At 11.7 volts, the LEDs should be off indicating a dead battery. Each LED represents an approximate 25% change in charge condition or 300 millivolts, so that 3 LEDs indicate 75%, 2 LEDs indicate 50%, etc. The actual voltages will depend on temperature conditions and battery type, wet cell, gel cell etc. Additional information on battery maintenance can be found at:
Deep Cycle Battery FAQ
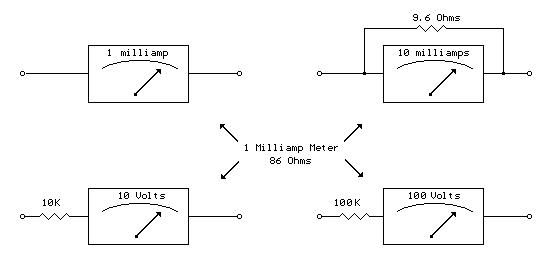
Analog Milliamp Meter Used as Voltmeter
A milliamp meter can be used as a volt meter by adding a series resistance. The resistance needed is the full scale voltage reading divided by the full scale current of the meter movement. So, if you have a 1 milliamp meter and you want to read 0-10 volts you will need a total resistance of 10/.001 = 10K ohms. The meter movement itself will have a small resistance which will be part of the total 10K resistance, but it is usually low enough to ignore. The meter in the example below has a resistance of 86 ohms so the true resistor value needed would be 10K-86 or 9914 ohms. But using a 10K standard value will be within 1% so we can ignore the 86 ohms. For a full scale reading of 1 volt, the meter resistnace would be more significant since it would be about 8% of the total 1K needed, so you would probably want to use a 914 ohm resistor, or 910 standard value. The milliamp meter can also be used to measure higher currents by adding a parallel resistance. The meter resistance now becomes very significant since to increase the range by a factor of ten, we need to bypass 9/10 of the total current with the parallel resistor. So, to convert the 1 milliamp meter to a 10 milliamp meter, we will need a parallel resistor of 86/9 = 9.56 ohms.