PURPOSE
This device is designed as a precision hi/lo temperature
limit switch for environmental and reliability test chambers.
Whenever the measured temperature strays above or below a preset
"normal" range, a "high" or "low"
relay contact switches to the "off" state to
disable either the heating system or the cooling system. Visual
LIMIT indications and an audible warning signal are provided,
and the output is held off until manually reset by the user (automatic
reset is a user-selected option).
An "auxiliary" contact is also provided.
This third contact may be slaved to the "high" and
"low" outputs (switching off when either limit is exceeded)
to control power to live loads, or it may be configured to pulse
remote alarm devices.
DESCRIPTION
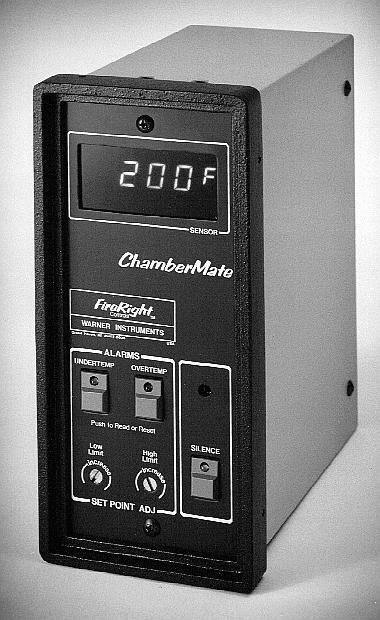
This device is packaged as a single, panel-mounted
component, consisting of printed circuit assemblies housed in
a painted and anodized aluminum case. Front panel controls and
indicators include :
The controller is designed for use with ISA type
T (coppgr vs constantan) thermocouples, with a measuring range
of -125F to +375F. Electronic cold junction compensation is provided,
and the input is unaffected by sensor leadwire resistance. In
the event of an open sensor circuit, the controller will produce
a blank display, and a flashing SENSOR warning. A special failsafe
circuit also disables both the heating and cooling outputs, assuring
that both systems will remain inoperative until protection is
restored. The indicating accuracy of the controller is .25%.
The switching accuracy is mainly a function of its setability;
about 1%.
The outputs of the controller consist of three mechanical
1P2T relay contacts, rated 10-amps at 250vac maximum. These relays
are energized during all periods of normal operation, and drop
out whenever a limit is exceeded, or when power is removed from
the equipment.
Input power requirements are 3.5VA max at 110/120vac
or 208/240vac, 50/60 Hz. All connections are made at terminal
blocks on the back of the unit.
Install the controller at a location which is convenient
to system wiring, reasonably free of vibration and temperature
extremes, and accessible to equipment operators. The controller
is normally panel-mounted in a 3-11/16" x 8-3/16" cutout,
using special mounting clamps (p/n 352052). As shown on Drawing
No. 470684, the controller normally protrudes 7-3/16" behind
the face of the mounting panel.
Connect an ISA type T thermocouple to the SENSOR
terminal block in the upper right-hand corner of the controller,
observing the RED (-) and BLU (+) color code. Use only type "XT"
(copper vs constantan) thermocouple extension wire between the
sensor and this terminal block. The controller is not affected
by leadwire resistances less than 1000-ohms.
Connect the input power to the terminal block in
the lower right-hand corner, as follows:
An indicator LED is provided on the back of the unit
adjacent to each output relay. These lights will be on whenever
their associated relay is energized. The relays are energized
during all periods of normal operation (exception for K3 noted
below), opening when limits are exceeded, or when power is removed
from the unit. Whenever these relays are energized, their normally
open contact set will connect COM to NORM at their associated
terminal block.
The output connections are marked HIGH/COM/NORM,
LOW/COM/NORM and ALARM/COM/NORM. During normal operation, COM
will be connected to NORM. When a high or low limit is exceeded,
COM switches to HIGH or LOW, as the case may be. Control power
for the heating and cooling systems will therefore normally be
wired through the COM and NORM terminals.
The operation of the auxiliary "ALARM"
contact varies with the mode selected. In the slaved mode, COM
will be connected to NORM until either limit is tripped, at which
time COM switches to ALARM. Control power to live loads will
therefore normally be wired through the COM and NORM terminals.
In the alarm mode, this relay is normally off (COM to ALARM),
and is pulsed on (COM to NORM) and off whenever a limit has been
exceeded and the SILENCE button on the front of the unit has not
been pressed (problem having not been attended to). Power to
remote alarm devices will therefore also normally be wired through
the COM and NORM terminals.
SELECTION OF OPTIONAL OPERATING MODES
Jumpers on the back of the unit permit the user to
configure the operating mode of the unit. Two of these jumpers
provide for the selection of either manual or automatic reset
operation on the "High" and "Low" limit channels.
If the controller is used in the manual reset mode, it will normally
start-up in the "tripped" condition. A third jumper
therefore provides for the selection of automatic reset on power-up,
when desired. If the alarms should trip on power failures, but
not in connection with routine on-off switching, connect the instrument
to the main power buss, just ahead to the equipment's on/off switch,
and set the third jumper at the "normal" position.)
The third "Auxiliary" contact may be slaved
to the "High Limit" and "Low Limit" outputs,
switching off when either limit is tripped. Or the "Aux"
output may be set to pulse on and off when either limit is tripped,
to operate remote alarm devices. Set the "AUX" jumper
to provide the desired alternative.
Finally, a fifth jumper provides for the selection
of either the Celsius or Fahrenheit indicator temperature range.
These jumpers and the above options are also illustrated
on Dwg No 470684. As shipped from the factory, these jumpers
are set to provide manual reset, manual power-up reset, alarm
operation of the auxiliary contact, and Fahrenheit temperature
indications.
OPERATION
The limit temperatures can be set by pressing either
the HIGH LIMIT or LOW LIMIT reset button, then turning the respective
set point adjustment as necessary to provide the desired indication.
When power is first applied, the controller will
start-up in the "LIMIT" mode. Its red HIGH LIMIT and
green LOW LIMIT indicators will flash on and off, and the audible
alarm will sound. To start the equipment, press both RESET buttons.
If the measured temperature is within the set limits, the indicators
and audible alarm will be switched off, and the outputs will be
enabled (units set for automatic reset will start up automatically).
If desired, automatic power-up reset operation may
be selected via a jumper on the back of the unit. When this feature
is used, the limit indicators will flash on momentarily when power
is first applied, and will then automatically assume the normal
reset condition.
During all periods of normal operation, the alarm
indicators and the audible warning device will remain off, and
the system will be enabled by the controller's output contacts.
If the measured temperature ever exceeds a limit setting, the
controller will immediately switch to the LIMIT mode. The flashing
red or green indicator will then be enabled, the audible warning
will sound, and the associated output will be disabled. When
the temperature has returned to an acceptable level, press the
lighted reset button to return to normal operation. In the meantime,
the audible warning signal (and remote alarm devices, if used)
can be turned off by pressing the SILENCE button.
Independent automatic reset operation is available
for both the HIGH and LOW channels, via jumpers on the back of
the unit. When used, the alarms will return to the normal status
as soon as the measured temperature returns to within limits.
Note that the selection of automatic reset inherently provides
power-up reset for that channel. It is not possible to set the
jumpers to provide automatic reset on both limit channels, with
manual reset on power-up.
CIRCUIT ANALYSIS
Please refer to schematic diagram, Drawing No 470665.
Excerpts from that diagram are provided in the following text. The
full diagram is available for download
(499KB) as two overlapping diagrams which may be printed on 8.5" x 11"
paper using ordinary printers and commonly available graphics shareware
such as LViewPro or Graphics Workshop.
You may also view the full schematic diagram immediately by
opening its left half (231KB) and
its right half (243KB) in your browser
windows. Most browsers will add these files to their cache, and you should
then be able to retrieve them from that folder and save them for future
reference, if desired.
Layout diagrams for each printed circuit board are provided
in the Parts List section, which appears below.
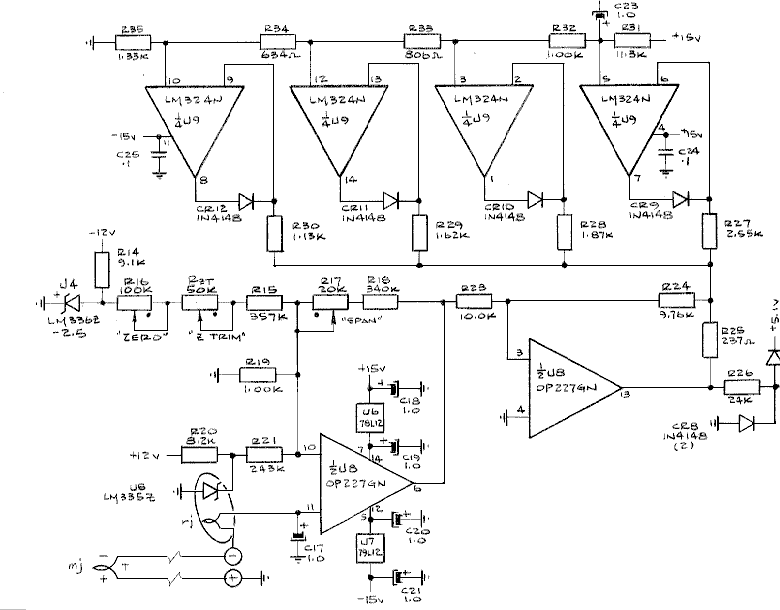
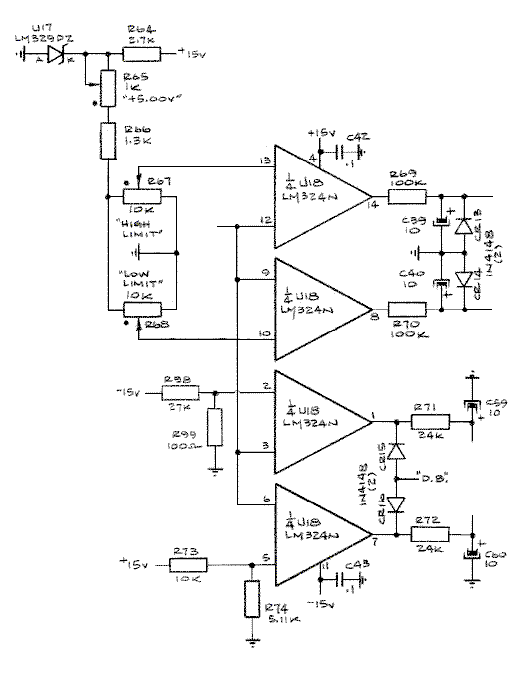
The controller's temperature measuring circuit, the
first half of U8 and its associated circuitry, converts the low
level thermocouple input to a scaled and compensated high level
analog voltage. The sensor, "mj" (measuring junction)
is connected to U8-11, the input of this amplifier. C17 provides
low pass filtering for this input. Standard units are designed
to measure temperatures over the range of -125F to +375F, using
a type T (copper vs constantan) thermocouple. Over this temperature
range, this sensor produces emf's ranging from -3.006mV to +8.787mV.
This input is amplified and scaled to provide a 0v to -5.0v analog
output at U8-6. To achieve this, the gain of the amplifier is
set by R17, R18 and R19 at 424.
This non-inverting amplifier will always settle at
the point where the potential at its inverting input, U8-10, is
exactly equal to its input, U8-11. This condition is established
by a feedback current, passed from the output, U8-6, through R18
and R17 to the amplifier's inverting input. For a given input,
the magnitude of the feedback current required to establish this
balance is a function of R19. Having established that, the magnitude
of the amplifier's output voltage then becomes a function of the
feedback resistors, R17 and R18. The resistor values used permit
the gain to be set exactly at 423.98, with a calibration range
of about 2% to accommodate all tolerances.
Thermocouple circuits necessarily involve a second
junction, sometimes called the "reference junction".
This junction, shown as "rj" on the schematic, has
the same "emf vs temperature" characteristic as the
sensor. It occurs in series with the sensor's emf, with the opposite
polarity. The emf produced by the "rj" junction is
algebraically summed with the sensor emf, so any variation of
the ambient temperature directly affects the measurement.
U5, R20 and R21 provide reference junction compensation,
which minimizes errors due to variations in ambient temperature.
U5, which is located at the (-) end of the SENSOR terminal block,
is an integrated circuit temperature sensor, which produces an
output proportional to its absolute temperature. This output
varies 10mV/C, and is scaled by R21 to produce a feedback current
through R17 and R18 which will be approximately equal and opposite
to that being caused by the influence of the reference junction
emf. At room temperature, the emf produced at rj varies about
40.7uV/C which, in turn, produces a feedback current of about
40.7nA through R21. A 1C ambient temperature change will also
result in a 10mV variation at U5. This will produce a -41nA change
in the total feedback current, which approximately cancels out
the shift produced by rj.
U4, R14, R15 Rzt and R16 provide a means
of shifting the amplifier's output to zero with a -125F input
at "mj". U4 is a precision voltage reference integrated
circuit, which provides a stable +6.9v at its junction with R14
and R15. At -125F, the mj input will be -3.006mV. Assuming a
25C ambient temperature, the emf produced by rj will be about
+0.992mV, so the net input will be about +3.998mV, producing an
offset of about +1.7 volts at U8-6.
Meanwhile, the voltage at the U5, R20 node varies
with absolute temperature by 10mV/K, and will therefore be about
+2.98v (0C = 273K). This produces a compensator-related offset
at U8-6 of about -5.2 volts.
U8 is a precision op amp, with negligible offsets,
so the total value of the offsets is therefore about -3.5 volts.
To shift the output level back to zero, R16 is adjusted so that
the zero network injects a current into the feedback node which
is about equal and opposite to that caused by the total offsets;
about -3.5v/422.98K = -8.3uA. Rzt is a "zero
trim" adjustment, and is located on the back of the unit
next to the sensor input terminals.
Linearizer Circuit
The "emf vs temperature" response
of the thermocouple temperature sensor is highly nonlinear, varying
from 16.6uV/F at -125F to 29.2uV/F at +375F. To provide a highly
accurate digital temperature read-out, U8 and U9 convert the nonlinear
0/-5.00v measuring circuit output (U8-6) to a linear analog at
U8-13. The linear analog has a range of 0/+5.00v (slope = 10mV/F).
A "piecewise" linearizing strategy is used,
which breaks down the output at U8-6 into five segments. The
apparent gain of the inverting buffer, U8's second half, is readjusted
as necessary to produce a linear 10mV/deg slope within each segment.
For example, the non-inverting input at U9-5 is held at +3.752
volts by the voltage divider R31 - R35. With the R24/R25 node
at any higher level, U9-7, and all the other outputs of U9, will
be at the negative saturation limit. Because of the diodes CR9
thru CR12, U9 makes no contribution to the output under these
circumstances.
As the temperature decreases, the R24/R25 node drops
below the +3.752 volt threshold (U8-13 = +3.843v), U9-7 swings
to +3.752 volts plus the diode drop, acting like a dc buffer which
holds U9-6 at +3.752 volts as the voltage at U8-13 continues to
decrease. This produces a small current in R27. Since the other
three linearizer stages are still off, this current is provided
from the output U8-13, through R25. In order to provide this
additional current, U8-13 drops to a slightly less positive level
than would otherwise be required to satisfy the normal R23 feedback
requirement.
As the temperature continues to fall, the voltage
at the R24/R25 node decreases. This increases the linearizer
current, which increases the resulting offset factor in the U8-13
output. When the R24/R25 node falls to +2.757 volts, the next
linearizer stage is enabled, increasing the rate of curve correction.
By increasing the slope-compensating action as the measured temperature
decreases, the linearizer converts the sensor's "curve"
to a constant 10mV/F slope.
Without linearization, measuring errors as large
as 33.3F could result. The theoretical maximum error of this
linearization scheme is -1.7F occurring at -76F.
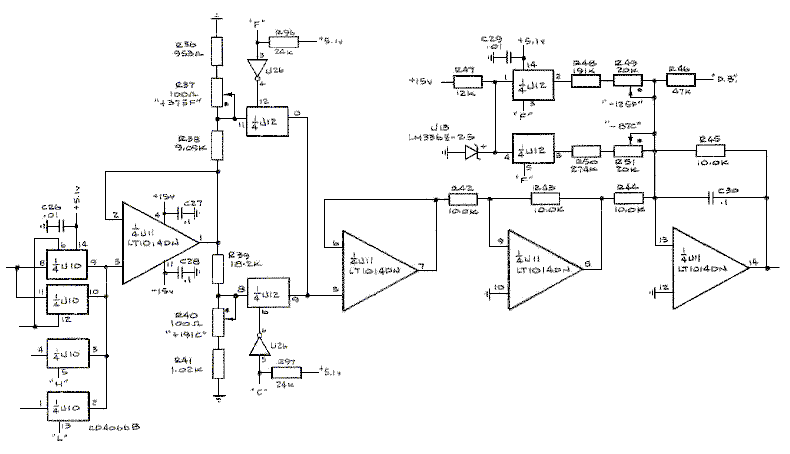
The indicator A/D converter is basically a digital
millivolt meter. The 0/+5.00v output provided at U8-13, and the
limit set point analog voltages from R67 and R68, must therefore
be converted to -125mV/+375mV to provide a "-125F" to
"+375F" display. The scaling circuit also converts
these analog voltages to equivalent "C" values.
Analog switch U10 multiplexes the analogs into buffer
input U11-3. The output of this buffer is connected to two voltage
dividers. The R36 - R38 divider converts the 5-volt analog to
a 0/500mV analog, representing the 500F span. The R39 - R41 divider
converts the 5-volt analog to a 0/278mV analog, representing
the equivalent 278C span. Either the "F" or the "C"
analog is selected by U12, is buffered, then applied to R42, an
input to a unity gain inverter. The inverted output, U11-8, is
then applied to R44, one input of a unity gain summing circuit.
At this circuit, the analog is summed with an offsetting
voltage selected by two additional sections of U12. In the "F"
display mode, R48 and R49 injects +12.5uA into the feedback node,
which shifts the output at U11-14 in the negative direction by
exactly 125mV. This provides a "-125" read-out when
the measuring circuit analog is at zero volts. In the "C"
display mode, an offsetting current of +8.72uA is provided by
R50 and R51, to provide -87.2mV at U11-14 (-125F = -87.2C).
The "display blank" input to R46 is taken
from the CR15/CR16 junction at U18, and is normally open since
the diodes are normally reverse biased. Certain sensor faults
cause U18 to forward bias one of these diodes, imposing a -13.3v
potential on R46. This forces U11-14 to at least +2.5v, which
activates the over-range function of the A/D converter, producing
a blank display.
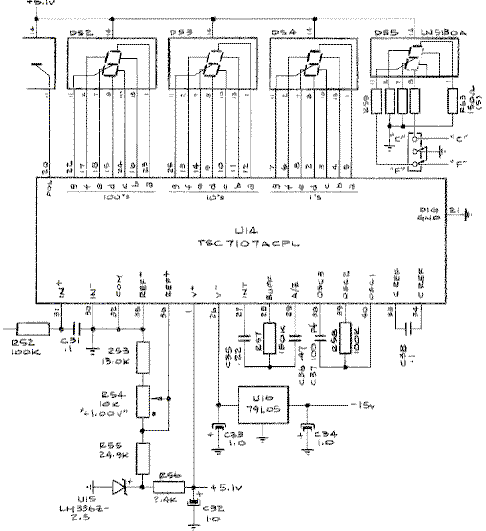
The scaled and level-shifted analog voltage at U11-14
is applied to the input of DVM circuit, U14, through low pass
filter R52 and C31. U14 is a dual-slope 3-1/2 digit A/D converter
which provides 7-segment outputs to operate the digital display
system. The most significant digit is not used in this application,
and zero-blanking is not provided.
U14 does the A/D conversion in three phases. First,
the converter is internally zeroed. Next, the input voltage is
applied to an integrator, the output of which increases from zero
at a linear rate until stopped at the end of this precisely timed
period. Since the integrator's output slope is a function of
its input voltage, its output at the end of this (integrate) phase
is directly proportional to the input voltage. In the third and
final (de-integrate) phase, the precision +1.000v reference voltage
is applied to the integrator to drive its output back to zero
at a known rate, while a counter system measures the time required
to do so. The resulting count is therefore proportional to the
magnitude of the input voltage, and is converted from binary to
7-segment code for display purposes.
Peripheral circuitry includes U15, which provides
a +1.000v reference voltage, and U16, which provides a -5v supply
for the DVM chip. The DVM chip handles all other necessary
functions internally. A jumper on the back of the
unit permits the selection of either a"F" or "C"
character for display purposes. Two gates of U26 buffer the choice
to analog switch U12 in the scaling circuitry.
Display Mode Selector Circuitry
The digital display system is used to read-out the
high and low limit set points as well as the measured temperature
value, and can display all values in either F or C. The display
mode is selected by the circuitry composed of U26 and U27.
When the high limit reset button is pressed, U26-8
goes high and enables U10-3 to connect the high limit analog to
the scaling circuit at U11-3. At the same time, U27-11 is forced
low, which disconnects the measuring circuit analog from U11-3.
The low limit setting is selected in a similar manner. The circuit
is rather straightforward, and tracing the logic is left as an
exercise for the reader.
U18 provides a system of comparators which monitors
the measured temperature with respect to high and low limit settings,
and for "reasonableness". U17 provides a precision
+6.9v reference for the limit set points, R67 and R68. These
set point outputs provide one input to their respective comparator
circuits, while the 0/+5.00v temperature analog voltage is connected
to the other inputs. When the analog voltage is less than the
high limit set point, and greater than the low limit set point,
both U18-14 and U18-8 will be low. U19-3 and U19-4 will therefore
be high.
Furthermore, when the analog voltage is greater than
-50mV, but less than +5.07v, failsafe detector outputs U18-1 and
U18-7 will both be high, and U19-10 will therefore be low.
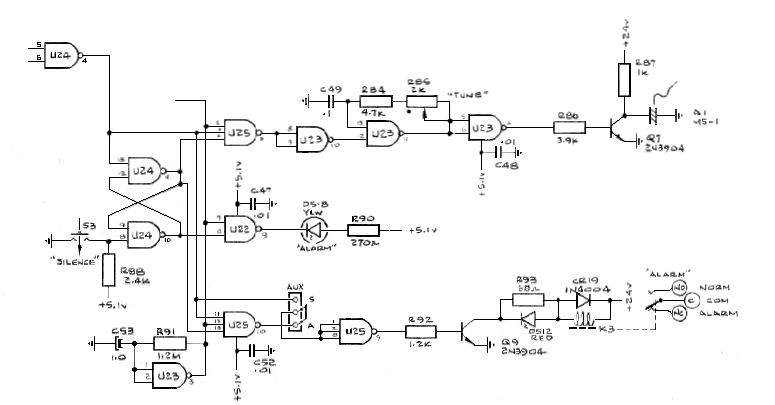
Pressing both reset buttons, S1 and S2, forces U20-3
and U20-4 high. With all three inputs high, U21-6 and U21-9 go
low. This disables both the high limit and low limit indicators,
enables the output transistors, Q2 and Q4,and latches U20-3 and
U20-4 at the high level. With both of its inputs high, U24-4
will be low, which turns off Q7 and DS-8 and turns on Q9 (in the
"slave" mode). This is the normal operating status.
If the measured temperature strays outside of the
set range, either the high limit or low limit will be tripped,
and the above status for that limit will be reversed; the indicator
will be on and output transistor off. The indicators are gated
by a flasher signal provided from U23-3.
When neither limit is tripped, U24-4 will be low.
U23-4 and U22-8 will therefore both be low, holding both the
audible warning device (beeper) and the "SILENCED" indicator
off. When either one(or both) of the limits are tripped, U24-4
goes high. This enables the audible warning device, but not the
"SILENCED" indicator. Pressing S3 forces U24-10 high.
U24-11 then goes low, which latches the beeper off, and the "SILENCED"
indicator on. Both the beeper and the "SILENCED" indicator
are also modulated by the flasher signal.
At power-on, U18-7 is initially held low as C41 begins
to charge. This trips both limits and toggles the sensor fault
indicator. A momentary loss of power will therefore trip both
limits. An open sensor connection will cause the measuring circuit
to provide abnormal analog voltage levels and toggle either U18-1
or U18-7. A flashing "SENSOR" warning signal via U22-6,
and both limits will also be tripped. U24-3, Q5 and Q6 comprise
a power-up reset timer.
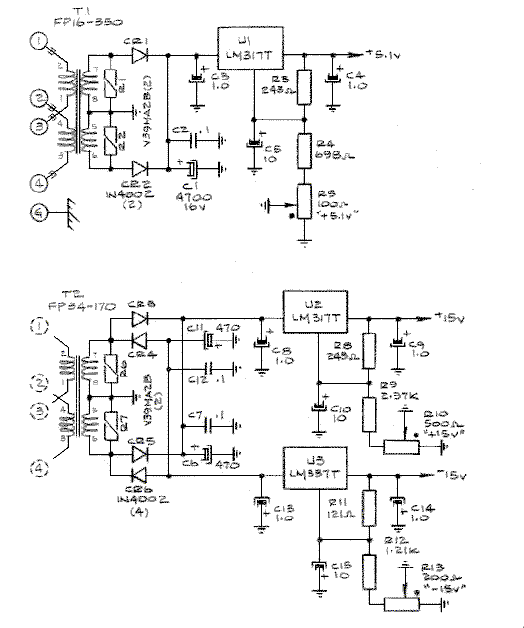
Power for the controller can be taken from either
110/120vac or 208/240vac, 50/60 Hz lines. The controller circuitry
uses +15v, -15v and +5.1v dc voltages. The +/-15v levels are
provided by T2 and its associated bilateral full-wave rectifier
circuit. Regulators U2 and U3 stabilize these supply voltages
at the required +15v and -15v levels. A separate +5.1v supply
is provided for the controller's logic and display circuitry by
T1 and regulator U1. All three of these supplies are adjustable,
and are set precisely at the 15v and 5.1v levels. The 15v potentials
are re-stabilized at +/-12v for use at the low level measuring
circuit, U8.
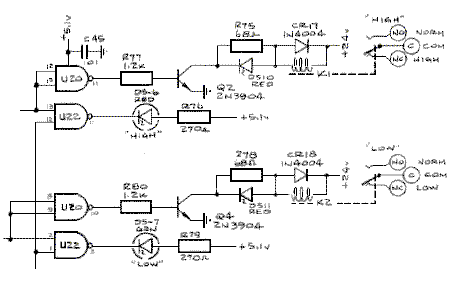
Separate 1P2T contacts capable of switching
10-amps ant 250vac are provided for each of the three outputs.
A LED indicator is provided near, and operates with, each relay.
The relays are de-energized by abnormal operating conditions
(COM to HIGH or COM to LOW and COM to ALARM).
CALIBRATION PROCEDURE
Please refer to analog circuit board layout
Drawing No. 470668 and perform the following adjustments.
1. Connect a digital voltmeter between the right-hand
pin of U3, and ground ([-] side of C13, C14 or C15). Adjust the
"-15v" trimmer, R13, for an indication of exactly -15.0v.
2. Connect the DVM (+) lead to the center pin of
U2. Adjust the "+15v" trimmer, R10, to provide an indication
of exactly +15.0v
3. Connect the (+) lead to U12-14. Adjust the "+5.1v"
trimmer on the bottom board (accessible through the hole in the
top board) to provide an indication of exactly +5.1v
4. Trip the limits to provide an audible warning.
Adjust the "tone" trimmer, R85 on the bottom board
(accessible through the hole in the top board) to find the peak
audible output.
5. Connect the (+) lead to the wire loop by the
trimmer on the DVM board. Adjust "Vref" trimmer, R54,
to provide an indication of exactly +1.000v (see Dwg No 470671,
page 24).
6. Turn the low limit all the way counterclockwise,
and the high limit fully clockwise. Connect the DVM (+) lead to
U11-1. Select the LOW LIMIT display mode. Adjust the "-125F"
trimmer, R49, for a read-out of exactly -125F, and the "-87C"
trimmer, R51, for an indication of exactly -87C.
7. Select the HIGH LIMIT display mode, then adjust
the "SP Span" trimmer, R65, to provide a DVM indication
of exactly +5.00v.
8. With the HIGH LIMIT still selected, adjust the
"F Span" trimmer, R37, to provide a display indication
of exactly 375F, then adjust the "C Span" trimmer, R40
to display 191C.
9. Disconnect the sensor, and connect a compensated
portable potentiometer or precision mV source to the input terminals
of the controller. Set the input at "-125F" or -3.006mV.
With the DVM still connected between U11-1, and ground, center
the Rzt adjustment and adjust the "Zero" trimmer, R16,
to provide a DVM indication of exactly 0.00v.
10. Set the input at "+375F" or +8.787mV,
and adjust the "Span" trimmer, R17, to provide an indication
of exactly +5.00v. Large span adjustments will effect the
zero adjustment somewhat; therefore repeat Steps 9 and 10 if a
large span adjustment was required.
11. Check the limit accuracy, and the operation
of the associated lights and relay contacts. Set the input at
about "+300F", and slowly reduce the HIGH LIMIT setting.
When the displayed setting falls just below "300",
the high limit alarm should trip. Press the SILENCE button and
observe that the audible warning is canceled. Reset the high
limit, and check the LOW LIMIT in a similar manner.
REPLACEMENT PARTS LIST
This section of the handbook includes
parts lists for each major assembly and repairable subassembly.
This lists are arranged by part number, as indicated in the table
of contents. Each list includes a component layout drawing, which
physically located most items.
Every item used in an assembly is identified
in its parts list. The various parts are listed by part number.
The six-digit part numbering system has a logical order, which
is summarized as follows:
Since the manufacturer's name and part
number are often printed on purchased parts, this information
is included in the parts lists to help you properly identify the
item in question. Purchased parts are often provided by alternate
sources however, so this information should be taken as representative,
rather than absolute.
Part Number: 012019
"ChamberMate" BI-DIRECTIONAL
TEMPERATURE LIMIT CONTROLLER
Part Number: 048062
"ChamberMate" ANALOG PCB ASSY
Part Number: 048063
"ChamberMate" DIGITAL PCB ASSY
Part Number: 048064
"ChamberMate" CONTROL PCB ASSY
Part Number: 048065
"ChamberMate" DVM PCB ASSY
Part Number: 048066
"ChamberMate" RELAY OUTPUT PCB ASSY
DESCRIPTION
INSTALLATION & WIRING
SELECTION OF OPTIONAL OPERATING MODES
OPERATION
Linearizer Circuit
Scaling Circuit
DVM Circuit
Display Mode Selector Circuitry
Alarm Circuitry
Power Supply Circuits
Output Circuits
Analog PCB Assy
Digital PCB Assy
Control PCB Assy
DVM PCB ASSY
Relay Output PCB Assy

INSTALLATION & WIRING
Com to terminals 3 & 4
Ground to terminal 5
("GND")
jumper to terminals 2 & 3
L2 to terminal 4
Ground to terminal 5
("GND")
Measuring Circuit
Scaling Circuit
DVM Circuit
Alarm Circuitry

Power Supply Circuits
Output Circuitry
Major Assemblies & Subassemblies Electronic Component Parts Electromechanical Parts Optical Parts, Sensors Wiring & Wiring Hardware Printed Circuit Boards Electrical Parts & Hardware Mechanical Hardware Fluidic (Pneumatic) Parts & Hardware Mechanical & Structural Parts Drawings, Publications & Literature
Drawing Number: 470665
PART #
DESCRIPTION
MFGR
MFGR'S NO
QTY
UM 048062
ANALOG PCB ASSY, TLC-II
WRNR
048062/470668
048063
DIGITAL PCB ASSY, TLC-II
WRNR
048063/470669
048064
CONTROL PCB ASSY, TLC-II
WRNR
048064/470670
048065
DVM PCB ASSY, TLC-II
WRNR
048065/470671
048066
RELAY PCB ASSY, TLC-II
WRNR
048066/470672
142003
FILTER, RED DISPLAY 1.5"x3.0"
WRNR
142003
251018
INSULATOR, TLC-II
WRNR
251018/470683
266002
STICK MOUNT, GREEN
MEIJ
`
271026
SCREW, BDR HD 6-32x.250
271028
SCREW, BDR HD 6-32x.500
271136
SCREW, FIL HD 10-32x1.00
271259
SCREW, TRUS HD 6-32x.250 BLK
272038
WASHER, NYLON PLAIN #4 REG
KEYS
3358
272041
WASHER, NYLON PLAIN #6
KEYS
3163
279001
STANDOFF, SWAGE 6-32x.250
RAF
3047-B-632-B
279004
STUD, CAPTIVE 4-40x.250
CFC
CH-440-10-C
279007
CAP NUT, 10-32
CFC
CF74-1032
279009
THREADED INSERT, 6-32x.063 SS
CFC
CLF-632-1
279022
SPACER, M-F TYPE 6-32x1.25
EFJ
J217
279024
SPACER, M-F TYPE 6-32x.375
SMTH
8249
279026
SPACER, MM-F TYPE 6-32x.250
KEYS
8717
351030
BEZEL, FRT
WRNR
351030/470698
351042
CHASSIS, TLC-II
WRNR
351042/470694
352052
MOUNTING CLAMP
WRNR
352052/470602
352056
COVER PLATE, INTERNAL
WRNR
352056/470694
353026
COVER, FRT
WRNR
353026/470695
Drawing Number: 470668
PART #
DESCRIPTION
MFGR
MFGR'S NO
QTY
UM 051049
RESISTOR, CFLM 1/4W 5%
100
DIGI
100Q
051076
RESISTOR, CFLM 1/4W 5%
1.3K
MOUS
29SJ250-1.3K
051083
RESISTOR, CFLM 1/4W 5%
2 7K
MOUS
29SJ250-2.7K
051095
RESISTOR, CFLM 1/4W 5%
8.2K
MOUS
29SJ250-8.2K
051096
RESISTOR, CFLM 1/4W 5%
9.1K
MOUS
29SJ250-9.1K
051099
RESISTOR, CFLM 1/4W 5%
12K
MOUS
29SJ250-12K
051106
RESISTOR, CFLM 1/4W 5%
24K
MOUS
29SJ250-24K
051107
RESISTOR, CFLM 1/4W 5%
27K
DIGI
27KQ
051113
RESISTOR, CFLM 1/4W 5%
47K
MOUS
29SJ250-47K
051121
RESISTOR, CFLM 1/4W 5%
100K
MOUS
29SJ250-100K
052209
RESISTOR, MFLM 1/4W 1%
121
NIC
121X
052237
RESISTOR, MFLM 1/4W 1%
237
NIC
237X
052238
RESISTOR, MFLM 1/4W 1%
243
NIC
243X
052278
RESISTOR, MFLM 1/4W 1%
634
NIC
634X
052288
RESISTOR, MFLM 1/4W 1%
806
NIC
806X
052295
RESISTOR, MFLM 1/4W 1%
953
NIC
953X
052301
RESISTOR, MFLM 1/4W 1%
1.00K
NIC
1.00KX
052302
RESISTOR, MFLM 1/4W 1%
1.02K
NIC
102KX
052306
RESISTOR, MFLM 1/4W 1%
1.13K
NIC
1.13KX
052309
RESISTOR, MFLM 1/4W 1%
1.21K
NIC
1.21KX
052313
RESISTOR, MFLM 1/4W 1%
1.33K
NIC
1.33KX
052321
RESISTOR, MFLM 1/4W 1%
1.62K
NIC
1.62KX
052327
RESISTOR, MFLM 1/4W 1%
1.87K
NIC
1.87KX
052337
RESISTOR, MFLM 1/4W 1%
2.37K
NIC
2.37KX
052340
RESISTOR, MFLM 1/4W 1%
2.55K
NIC
2.55KX
052369
RESISTOR, MFLM 1/4W 1%
5.11K
NIC
5.11KX
052393
RESISTOR, MFLM 1/4W 1%
9.09K
IC
9.09KX
052396
RESISTOR, MFLM 1/4W 1%
9.76K
NIC
9.76KX
052401
RESISTOR, MFLM 1/4W 1%
10.0K
NIC
10.0KX
052406
RESISTOR, MFLM 1/4W 1%
11.3K
NIC
11.3KX
052426
RESISTOR, MFLM 1/4W 1%
18.2K
NIC
18.2KX
052528
RESISTOR, MFLM 1/4W 1%
191K
NIC
191KX
052538
RESISTOR, MFLM 1/4W 1%
243K
NIC
243KX
052543
RESISTOR, MFLM 1/4W 1%
274K
NIC
274KX
052552
RESISTOR, MFLM 1/4W 1%
340K
NIC
340KX
052554
RESISTOR, MFLM 1/4W 1%
357K
NIC
357KX
054004
POTENTIOMETER, TRIM 1T-3/8
100
PANA
0FA12
054005
POTENTIOMETER, TRIM 1T-3/8
200
PANA
0FA22
054006
POTENTIOMETER, TRIM 1T-3/8
500
PANA
0FA52
054007
POTENTIOMETER, TRIM 1T-3/8
1K
PANA
0FA13
054011
POTENTIOMETER, TRIM 1T-3/8
20K
PANA
0FA24
054013
POTENTIOMETER, TRM 1T-3/8
100K
PANA
0FA15
062060
CAPACITOR, CRMC 25V
.01uF
NIC
NCD.01M25MX5U
063013
CAPACITOR, TANT 35V
1.0uF
NEC
1.0M35
062067
CAPACITOR, CRMC 50V
1uF
NIC
NCD.1M50MX5U
063045
CAPACITOR, TANT 25V
10uF
NEC
10M25
081001
DIODE, SIG
MOUS
1N4148
081015
DIODE, SIGNAL LOW iR
SPC
1N457
091013
IC, QUAD BILATERAL SWITCH
RCA
CD4066BE
093002
IC, QUAD OP AMP
NS
LM324N
093010
IC, ADJ POS 1.5A REGULATOR
NS
LM317T
093011
IC, +12V 100mA REGULATOR
NEC
UPC78L12
093012
IC, -12V 100mA REGULATOR
PANA
AN79L12
093013
IC, ADJ NEG 1.5A REGULATOR
NEC
UPC337H
093016
IC, PRECISION 6.9V REFERENCE
NS
LM329DZ
093017
IC, PRECISION 2.5V REFERENCE
NS
LM336Z-2.5
093030
IC, DUAL PRECISION OP AMP
LTEC
OP227GN
093032
IC, PRECISION QUAD OP AMP
LTEC
LT1014DN
173003
HEADER, RA/SR MALE 36-W GOLD
APT
929648-01-36
175002
SOCKET, IC 14-PIN SOLDER TAIL
AMP
A9314
201073
PTD CKT BOARD, TLC-II ANALOG
WRNR
201073/470673
271014
SCREW, BDR HD 4-40x.250
273002
LOCKWASHER, HELIC #4 REG
274002
NUT, HEX 4-40
Drawing Number: 470669
PART #
DESCRIPTION
MFGR
MFGR'S NO
QTY
UM 051075
RESISTOR, CFLM 1/4W 5%
1.2K
MOUS
29SJ250-1.2K
051089
RESISTOR, CFLM 1/4W 5%
4.7K
MOUS
29SJ250-4.7K
051106
RESISTOR, CFLM 1/4W 5%
24K
MOUS
29SJ250-24K
051129
RESISTOR, CFLM 1/4W 5%
220K
MOUS
29SJ250-220K
051147
RESISTOR, CFLM 1/4W 5%
1.2MEG
MOUS
29SJ250-1.2M
052238
RESISTOR, MFLM 1/8W 1%
243
NIC
243X
052282
RESISTOR, MFLM 1/8W 1%
698
NIC
698X
054004
POTENTIOMETER, TRIM 1T-3/8
100
PANA
0FA12
054008
POTENTIOMETER, TRIM 1T-3/8
2K
PANA
0FA23
056001
VARISTOR, 180mJ
31VDC
PANA
P7020
062060
CAPACITOR, CRMC 25V
.01uF
NIC
NCD.01M25MX5U
062067
CAPACITOR, CRMC 50V
.1uF
NIC
NCD.1M50MX5U
063013
CAPACITOR, TANT 35V
1.0uF
NEC
1.0M35
063045
CAPACITOR, TANT 25V
10uF
NEC
10M25
064004
CAPACITOR, ELEC 35V
470uF
PANA
P6255
064016
CAPACITOR, ELEC 16V
4700uF
PANA
P6900
067046
CAPACITOR, FILM 100V
.1uF
MLRY
160104J100C
071005
TRNSFORMER, PWR 34VCT@170MA
SGNL
LP34-170
071006
TRNSFORMER, PWR 16VCT@350MA
SGNL
LP16-350
081002
DIODE, RECT 200V 1A
MOT
1N4002
083021
TRANSISTOR, NPN GENL PURPOSE
MOUS
KN3904
091001
IC, QUAD 2-INPUT SCHMIT NAND
RCA
CD4093BE
091011
IC, TRIPLE 3-INPUT NAND GATE
RCA
CD4023BE
091018
IC, QUAD 2-INPUT NAND (OC)
RCA
CD74HC03E
091019
IC, HEX SCHMITT INVERTER
RCA
CD74HC14
093010
IC, ADJ POS 1.5A REGULATOR
NS
LM317T
173003
HEADER, RS/SR MALE 36-W GOLD
APT
929648-01-36
173006
RECEPTACLE, STR/SR PCB 36-W GD
APT
929850-01-36
175002
SOCKET, IC 14-PIN SOLDER TAIL
AMP
A9314
201074
PTD CKT BOARD, TLC-II DIGITAL
WRNR
470674
271014
SCREW, BDR HD 4-40x.250
273002
LOCKWASHER, HELIC #4 REG
274002
NUT, HEX 4-40
Drawing Number: 470670
PART #
DESCRIPTION
MFGR
MFGR'S NO
QTY
UM 051059
RESISTOR, CFLM 1/4W 5%
270
MOUS
29SJ250-270
051073
RESISTOR, CFLM 1/4W 5%
1.0K
MOUS
29SJ250-1.0K
051082
RESISTOR, CFLM 1/4W 5%
2.4K
MOUS
29SJ250-2.4K
051087
RESISTOR, CFLM 1/4W 5%
3.9K
MOUS
29SJ250-3.9K
083021
TRANSISTOR, NPN
MOUS
KN3904
102010
SWITCH, PB PCB
SHDW
200130
109005
KEY CAP, GRY 1-LED
SHDW
71077
121003
LED, T1 MIN DIFF
RED
ROHM
SLR-34 VR3
121009
LED, T1 MIN DIFF
YLW
ROHM
SLR-34 YY3
121010
LED, T1 MIN DIFF
GRN
ROHM
SLR-34 MG3
124001
SOUND TRANSDUCER
BELL
MS-1
173006
RECEPTACLE, STR/SR PCB 36-W GD
929850-01-35
201075
PTD CKT BOARD, TLC-II CONTROL
WRNR
470675
Drawing Number: 470671
PART #
DESCRIPTION
MFGR
MFGR'S NO
QTY
UM 051059
RESISTOR, CFLM 1/4W 5%
270
MOUS
29SJ250-270
051061
RESISTOR, CFLM 1/4W 5%
330
MOUS
29SJ250-330
051082
RESISTOR, CFLM 1/4W 5%
2.4K
MOUS
29SJ250-2.4K
051121
RESISTOR, CFLM 1/4W 5%
100K
MOUS
29SJ250-100K
051125
RESISTOR, CFLM 1/4W 5%
150K
MOUS
29SJ250-150K
052412
RESISTOR, MFLM 1/4W 5%
13.0K
DIGI
13.0KX
052439
RESISTOR, MFLM 1/4W 5%
24.9K
DIGI
24.9KX
054010
POTENTIOMETER, TRIM 1T-3/8
10K
BRNS
3386P-1-103
054042
POTENTIOMETER, CONT 1T
5K
ALPH
31VC401
062067
CAPACITOR, CRMC 50V
.1uF
NIC
P4164-ND
063013
CAPACITOR, TANT 35V
1.0uF
NEC
1.0M35
067046
CAPACITOR, FILM 400V
.1uF
THOM
MC104K1C
067050
CAPACITOR, FILM 100V
.22uF
THOM
MC224K1D
067054
CAPACITOR, FILM 63V
.47uF
THOM
MC474K1F
067087
CAPACITOR, POLY 25V
100pF
PANA
ECQ-P1H101JZ
093017
IC, 2.5V REFERENCE
NS
LM336Z-2.5
093026
IC, -5V 100mA REGULATOR
NS
LM79L05ACZ
094002
IC, D/A DISPLAY CONVERTER
TLDN
TSC7107CPL
121003
LED, T1 MIN DIFF
RED
ROHM
SLR-34 UR3
125003
DISPLAY, .43" DIGIT RED (CA)
PANA
LN514OA
125004
DISPLAY, .30" DIGIT RED (CA)
PANA
LN513OA
173003
HEADER, RA/SR MALE 36-W GOLD
APT
929648-01-36
173006
RECEPTACLE, STR/SR PCB 36-W GD
APT
929850-01-36
175017
SOCKET, IC 40-PIN SOLDER TAIL
AMP
A9340
201076
PTD CKT BOARD, TLC-II DVM
WRNR
470676
274009
NUT, HEX 3/8-24
A-B
w/054042
279001
STANDOFF, SWAGE TYPE 6-32x.250
RAF
3047-B-632-B-0
279032
STANDOFF, SWAGE TYPE 6-32x.375
KEYS
1561B
Drawing Number: 470734
PART #
DESCRIPTION
MFGR
MFGR'S NO
QTY
UM 051045
RESISTOR, CFLM 1/4W 5%
68
MOUS
29SJ250-68
054012
POTENTIOMETER, TRIM 1T-3/8
50K
BRNS
3386P-1-503
081003
DIODE, RECT 400V 1A
MOT
1N4004
093029
IC, TEMP SENSOR
NS
LM335Z
111004
COVER, MIN PCB RELAY
P&B
35C620
111005
RELAY, MIN PCB 24V 1P2T
P&B
T90N5D1224
121003
LED, MIN RED DIFF T1
ROHM
SLR-34 VR3
173002
SHUNT
2-W
APT
929950-00
173005
HEADER, MALE PCB STR
3-W
APT
4-103321-0
173006
RECEPTACLE, SSTR/SR PCB
36-W
APT
929850-01-36
176006
TERMINAL STRIP, PCB
3-W
MOUS
ME153-2103
176007
TERMINAL STRIP, PCB
2-W
MOUS
ME153-2102
201077
PTD CKT BOARD, TLC-II RELAY
WRNR
470677
![]()
1320 Fulton Street Box 604
Grand Haven, Michigan 49417-0604 USA
Phone: (616) 842-7658
FAX: (616) 482-1471
e-mail: info@fireright.com
Page Last Revised on March 29, 1998
©Copyright Warner Instruments 1996 ~ 1998