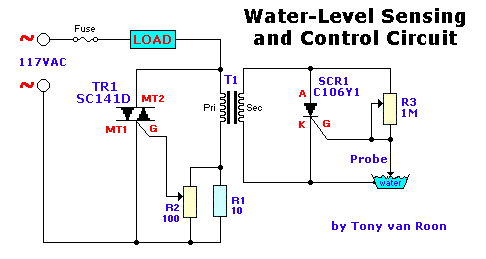
Parts List
R1 = 10 ohm, 10 watt, wirewound
R2 = 100 ohm, potentiometer, wirewound
R3 = 1 Mega-ohm potentiometer
T1 = Transformer, 12.6volt, 1.2amp (min)
SCR1 = Silicon Controlled Rectifier, C106Y1, or equivalent
TR1 = TRIAC, SC141D, rated 6 to 10 amp at 200 to 400 volt. Case TO-220
Fuse = Slow-blow, 2 amp.
This is a simple but reliable circuit for your sump-pump, aquarium, boat, or whatever. Please be careful when working with 115Volt line voltage! Take every precaution to avoid electrical shock. Unplug the power before making changes or touching resistor R1. Murphy's Law applies to all of us!
A Couple Notes
Triac TR1 enegizes a load which might control a valve, indicator light, audible alarm, relais, etc. The SC141D can be substituted with NTE5635, or Radio Shack 276-1001 model.
When the water-level is "low", the probe is out of the water and SCR1 (C106Y1) is triggered "on". It conducts and imposes a heavy load on Transformer T1's secundary winding. That load is reflected back into the primary, gating TR1 on which energizes the load. The C106Y1 can be substituted with a NTE5452 or Radio Shack (or Tandy) 276-1352
Applications of the circuit are limited only by one's imagination.
The load may vary from a watervalve, a relay controlling a pump, etc. Lots of possibilities. Value of the (slow-blow) fuse may vary depending on your load. Select your probe carefully, keeping in mind the hardness and/or pH level of the water. In either case, on occasion it will be necessary to clean your probe from contaminants.
If your country's electrical supply is 220VAC change TR1 to a 400 - 600 volt type, potentiometer R2 to 220 - 500 ohms. If you find that 500 ohms is too coarse go with 220 ohm.
Experiment with the value for wire-wound resistor R1. It can be anywhere from 5 to 47 ohms. Start with 15 ohms or so and take it from there. Feel if it gets real hot (unplug the power first!). If so, increase the value.
If you have checked out this circuit previously, the circuit is the same just positioned a bit differently so it is less confusing for those just starting out in electronics.
Back to Circuits page
Copyright © Tony van Roon

