Ground Resistance Surveys
******
I would like to gratefully acknowledge the assistance of two individuals
who took time from their already busy schedules to answer my questions and lend me some of
their knowledge and expertise. They are Bob Fitzgerald (Professional
Precision Locators) Reedsport, OR, and Steve Ryland (CalGold, Treasure
Hunter Confidential), Pasadena, CA.
Their valuable input is noteworthy not only from a technical standpoint,
but also because it was given quite freely and in the spirit of sharing rather than
withholding of worthwhile information. Their contribution is not only appreciated, but
also significant in making this document unique, as it pertains to the broad subject of
Ground Resistance survey equipment and methods.
*****
Why Utilize Ground Resistance Surveys?
Ground resistance surveying is a prominent and most useful technique in a wide range of tools that are available to the modern geo-prospector and treasure hunter. In the most simple terms, resistance to the flow of current, through a section or area of the Earth, is just one of several parameters that may be measured with the appropriate instrumentation. By measuring the resistance to the flow of current in a structured or grid-like manner, recording and then analyzing that data, it is often possible to discern the presence of certain anomalies based on the readings obtained. The anomalies, when analyzed and compared to the background readings, can aid in locating all sorts of features and objects, which would otherwise be unknown at ground level.
Mineral deposits, caves, adits or voids in the ground, buried treasure, archaeological features and natural Earth features all exhibit variations in resistance, and thus might be discovered through the use of Ground Resistance (GR) surveys. Ground Resistance surveys are quite valuable in that they can usually be conducted in at least 80% of all areas where geophysical exploration and discovery is desired. This fact alone qualifies GR as a unique tool in that it is not hampered by some of the problems inherent with certain other techniques, such as GPR (Ground Penetrating Radar) and PI (Pulse Induction).
Resistance and Resistivity
The terms "resistance" and "resistivity" are sometimes confused, one for the other, as if they were synonymous. They are two quite different properties, although they are related.
The amount of current that flows as a result of a given applied voltage potential in various materials is known as the resistance of the material. Resistance is measured in ohms and in general is inversely proportional to the cross-sectional area of the material that is carrying the applied current, and is proportional to the resistivity of the subject material.
Ohm’s Law states that the current flowing in any given circuit (or material) is directly proportional to the applied voltage (e.m.f.) and inversely proportional to the resistance. Therefore, the resistance of a circuit is equal to the applied voltage divided by the resultant current.
R = E/I
For instance, if a voltage potential of 10 volts were applied across a material, and a current of .001 amperes was measured flowing through the material (circuit), the resistance of the material would be 10/.001, or 10,000 ohms.
Resistivity is a bulk property of material describing how well that material inhibits current flow. This is slightly different from resistance, which is not a physical property. If we consider current flowing through a unit cube of material, resistivity is defined as the voltage measured across the unit cube's length (V/m) divided by the current flowing through the unit cube's cross sectional area (I/m2). This results in units of Ohm m2/m or Ohm-m.
Resistivity(rho) = R A/L
Where;
R = resistance of material along its length
L = length
A = cross sectional area
Solid annealed Copper has a Resistivity of 1.72 ohm-cm x 10-6. When compared to Copper some other materials have a Resistivity that is somewhat different. Gold is 1.4 times Copper, while Silver is 0.94 times Copper.
Apparent Resistivity
Although the resistivity of certain conductive elements and metals are known, the resistivity of various conductive metals and minerals in combination with certain soils exhibiting various moisture levels, all contribute to what is known as apparent resistivity. The apparent resistivity reflects a reading from what may be a large number of contributing factors and this characteristic alone is what makes the final analysis of any ground resistance survey a significant challenge. This also points up the obvious advantage those operators have, who are experienced in the operation and interpretation of GR instrumentation.
The apparent resistivity can be greatly affected by two significant factors.
Fill soils, ashes, cinders and brine wastes can average around 2370 ohm-cm, with a total range of 590 to as high as 7000 ohm-cm.
Clay, shale, gumbo and loam average around 4060 ohm-cm, and exhibit a range from 340 to 16300 ohm-cm.
Gravel, sand, stones and a small percentage of clay or loam can average around 94000 ohm-cm, with a range from 59000 to 458000 ohm-cm.
The conduction of current in soil is primarily electrolytic, in nature. Therefore, the amount of moisture and salt content will contribute significantly to variations in resistance readings. As might be expected, the amount of water in the soil will vary with the weather, time of year and overall characteristics of the sub-soil under test. The depth of the water table in any given area will also influence the residual moisture that a particular sub-soil might exhibit.
Having iterated all of the possible parameters that enter into the resultant apparent resistivity, it is obviously no small task to properly analyze ground resistance data, and make conclusive determinations concerning the possible precious metals or archaeological features that might be just below the surface.
Basic Techniques
There are a few basic techniques or methods, which are generally employed to measure ground resistance. In most all cases, an applied voltage and resultant reading is taken across metal probes or pins that are driven into the soil. The typical methods involve 2, 3 or 4 probes. (Actually, I’ve also seen a Single-Probe device, which involves a compact AC resistivity bridge and measures resistivity by the null method.) This discussion will center on a few different Four-Probe configurations, and a popular Two-Probe method.
Instrumentation selection can be quite critical in obtaining usable ground resistance measurements and surveys. Since it is often thought that ground resistance is a simple measurement of electrical resistance, it would seem that this might be accomplished with an ordinary generic ohmmeter. Unfortunately, a simple ohmmeter can render a value, but the accuracy and usefulness of the measurement is such that it will be completely worthless.
If you place two probes in the ground, and connect them to an ordinary ohmmeter, the ohmmeter reading will constantly increase, over time, in an exponential manner. This is caused by a gradual increase in the contact resistance between the probes and the soil surrounding the probes, which is actually termed the electrolytic effect. In addition, if the probes were reversed, the resistance readings would be different from the previous ones, and this action exhibits a reaction known as the "battery effect".
Also, the typical ohmmeter usually incorporates a small internal battery, whose output current capacity is entirely too small to travel any significant distance in the soil.
Another problem encountered with a simple ohmmeter measurement would be the extraneous ground fault currents that may be present in certain areas. These currents typically occur at the line frequency of the AC power mains, and would normally be between 50 and 60 Hertz. Electrical currents of this nature, when present, could obviously influence the overall accuracy of simple ohmmeter measurements.
After iterating the problems and shortcomings of attempting ground resistance measurements with an ordinary ohmmeter, it is obvious that we must employ instrumentation and methods that will overcome these problems, and which will yield accurate and useful measurements.
To correctly measure ground resistivity, the instrumentation will generally transmit an AC square wave that is at a frequency different from the typical AC mains, and one that will not be a harmonic of the mains frequency (50/60 Hz). Several commercial units utilize an AC square wave in the range of 135 to 160 Hertz, while certain other units employ an AC square wave in the 60 Hertz range and, through the combined use of "pulsing", "filtering" and "averaging" techniques, derive a usable output reading. In either case, employment of an AC square wave eliminates the "electrolytic effect", the "battery effect" and allows for the reduction of extraneous 50/60 Hz ground fault currents.
Four Probe (pin)
One of the most common methods of measuring soil resistivity employs four probes.
The four-probe method involves two probes across which a constant current is applied, while a different set of two probes is used to measure a voltage potential.
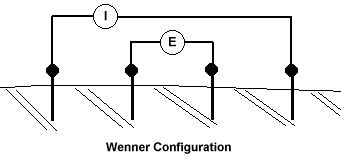
Wenner Configuration
In 1915, Dr. Frank Wenner (of the U.S. Bureau of Standard) exhibited a test for determining soil resistivity. He demonstrated that if the probe depth is kept small when compared to the distance between the probes, the following formula could be utilized:
p (ohm-cm) = 2 Pi A R
…where p is the average soil resistivity to a depth of A, in ohm-cm,
Pi is 3.1416, A is the distance between the probes in cm and R is the resistance in ohms from the instrument. (Note that the instrument reads out in ohms as a result of the internal calculation from the known applied current, and the voltage read across the two voltage probes. If the meter did not readout in ohms, this calculation could be accomplished by knowing the current applied across the two current probes, and the voltage read across the two voltage probes, i.e. R=E/I.
One of the unique characteristics about the Wenner test method is that the probes are all placed in the ground at equal distance (A) apart from one another, in a straight line. For instance, the two outer probes (with the current (I) impressed on them) might be spaced 12 feet apart, while the two inner probes (used for recording the voltage (E) measurement) are placed 4 feet apart and are set 4 feet from each of the outer probes.
Unfortunately, in order to take a series of readings over any given plot of land, all four probes must be moved for each reading.
Schlumberger Configuration
A Schlumberger survey is carried out with a slightly different arrangement of ground probes. The two current probes and the two voltage probes are still placed in line with one another and centered on some location, but the potential and current electrodes are not placed equidistant from one another.
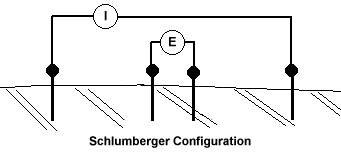
The two current probes are at a considerably wider distance from one another, whereas the voltage probes are placed rather close to one another. One of the advantages of this method is that several readings may be taken, and only the two voltage probes need to be moved for a group of readings. Eventually, as the voltage probes get too far from the current probes to produce a significant voltage drop, the current probes would also need to be moved.
The formula for calculating apparent resistivity for this arrangement is similar to the Wenner arrangement, but includes parameters that account for the different probe spacing.
For more information concerning both the Wenner and the Schlumberger methods of measuring apparent resistivity, the interested reader should refer to the following site, which gives an excellent dissertation of both methods.
http://www.mines.edu/fs_home/tboyd/GP311/MODULES/RES/NOTEOUT/resoutline.html
Dipole-Dipole Method
This method is another example utilizing a pair of current probes and a pair of voltage probes. Sometimes the current probes are referred to as the "transmitter" and the voltage probes are termed the "receiver". The Dipole-Dipole configuration is one of the more popular 4-probe methods utilized in treasure hunting or when seeking locations of precious metals.
This method dictates that a line be laid out along some dimension of the plot to be surveyed. For instance the line might be a 1000 feet long in total length. The "transmitter" (current probes) would first be located at the 0 and 100-foot points on the line. The first voltage reading (receiver) would be taken between the 200 and 300-foot points. Without moving the "transmitter" rods, the next voltage measurement would be taken between the 300 and 400-foot points. These readings would continue down the line until the magnitude of the voltage reading becomes too small to yield enough digits of accuracy. This usually occurs around 4 or 5 points away from the "transmitter" rods. When this happens, the "transmitter" rods are then moved to the next location on the other side of the last voltage reading (in a sort of leapfrog manner) and the whole process starts over again.
Once the entire line has been traversed, a new line is laid out some distance from the first one, and the entire process starts over again. The readings taken should be correlated to an accurate sketch of the terrain being surveyed so that the subsequent resistivity readings will profile any anomalies that might exist in the area.
As in the Wenner and Schlumberger configurations, this method yields resistivity values that must be calculated from the raw readings, and then analyzed for possible anomalies. Today, these calculations and analysis are usually performed by a small personal computer, such as a portable laptop.
Twin-Probe Method
The final example of our 4-probe methods is called the Twin-Probe Method. Although the name suggests two probes, there are actually four involved in all the measurements, and again we are measuring a voltage and a current and then calculating the resultant resistivity. This method is quite popular because it only requires that two probes be moved over the entire plot to be surveyed, while the other two probes remain fixed at a single location.
First, the entire area to be surveyed is usually divided off with string or some other type of lines so that a uniform grid is established. A sketch or map of this grid area is used to record the raw data. A single reading is usually taken in the middle of each of the respective grid areas. When all of the readings have been gathered, once again a small computer might be utilized to aid in the final analysis of the resistivity profile.
The four probes for this sort of a survey are setup in the following manner. One of the Current (or transmitter) probes and one of the Voltage (or receiver) probes are placed perhaps a half-meter apart and a few meters outside the actual area to be surveyed. These two probes remain in this single location for the remainder of the survey. The remaining two probes, one Current probe and one Voltage probe, are generally attached to a wooden frame and fixed at a half-meter apart. The operator now carries this frame (containing the two probes) and the probes are inserted into the ground at the center of each of the small grids that were established previously. A single reading is taken at each station.
This Twin-Probe method is especially popular with those surveys that are concerned with the discovery of archaeological features, however, I see no reason why this method might not be equally useful for certain treasure hunting applications.
In order to calculate the resistivity from this configuration of probe placement, the distance between the individual probe pairs and the distance between each pair of probes becomes a part of the equation.
For more information about this type of probe configuration and some examples of how it was utilized, the interested reader should visit:
Two Probe Resistance Method
As the name suggests, this method of surveying a plot of ground does not attempt to measure or ultimately indicate apparent resistivity. Utilizing only two probes, this method was devised to gather "apparent resistance" readings. Further, this method is not so much concerned with the actual value of the apparent resistance, but rather gains usefulness by the discovery of significant isolated anomalies, when compared to the background readings.
This method, although quicker to perform than most 4-probe configurations and without the need for resistivity calculations, does come with a certain few cautions and limitations. Since this method deals only with gross apparent resistance measurements, the conventional geophysics consortium abandoned this type of measurement in 1924, in favor of the more accurate 4-probe techniques that could yield actual resistivity readings.
Still, in the past several years, devices incorporating this 2-probe method have continued to be developed and offered, especially as a viable tool for the treasure hunter or geo-prospector. While not all of these past devices could be deemed as worthwhile tools the idea and concept continues to be refined and upgraded even today. Certainly, if this 2-probe method continues to keep pace with some of the latest technology available today, I see no reason why these devices (method) could not be considered as another valuable tool in the modern treasure hunter’s arsenal.
Concept and Principle of Operation
As I indicated before, this method does not require the use of a set of current probes (transmitter) and a separate set of voltage probes (receiver). Still, this method does incorporate the transmission of a fairly significant level of current between two probes spaced at some appropriate distance. The magnitude of this current may vary from one brand device to the next, but it is far greater in all instances than that which would be available from an ordinary generic ohmmeter.
Also, in order to overcome the "electrolytic" and "battery" effect that would be seen when applying pure direct current to the ground, these devices utilize an alternating voltage that resembles an alternating square wave.
Carrier Wave
The alternating square wave is generally referred to as the "carrier wave", and the polarity of the applied voltage switches at some specified frequency. Typically, this frequency might be in the 50 to 60 Hz range.
In normal operation the carrier wave is applied for a few seconds across the two probes that were previously driven into the ground. As the current flow occurs, the magnitude of this current will be determined by the resistance of whatever is in the path between the two probes. One such device senses this current, and with the aid of some filtering and averaging techniques, displays the resultant reading on a meter incorporated in the device. The meter is usually calibrated to indicate ohms of apparent resistance, although the ohms indicated may not correlate directly with a like amount of actual DC resistance material. The meter may also display certain markings or individual values, supposedly to indicate specific metals or elements. In my opinion, the value of such markings is questionable since they would only be accurate if the background readings and conditions were of a specific "typical" or "normal" value.
The real value of these devices stems from the fact that several readings might be taken over a short period of time, and certain isolated anomalies may be discovered which can indicate a sought after treasure, mineral deposit, cave or void in the Earth.
Isolated anomalies are generally considered to be those readings that are 20 to 25% different than the general background readings. If the probes are set farther apart, sometimes only a 10 to 15% change from the background can signal an isolated anomaly.
Long-time Buried versus Fresh Buried Targets
As I mentioned in a related article, entitled Electrochemical Enhanced Locating Systems (EELS), precious metals that are placed in a soil environment appear to enter into some form of electrochemical action with not only the surrounding soil but also other less precious metals in the area. A prominent supplier of a Two-Probe Ground Resistance Device in the following quote echoes this same concept (hypothesis).
"All buried precious metal suffers an electrolysis target action due to acid rain, snow and other chemicals. When acid and ultra high radiation attack precious metals, they are converted into batteries (Ed: Batteries being another term for electrochemical actions.) Free electron radiation fields (F.R.E.F.) are created as a result of the chemical changes that have taken place in the ground. These fields are as large as the size of each precious metal buried. The longer objects are buried the stronger the electrochemical activity will be, and consequently the stronger the surrounding field."
In my opinion, a significant quantity of precious metal that was NOT long-time buried should still be discernable by this 2-probe method. However, a smaller mass of precious metal (3 pounds) may not be distinguishable from the background readings, unless it had sufficient time to enter into electrochemical activity –thus producing a field, the size of which may be double that of the original mass of metal.
Probe Configurations
Although the 2-probe method applies a "carrier wave", or current, across only two probes at any one time, and senses the apparent resistance with the same two probes, these devices often employ four probes arranged in various geometric configurations.
Box Arrangement
The Box arrangement is probably the most popular configuration, utilized for large areas and preliminary surveys. Four probes are driven into the ground in the shape of square (box), and each probe is connected to a wire that leads back to the device. The largest Box dimensions are typically 200 to 220 feet on a side. Through various switching arrangements, either toggle switches or rotary selector switches, each of the six possible combinations may be chosen and the "carrier wave" transmitted to a specific pair of probe rods. This results in six different readings from one "setting" of the four probe rods. The six readings consist of the four sides of the square and the two diagonals across the corners.
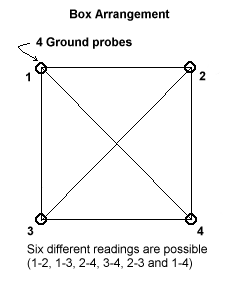
The idea being that if one or more of the six readings indicates an isolated anomaly, than the next step would be to move the entire "box" arrangement in the direction of the anomaly. As this type of survey is progressed, it is the intent to adjust the position of the "box" until it appears to be centered over the probable target. The "box" might also be made somewhat smaller, in order to aid in the process of narrowing down the location of the isolated anomaly.
Straddle Arrangement
Once the Box Arrangement has been implemented to identify a probable isolated anomaly, the Straddle arrangement is next utilized to further pinpoint the location, as well as to ascertain an approximate depth.
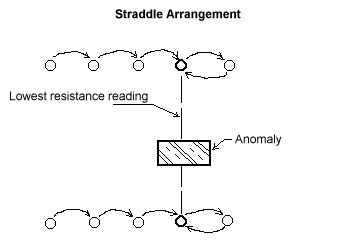
The Straddle Arrangement involves only two probes and begins by placing the probes a distance apart that might be twice or three times the size of the area where the probable anomaly is thought to be. Starting from one side (and away from the possible target), readings are taken, and the probes are advanced towards the target area. Each time the probes are moved, a reading is taken until the isolated anomaly is indicated. These two probes are then left in the ground, and two other probes are setup at right angles to the first two. The procedure is repeated with the second set of probes, and the object is to once again identify the anomaly between the second set of probes. At this time, the suspected anomaly should be located approximately below a point centered between the two imaginary lines. One line drawn between the first set of probes, and one drawn between the second set of probes. (Ed: This procedure is more difficult to explain than it is to actually perform, and is explained in significant detail in the operating instructions for most of these devices.)
Determine Approximate Depth to Anomaly
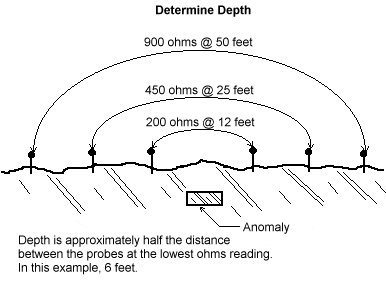
After pinpointing the isolated anomaly, the next and final step is to determine the approximate depth. This is accomplished again with only two probes. Knowing the perceived center of the anomaly, the two probes are centered on a line directly over that center point and spaced equally at a distance that is greater than twice the estimated depth of the target. Readings are then taken and after each reading, the probes are moved closer to one another. The readings should get progressively lower (on a precious metal target) until finally no more change in resistance can be noted. At this point the probes are moved back to the spacing they were at, just before the reading that made no additional change. This spacing is then measured and the approximate depth to the target will be one half the distance of the spacing between the probes.
As with any logical progression of search and discovery methods, it is recommended that an attempt be made to verify the existence of the target by some other method, prior to undertaking any significant earth moving operations.
Small hand augers, probe rods or other geophysical instruments may be utilized to aid in the verification process.
Specific Cautions and Restrictions of the Two-Probe Method
The Two-Probe Resistance Method is probably faster, and certainly more cost effective and user-friendly than most all of the 4-probe methods. Further, it is thought by many to be quite adequate for discovering isolated anomalies under the toughest of field and soil conditions. However, as is true of so many geophysical survey systems, the Two-probe method of measuring gross apparent resistance comes with a few cautions and restrictions. Here are the major ones I am aware of (there may be others).
Overall Limitations and Constraints for all GR Surveys
As was mentioned above, there are several attributes about ground resistance surveys, which can influence the individual measurements. Operator experience and familiarity with the instrumentation perhaps plays as important a role as many of the physical parameters. As with any geophysical method or device, it is always a good idea to substantiate the findings and suppositions of one method with that of one or more other methods, especially before making a large investment in manpower or actual earth-moving activities.
Aside from operator experience there are some general things that can hamper GR surveys, or influence the accuracy of the resultant survey data.
Summary
Of all the parameters about the Earth that may be measured with geophysical locating instruments, Ground Resistance (Resistivity) appears to be one of the most useful, and conclusive techniques that can be employed. Ground Resistance has some cautions and parameters that need to be observed, but overall, GR seems to be more adaptable and useable in a wider range of conditions and environments than many of the other geophysical locating tools.
With this in mind, the modern treasure hunter, geo-prospector or archaeologist will no doubt find Ground Resistance a most valuable tool in their quest for discovering those things hidden just below our feet.