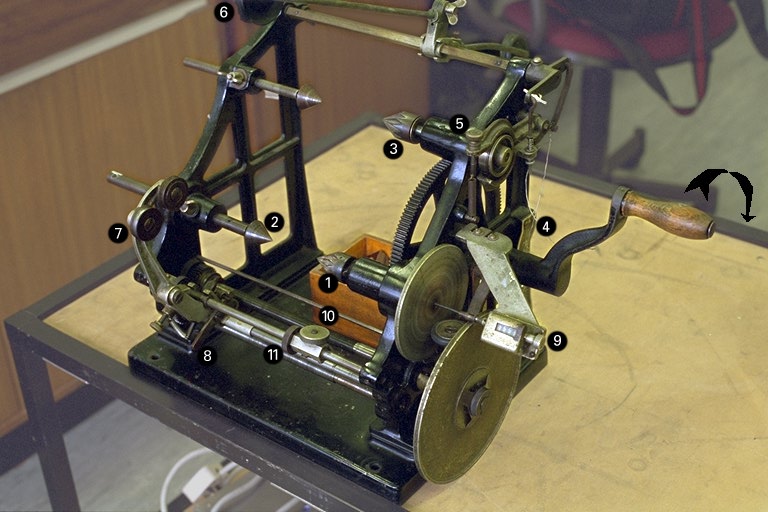
The ESU coil winder can hold a reel of wire and feed it out, under controlled tension, onto a coil former which may be hand rotated at several hundred turns per minute. The feed guide can be scanned across the coil former automatically at the correct rate for the size of wire in use.
Swing the feed head (7) back towards you so that it is clear of the take up spindle.
Disengage the feed head clutch by pushing the lever (8) downwards so that the head is free to slide. NEVER slide the head with the clutch engaged or its thread will be damaged.
The two large disks at the right hand side form a continously variable speed transmission for the traverse. Adjust it for the thickness of wire as indicated at (4). This will be easier if the handle is turned slowly whilst moving the lever.
Most coil formers must be fitted onto a mandrel for mounting between the headstock (1) and the tailstock (2). Mandrels are currently available for cores -
The reel of wire is mounted in the same way on the feed spindle (3). There are two brakes at the end of the spindle to keep the wire tight as it is fed out: a static brake, adjusted by the nut (5) and a dynamic brake (also adjustable) which is released when the wire tightens and moves the pulley (6) downwards. Both brakes need to be set lightly if thin wire is not to snap.
Adjust the position of the pulley so that it is roughly centred over your coil former.
Slide the feed head along to the point where the winding will start.
Pass the wire over the pulley, under the first wheel on the feed head and over the second wheel. Anchor the end of the wire on the pin or tag on your coil former corresponding to the start of the winding.
Swing the feed head towards the coil former until it is just clear of it, taking up the slack by turning the wire reel backwards.
Reset the turns counter (9) to all zeros by rotating the knob at the side. Note: this counter will not count backwards. Keep this in mind if you have to remove any turns.
Engage the feed head clutch and turn the handle slowly. As you wind observe how the feed head is moving. When the head reaches the point where it should reverse direction stop winding. Slide the end stop towards which the head is moving up to the head until the mechanism clicks over and then lock the stop in place. Resume winding and repeat the process when the head reaches the other end of the former. You can make fine adjustments to the end stops with the wheels (11) at their side.
 Producing wound components]
[Further information about the above winder]
[Equally awesome
leading edge technology]
Producing wound components]
[Further information about the above winder]
[Equally awesome
leading edge technology]