 |
The 30mW FM Transmitter
The First Stage
If you are new to the world of RF (Radio Frequency) projects and/or have never made a LPFM (Low-Powered Frequency Modulated) Transmitter...or have made one or more, only to be discouraged to have it not work properly or not at all, then this project would be right down your alley! I have started out myself with these LPFM units and have become fairly proficient into troubleshooting...should it not work proerly. Even though by looking at this simple schematic below, do not be headset into thinking that everything should go according to plan, once you have finished the project. Whereas this project is no more different than others that you have spotted on the internet, the main difference in this venture would be all the text that is covered....beginning from the electret microphone, all the way to the end, which is the antenna. I have put a full amount of descriptive wording into thinking as if 'I' were you...and this being my first transmitter project. Think of this project as an experimental quest, because surely many variables will come into play as you journey along this road of electro-magnetic forces.
Even if you were to complete everything and the first turn-on failed, I am here to give assistance into helping you find the possible culprit that would be stopping the unit to function. And so, if you are willing to start the journey into the world of electromagnetics, then this would even be a better place then any to start!
The original design of this 30mW FM Transmitter came from a 200mW experimental project that Harry, at Harry's Homebrew Homepage, lay hidden in his mind for many years (he originally came up with it in the '80's), and I remember him pointing out..."please treat this FM transmitter only as an experimental project, as I have only the recollection of the circuitry just from memory, so the schematic may or may not be exactly right...you may have to experiment a little with it".
And so, the 200mW FM Transmitter was my first project from Harry's site that I had started with. Although I have doctured it up quite a bit, by adding and changing and deleting certain components, thru trial and error, over a period of one year...I have managed to get it working quite well and had told Harry that I would call it the HPSO...for the fact that Harry had said back in the eighties, it was a heavy duty little transmitter! Of course, the HPSO comes from Harry saying..."higher power suggestion only"...in his course of text associated with the fine little project. So throughout that whole year, I had questioned Harry on many things about the transmitter...how to measure output wattage...how to make a watt meter...what type of antenna would suffice the unit...how far would it transmit...and many other things as a 'new-comer' to the field of RF. By the time I had completed the transmitter, I was now familiar with using a home-made Watt Meter and a home-made FSM (Field Strength Meter)...together with my DVM (Digital Volt Meter) and was satisfied with the way the transmitter was performing.
I then decided to drop off the last stage of the 200mW unit to come up with a lower output wattage. As the title of this webpage shows, this 30mW project would be a delightful LPFM transmitter to make...especially if you have never made one before. It would also be a treasured project, in the fact that you could learn how to measure output wattage and field strength readings from this device.
If you are familiar with making these LPFM transmitters and have done well with them, you might want to just jump over the 30mW and start with the 200mW or the 7 watter...it is all up to you. But I would say, as one who has made these three transmitters...it would be very wise and prudent to start from the beginning (that is, starting with the 30mW unit), and then work your way up to the next trasnmitter...hands-on experience is by far the best teacher in the world!
So now, my friend, you have 3 choices of FM transmitters to choose from: The 30mW, the 200mW and the 7 Watter.
These three FM transmitters are all on this website. So without further ado, I surrender these fine FM transmitter projects for those who choose to venture out and make it.
...and let the project begin!
...your friend, Patrick
Please be advised that this transmitter can only be used under your countries' rules and regulations concerning radio frequency transmissions.
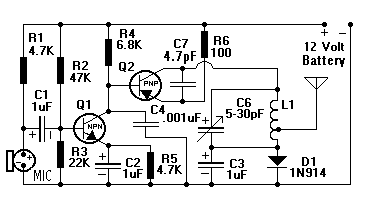
The Thirty Milliwatt FM Transmitter
|
Numbered Component Listing
| Electret Microphone | 1uF Electrolytic Capacitor (C2) |
| 1uF Electrolytic Capacitor (C1) | 4.7K Resistor (R5) |
| 4.7K Resistor (R1) | PNP MPS2907 Transistor (Q2) |
| 22K Resistor (R3) | 1uF Electrolytic Capacitor (C3) |
| 47K Resistor (R2) | 5-30pF Variable Capacitor (C6) |
| NPN MPS3904 Transistor (Q1) | Tapped Air Core Coil (L1) |
| 1.2K Resistor (R4)* | 1N914 Diode (D1) |
| 5.6K Resistor (R4)* | 4.7pF Disk Capacitor (C6) |
| .001 Disk Capacitor (C4) | 100 Ohm Resistor (R6) |
The Electret Microphone...Radio Shack sells this microphone as a two terminal connection and a three terminal connection. Use the two terminal connection. The side that is connected to the housing of the microphone is the negative side and that terminal goes to ground on the PCB. The other terminal is the positive side. Also, when you are at Radio Shack for this item and other items listed below, it would be wise to pick up about one foot of 75 ohm coax cable. With this cable you can 'extend' the length of the electret microphone so it won't be so close to the circuitry. I have mine right at 3 inches, which out and away from the circuitry and seems to work excellent as regards to clarity; not to mention your head staying a little ways away from the unit so as to not affect the frequency (see 'tank circuit' below).
1uF Polarized Electrolytic Capacitor...This is a polorized device and may be purchased at Radio Shack. Make sure the negative terminal goes to the base of Q1. This capacitance should NOT be changed.
4.7K Resistor...This is a 1/2 watt carbon resistor that may be purchased at Radio Shack. This ohmage should NOT be changed.
22K Resistor...This is a 1/2 watt carbon resistor. My local Radio Shack does not carry this ohmage, although you may purchased two 47K and put them in parallel. This surely would suffice.
47K Resistor...This is a 1/2 watt carbon resistor and may be purchased at Radio Shack.
MPS3904 NPN Transistor...This transistor may be purchased at Radio Shack. Refer to the schematic for proper orientation of each leg of the transistor.
*1.2K Resistor...Since Radio Shack does NOT sell a 6.8K ohm resistor, you will have to purchase a 1.2K plus a 5.6K and put them in series to come up with the value of 6.8K. This 1.2K carbon resistor is 1/2 watt in rating.
*5.6K Resistor...Sind Radio Shack does NOT sell a 6.8K ohm resistor, you will have to purchase a 5.6K plus a 1.2K and put them in series to come up with the value of 6.8K. This 5.6K carbon resistor is 1/2 watt in rating.
.001 Ceramic Fixed Capacitor...The capacitance of this fixed disk capacaitor should NOT be changed. It may be purchased at Radio Shack.
1uF Polarized Electrolytic Capacitor...This is a polarized device and may be purchased at Radio Shack. Make sure the positive terminal on the capacitor goes to the emitter on Q1.
4.7K Resistor...This is a 1/2 watt carbon resistor and may be purchased at Radio Shack.
MPS2907 PNP Transistor...This transistor may be purchased at Radio Shack. Refer to the schematic for proper orientation of each leg of the transistor.
1uF Polarized Electrolytic Capacitor...This is a polarized device and may be purchased at Radio Shack. Make sure the negative terminal of the capacitor goes to ground.
5-30pF Variable Capacitor...Radio Shack does sell a 3-40pF variable capacitor (Part Number RSU 11919081), but it must be ordered through the store. It sells for around $2.00 This is one of two devices that make up the oscillating circuit (commonly known as the 'tank circuit'). A variable capacitor is needed in order to adjust for a specific transmitting frequency. It would be wise to understand how the tank circuit operates...since it is this variable capacitor, together with the air-core coil that you will experiment with...in order to capture the specific transmitting frequency you want. It will be left up to you to tune-in your transmitting signal to a receiver. Just CLICK HERE to understand how to tune your transmitter once you have made it and ready for the first 'turn-on'.
The 'tapped' Air-Core Coil...This is a home-made device and must be made by you. Just CLICK HERE for construction of the coil. This is one of two devices that make up the oscillating circuit (commonly known as the 'tank circuit'). A coil is needed in order to adjust for a specific transmitting frequency. It would be wise to understand how the tank circuit operates...since it is this 'Tapped' Air-Core Coil, together with the 5-30pF Variable Capacitor, that you will experiment with...in order to capture the specific transmitting frequency you want. It will be left up to you to tune-in your transmitting signal to a receiver. Just CLICK HEREto understand how to tune your transmitter once you have made it and ready for the first 'turn-on'.
1N914 Diode...This device may be purchased at Radio Shack. Observe polarities on diode. The cathode (that's the negative side of the diode) goes to ground.
4.7pF Fixed Disk Capacitor...This is a non-polarized capacitor, meaning that is does not matter which leg is used for placement. Just make sure one leg goes to the emitter of the MPS2907 and the other leg goes to the collector of the MPS2907. Keep the distance of the legs no further than 1/8 of an inch to the said transistor.
100 Ohm Resistor...This is a 1/2 watt carbon resistor.
The Antenna...I have used a four to five foot antenna on this unit and it radiated out well with it. You can purchase a four or five foot telescopic antenna from Radio Shack.
Circuitry Layout
Just like the Radio Shack Special, this layout of the electrical routing of the copper on the PCB must be ahered to...should you design your own layout, I would not have any clue as to help you with your project, should the unit not function. The reason I specify this critical layout, is because it functions well with it. These two pictures below are PCB templates, to guide you into making the electrical copper routing on the PCB.
The PCB template below is for a two-terminal Variable (Trimmer) Capacitor
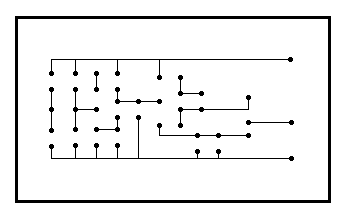 |
The PCB template below is for a three-terminal Variable (Trimmer) Capacitor
.gif) |
When the above circuitry routing is printed out, it will conform to the exact measurements needed in making the PCB. I have used 'dry transfers' from Radio Shack to make the copper routing. If you already know of a way to 'mimmick' the printed copy of the above picture, you are on your way. If you would like to make one using 'dry transfers', please go to my special section on how I used this process in making the Radio Shack Special. Even though the directions will be for the 'receiver', just use the above template for your own guide in making the transmitters' PCB. Just CLICK HERE for complete details on how I make a PCB using 'dry transfers' from Radio Shack.
Once, you have made your PCB, the picture below these words will show you where each individual component goes. Just look below the picture for each referenced number in relation to the component needed.
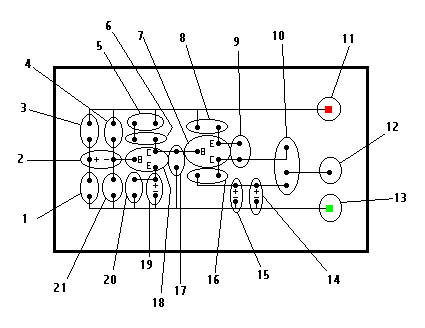 |
| 1.Electret Microphone | 12. The Antenna |
| 2. 1uF Polorrized Electrolytic Capacitor | 13. Ground side of the Battery. |
| 3. 4.7K 1/2 Watt Carbon Resistor | 14. 1N914 Silicon Diode |
| 4.47K 1/2 Watt Carbon Resistor | 15. 1uF Polarized Electrolytic Capacitor |
| 5. 1.2K 1/2 Watt Carbon Resistor | 16. 5-30pF Variable Capacitor |
| 6. 5.6K 1/2 Watt Carbon Resistor | 17. .001 uF Capacitor |
| 7. MPS2907 (PNP) | 18. MPS3904 (NPN) |
| 8. 100 Ohm 1/2 Watt Carbon Resistor | 19. 1uF Polarized Electrolytic Capacitor |
| 9. 4.7pF Capacitor | 20. 4.7K 1/2 Watt Carbon Resistor |
| 10. Tapped Air-Core Coil (*see text below) | 21. 22K 1/2 Watt Carbon Resistor |
| 11. 9 to 12 VDC Battery (The red square) |
*The 'tapped' air-core coil can be made by looking at my webpage entitled, "Construction of 'Tapped' Air-Core Coils. Should you have any concerns about the document, please feel free to send me a letter with details.
Once the components are all soldered onto the printed circuit board, then some sort of a SPST switch may be used, together with a battery. Keep leads as short as possible from battery to circuitry.
Information
Please confide in 'mimmicking' the exact routing of the PCB. That way, should the unit not function, I could help out...knowing that it probably isn't in the routing of the circuitry. A voltage of 12 volts was used on the unit. At 12 volts, you should get right around 30mW's.
Once you have made your unit and are satisfied with the way it is operating, you may then made your own 'Home-made Power Meter', to find out how much YOUR transmitter is putting out. Please CLICK HERE to find out how to construct a Watt Meter and how to figure out your output wattage.
Another useful piece of equipment is the Field Strength Meter...this meter will give you a sense of how the antenna is radiating its' transmitting signal...standing at different distances from the antenna, the meter will read-out its' 'field strength' output, which is in mill-volts. Later, I will be putting a Home-made Field Strength Meter on the website.
...also, do not hesitate to send a letter for any advice, concerns or comments you may have concerning this webpage of the 30mW FM Transmitter.
mailto:braincambre500@yahoo.com

| You are our website guest number 963 since June 11th 2002 |