Crystal Radio Project

A Brief Description:
I have been tinkering around with crystal radios for some time now. i find it to be an interesting hobbie. the materials needed for this project can either be brought or acquired. If you have access to an old tv or radio [one that dont work] it has an abundant supply of wire and knobs and so....if you have to buy the materials I estimate the cost [in us dollars] about 20 bucks or so. So once you have the materials on hand you are ready to get started. This radio will preform well if assembled as per instructions.

i listen to the grand ole oprey on WSM radio from nashville tnn. almost every Friday and Saturday night. All the way down here in Mississippi on the gulf coast. I also listen to some SW [ short wave ] stations like WWCR on 3125kHz and on 5070kHz. i hear stations from all over the world also! This project is a very buildable project and will give the enthuesist years of enjoyment

The Materials Needed :

A base for the radio :
it can be just about any non conductive material. I like to use wood. a regular piece of 1"x8" about 8 to 12" long. for mounting all the parts on.

A Capacitor :
if you want something that looks good you will have to buy it you will need a 10-365pf air variable cap. Or an old transistor radio tuning capacitor will do just fine. they are easy to get and work well. But you will have to desolder it from the radio [that aint nothing] and it will save you about 12 bucks! plus shipping!!!!

The Coil :
For this project we will be winding the coil ourselves. i use a piece of plastic pvc pipe 1-1/2" dia. the pipe is mesured from the inside but i want a 2" outside diameter coil former. well 1-1/2 inch pvc is 2" outside diameter. If i got you confused dont feel bad i stay that way! but any coil former will work between 1-1/2" to 2-1/2" outside diameter. and non conductive! cut your pvc pipe to a length of 3-1/2" or so but not much shorter. a little longer won't hurt, but, you want it to fit on the base.

We will have to wind the coil with MAGNET WIRE that is enamel coated wire you can buy from radio-shack. for our coil we can use from 26 gauge to 18 gauge wire. heres the deal! lets say you use 22 gauge wire like me the set will be a little louder but it will be not as slective as if i used 26 gauge wire. but with the 26 gauge wire will have less volume but it will be more slective! so its ok to use 22 gauge wire out in the country, if you live in or near the city you can use the thinner wire like 26 gauge. but for starters i would use the 22 gauge wire it is eayser to work with!! and eayser to hear!

WIRE :
For the coil we will be using MAGNET WIRE that is enamel coated wire. For hook up wire we can use any thing 20 to 14 awg stranded is preferd but if you have solid than thats ok!

Antenna :
The Antenna we will be making for this project will be a long wire Antenna and that means a piece of wire 50 foot or so long. 100 foot would not be to long. it can be just about any piece of wire solid or stranded insulated or not. one thing, we can not let the antenna touch anything or it will work poorly or not at all! so thats why i use insulated 12 gauge stranded wire. one end is hung from a tree via an insulator that is home made out of a piece of 3/4" pvc 6" long with 2 sets of holes drilled one at each end. about 1" from either end. The wire is connected to one end of the insulator and rope to the other end. thats what gets hung in the tree. ATTENTION DO NOT GET WITHIN 10 FOOT OF POWERLINES OR CROSS UNDER OR OVER POWER LINES WITH THE ANTENNA MAY RESULT IN SERIOUS INJURY OR DEATH!! The other end of the antenna gets connected to the set.

Ground :
Means just that. connected to the same electrical property as mother EARTH! this is done by driving a metal [copper preferd] rod in the ground 6 or 8 foot! one will do 2 or 3 wont hurt especially if you live in a dry climate. but 1 will do to get us started. From the radio to the ground should be as short as possible. if the wire gets to long it will act like an antenna. A cold water pipe is a good standby if you have a metal one! ATTENTION AGAIN DO NOT HOOK TO A GAS LINE IF YOU HAVE NATURAL GAS. THIS IS A NO NO!!!

Detector :
For the most of us will use a germanium Diode. the diode will rectify the radio frequency -RF- in to audio frequency -AF- which will be what we hear in the phones.

The Phones :
Here we have a little problem. we can not use a regular set of head phones like you get with your walkman! hum? well this is because the set dont have the power to make them work! but we can either buy a set of phones for around 15 us dollars or get a crystal earpiece. they are about .50 to 1.50 dollars thats the choice we have but its a small price to pay for a lifetime of fun and its a good learning experience to.....
Well so far we need :
Base :
a peice of wood 1" by 8" by 8" or so.
Capacitor :
we need a cap in the range of 10 to 365 air variable or one out of an old transistor radio
A Coli former :
A peice of pvc pipe 1-1/2 to 2-1/2" outside dia. and at least 5" long.
Some Wire :
About [ not less than ] 60 foot of 22 gauge enamel coated magnet wire and some hook up wire not really a whole lot. a few feet will do.
Antenna :
wire 50 foot at least, 100 foot will do also. remember longer your antenna the louder it will be. 14 or 12 gauge insulated stranded is what i use.
Detector :
A germanium diode radio shack has them about 10 for a buck!
Phones :
well the choice is up to you 15 dollars for a good set, I brought one there not to bad or 1.50 for a little ear peice. both will work but i found a pair of old military head sets for 5.00 each. and they work good!
Fahnestock clips :
We will need some way to hook up the wires together the Fahnestock clips is one way of doing it with out soldering. you will have to mail order them. well i do. You can also solder all connections for a more permanent version. I recommend at first to use the Fahnestock clips it will be eayser to modify or experiment with! thats the part i like is experimenting!!

The Construction :

We will start with the coil.
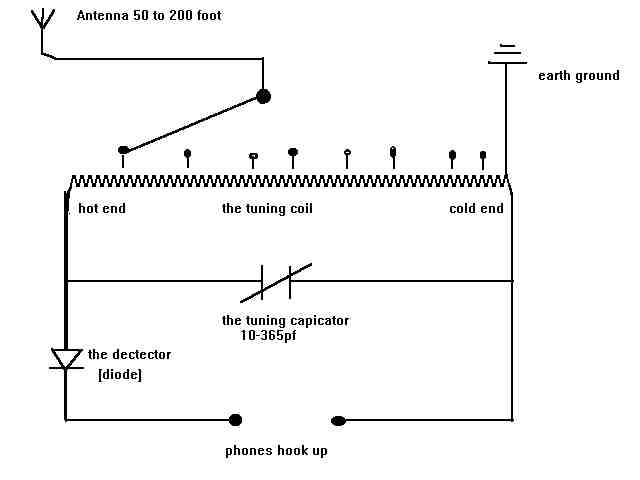
we will be making a taped coil with 20 or 22 or 24 gauge MAGNET wire. 1st we will drill 2 sets of holes all the way through the former. make shure the drill bit is just a little larger than the wire. about 1/8" will do. the holes should be 2-5/8" apart and centered so that there is equal distant from the ends. start one end of the wire through the former leaving enough sticking out the other side to work with. 3" or 4" should be plenty. now get some help! lol :-) you have to start winding on the former. wrap 5 turns keeping the turns tight! on the 5th turn take the 1/8" drill bit or nail or screwdriver and make a tap. for those of you who dont know what a tap is. take the wire and place it over the nail, make 2 turns with the nail to form a loop. that is a tap and thats why we call it a taped coil! so keep winding and tapping we are not done yet! you keep winding till you get to the 10th turn then make another tap. also tap the 16th 24th 32nd 40th 52nd 65th 80th turns then keep winding to 100th turn but dont tap that one you run the end of the wire through the other set of holes on the former. WALA! your done with the coil that is! you just completed the 2nd most hardest part, getting someone to help was the hardest part! A couple of hints, use tape to hold the wire on the coil, or some other method when winding the coil. when done use some glue around the ends of the coil to hold the windings tight. and to keep the windings as tight as possible while winding. after the glue dries take an xzacto knife or some sand paper and clean the taps and both ends of the wire so you can see the copper but dont get to crazy we dont want to hurt the windidgs. the longer the coil the lower the frequncey the shorter the coil the higher the frequency but 100 turns will get you in the BC band. So if your set tunes to low you will have to remove some windings. on the other hand if it tunes to high you will have to ad some turns. try 10 at a time.

Now you will want to mount the coil
on the base [ that peice of wood i told you about eairler ] but first you want to lay out the parts on the wood then figure how and where you are going to mount them. then when you are shure you got the right spot then mount the coil. remember a well planned project is a neat project! i think thats why mine are so shabby looking!

now you can mount the capacitor
and and start mounting the fahnestock clips, so we can hook up the detector and the phones and a ground lug to connect it to mother earth!

Now we are ready to wire it up the coil or L1
We will call the 100th turn end the cold end. this will also be known as ground! 1st turn will be the hot end. now you will have to hook up the coil and capacitor in parallel to form a L/C tuning circuit. the capacitor has 2 sections the stator [the part that dont move]. they are the solder lugs on the capacitor. and the rotor [the part that moves]. This will be the outside frame of the capacitor. you hook the rotor to the cold end of the coil and you hook the stator to the hot end. this is the part of the radio that will do the tuning.

From here we will hook up the detector
[ this is where the RF gets changed to AF ]. that will come off the hot end of the coil the other end of the detector will get connected to one of the phone jacks.

Next we will hook the other side of the phone
jack to ground or cold side of coil or mother earth how ever you want to look at it!

Now we are ready to hook up the antenna.
after you have mounted the antenna outside at least 10 foot of the ground. i ran mine from the tree to the eve of the house using some homemade stand-offs or insulators or what ever you want to call them. then i ran the wire through the window well i actually opened the window 1st then ran it through. then you can hook the antenna to the set. that is why we made the taps. And i bet you thought i had you do all that work for nothing! Now hook the antenna to one of the taps and tune the capacitor slowly and you should here some AM broadcast stations. if not try another tap! one thing to keep in mind is that the connections in any crystal set must be 100 per-cent they have to be better than a DC connection. you might have to nudge a wire a little to make a good connection. so dont get discouraged if you dont hear something the first time check for a loose or bad connection. or try a little later in the evening. there is one rule of thumb ive found with tinker-n around with crystal radios is nothing is written in stone. so feel free once you get this one working is to use your imagination experiment and have fun. so when you get done you will be able to tell every one that you can listen to the world on a wire and it cost less than a trip to macdonalds!
i also have some more information on homebrewing raidos, at. [ the technical stuff ]
http://www.datasync.com/~ignatz/electro/help/help.htm
I also recommend for the beginner or if you just want to learn about electronics to read GETTING STARTED IN ELECTRONICS By Forrest Mims from radio shack. it explains the basics and has some cool projects! xtal schematic

Harry's Homebrew Homepage : This guy is the king of homebrew geeks! allot of good information on home building radios receivers and transmitters!
Back to my radio projects page!
quick link to my site


This my crystal radio projects site owned by Art.
[ Previous 5 Sites | Skip Previous | Previous | Next | Skip Next | Next 5 Sites | Random Site | List Sites ]

And last but not least tell me what you think?
Do you plan on doing the project :
It will be done for :
Your Name :
Your Email Address :
Sex :
Your Age :
Location :
Do you like electronics :
Message : feel free to add any comments


FastCounter by LinkExchange