For all my ranting, the Radio Shack crystal radio kit Cat. No. 28-178 is a pretty fair starter set. It does work, and some simple modifications will enhance its performance. It can be picked up at any Radio Shack outlet for $9.99, which is as good a price for a basic set as you will find, with no shipping and handling. While you're there, pick up a 90 foot roll of #22 stranded plastic coated hookup wire and a pack of 2 inch alligator clips. You'll need the wire to put up an antenna, and the clips will be used for making different hookups quickly. You might also pick up a 3-pack of the magnet wire assortment for later use.
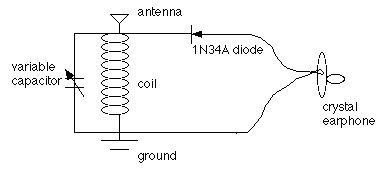
Assemble the set per the directions. This is a schematic of the finished product:
Now that you've had some fun, it's time to put up your antenna and ground. Put an alligator clip on one end of the coil of wire I told you to get, and put the rest of the wire out the window. We used insulated wire so you can just shut the window on the wire and not affect your antenna. String the antenna wire out as high and as far as you can get it from the house; higher is better. If you have to bend it some, that's okay; we're looking for wire in the air. Now use one of the wires that came with your kit and find a ground connection to hook it to. A cold water pipe, or a metal rod driven into the ground are best(sometimes the phone or cable company will have one next to the house, and you can use that). In a pinch, you can sometimes get away with using the screw holding on the cover of an electrical outlet; in new houses this is often connected to the house's electrical ground. Now try your set with your new antenna and ground hooked up. If you heard stations before, you should hear them better now. See if just connecting the antenna without the ground works. With my set, hooking up the antenna and ground as recommended in the instructions made the set tune very broadly, and a local airport beacon's morse signal from down around 450 kHz could be heard. I later realized that hooking the antenna directly to the top of a parallel tank circuit lowers the resonant frequency of the circuit considerably.
Here is something to try: disconnect the coil from the Antenna terminal, and connect the ground lead to the loose end of the coil. Now see what your set does. This changes your tuned circuit from parallel to series. For me, it returned some sharpness to the tuning and got rid of that annoying beacon.
Before we start modifying the set further, here's one more thing you can try. We are going to make a small capacitor to put between the antenna and the set; I find it sharpens up the tuning a bit, and gets rid of that beacon:
For the capacitor, you first get some masking tape, a couple of 2 inch pieces of insulated wire - the wire provided for ground or antenna wire for your set will work fine - and a piece of aluminum foil about 1/2 inch wide and one inch long. Cut the foil in half. Strip about one half inch of the insulation from each end of the two wire pieces. Now take 2 inches of masking tape and put it on a table sticky side up. Place the stripped end of one of the wires on the tape, making a T with the tape, and lay a piece of the foil on top of it, pressing the foil to the tape. Now take a second piece of tape about 1 and 1/2 inches long, and lay it over the first, also sticky side up, ensuring that it completely covers the foil and the bare part of the wire underneath it. Put one end of the second wire on top of the tape, making a T again, but lead the end of the wire out in the other direction from the first. Now put the second bit of foil on top of this wire, press it onto the tape, and fold the whole assembly over. You now have a fixed capacitor of about 20 or so picoFarads (pF) (when I measured mine, it was 25 pF, increasing to about 100 when I pressed it between my fingers). With the set back to its original connections, attach one lead of your capacitor to the antenna terminal of the set, and the antenna to the other lead of the capacitor, and see how it works. It made the tuning much sharper for me, and the beacon went away. This use of a capacitor in the antenna or ground lead, be it a fixed value or variable, is a fairly common design feature. You can also try putting the little capacitor you made in the ground connection instead of the antenna, and note how that works.
Time to get serious. Now we are going to add a couple of taps to the coil, one for the detector and one for the antenna. Remove the coil completely from the set. On one end, work the wire out of the two holes so you can unwind it. You might want to put a piece of masking tape about 1/3 to 1/2 way from this end of the coil on top of the wire; this will hold most of your wire on the coil in case your unwinding gets out of control - you won't have to completely rewind the wire. Now, unwind 11 turns of wire, and make a tap by making a small loop in the wire and twisting it around to give you about a quarter inch diameter circle - you can go HERE to see what a tap looks like. Now, continue unwinding until you have removed about one third or so of the turns. Make another tap then rewind the wire back on the coil. When you have it rewound, run the wire back in and out of the holes as it was when you started. You will probably lose a turn in making the taps, so your first tap is now at 10 turns; that's okay. You should have a couple of inches of wire left to hook back up to the radio. Now remove the enamel from the two taps you have made using a little sandpaper. Otherwise, you wont get a good electrical connection to them. Reinstall the coil, connecting the end you unwound to the ground connection. Now hook the ground back to the ground tap on the radio, and the antenna to the tap you made at 10 turns; do not use the little capacitor you made. Notice the difference?
The next step requires you to make a short jumper, using a 3 inch piece of wire and two alligator clips. Once you have your jumper, disconnect the diode from the antenna terminal, and connect it to the second tap you made with the jumper. If you want to do some soldering, you can attach one end of the jumper directly to the diode and forego the second alligatior clip. You should notice a significant improvement in your ability to separate stations now. If you have a couple of strong stations close to each other, you can try connecting the diode to the 10 turn tap with the jumper. If you do this, you may also notice that you can no longer hear some of the weaker stations. While you are at this point, hook the detector back to the new detector tap, and connect the antenna back to the antenna tap. Now try putting your little capacitor between the antenna and the set again and see how that works.
You may not have noticed, but the sensitivity of your set is still low, particularly at the low end of the dial (counter-clockwise direction). Basically, your antenna is too short, and we need to make it effectively longer. We'll do this with an antenna loading coil. For this you will need a cardboard core from a toilet paper or paper towel roll. You will also need some of that magnet wire I mentioned above - the #26 will do nicely. Now jump over to my Project Radio page and use the general directions for Coil #1 to wind a coil of about 100 turns, with taps at one end and every 10 turns thereafter. At the end of the coil leave about 4 inches of wire, and connect an alligator clip to it after scraping the enamel off the wire. This clip goes to the 10 turn antenna tap, and the antenna is connected to your new loading coil's taps. Higher frequency stations will be heard best with the antenna connected close to the set, and lower frequency ones with it tapped farther away on the loading coil. Now try this: Disconnect the antenna coil from the set, and hook the earth ground to one end, and the antenna to a tap on the antenna coil. Place the coil alongside the tuning coil of the set, about 1 to 2 inches away. You should find that your set will work just fine this way, even though it is coupled to the antenna by mutual inductance. By varying the distance between coils, you can locate an optimum point for selectivity and sensitivity. By separating them even farther from the optimum point, you will see even more improvement in selectivity between strong local stations close together in frequency.
At this point I'll stop. You can continue to play around with this, but I quite frankly feel that further improvements will be gained only with some major modifications, starting with the coil supplied with the set, which is probably the weak link. However, I hope you have gained enough experience to strike out on your own. This is by far not the ultimate crystal radio, but it is better than when you started, and can be used as a baseline set against which you can measure other sets you may build. You will also notice that it is flexible and can be returned all the way back to its original configuration (plus a couple of taps) in seconds. Have fun.
Just for grins, I used the broadband tuner from my antenna page (this requires a second variable capacitor), and logged some nice dx in the evening: New York, Netherlands Antilles, Cuba, Charlotte NC, Chicago, and a few others, all in a half hour or less of listening. Not bad for what started out as a mediocre set.