A basic radio consists of three parts: the antenna, the tuner, and the speaker or earphone.
The most overlooked antenna type is the loop antenna. Some loops can be just as powerful as the long wire; and they are small and portable, requiring neither a long fixed antenna nor a fixed ground. Although the loop antenna is highly directional, requiring it to be rotated to the optimum angle, this can be an advantage in tuning out a strong signal in favor of a weaker one if the two transmitters are separated by a sufficient angle from your location (90 degree separation for maximum effect); and since loops are small they are easily to re-orient. An electric field is not the only thing that can induce a current -- a current will flow in a conducting loop if the loop encompasses a changing magnetic field (i.e. magnetic lines of flux pass through the area of the loop). Since light consists of both electric and magnetic fields that oscillate (change back and forth) we can either get an oscillating current in a straight wire, where the current is greatest when the electric field is greatest, or in a wire loop where the current is greatest when the magnetic field is changing the most, which happens to be when the electric field is zero. One advantage with a loop is that with additional loop windings or by increasing the loop area the electric force can be increased. Later on instructions will be given so you can design and build your own loop antenna.
The LC circuit is tuned (the resonant frequency changed) by varying either the capacitor or the inductor. Many radios use a fixed inductor (also called a coil) and a variable capacitor: as you turn the dial to the left metal plates are rotated together increasing the plate area which increases the capacitance. Another option is to use a fixed capacitor and a variable inductor: usually you screw an iron rod in or out of the coil to change the inductance.
If you plan to make the above radio from scratch make sure you use a high impedance headphone (2000 ohms) or crystal earphone (1000 ohms), and the diode is germanium (e.g. 1N34A). You can use a variable capacitor (50pfd to 365pfd) and roll your own fixed coil by winding magnet wire (a hundred windings or so) around a cardboard or plastic tube or 1" wood dowel; or you can use a fixed capacitor (220pfd) and turn your self-wound coil into a variable inductor by attaching only one end of the coil to the radio and making a sliding connection along the coil (by sanding the insulation off of a strip of the coil) as the other contact with the radio circuit.
The air coil in the above type of radio is easy to make but has some drawbacks: if the radio signals are weak they can't be tuned in well, and if one radio frequency is much stronger than the others it tends to dominate so that other frequencies can't be tuned in. This is due to a property of inductors called the Q-value (or Q), which is related to the efficiency of the inductor (how well the magnetic field energy can be stored divided by energy lost due to resistance). The air coil has a low Q-value and the iron-core coil has a high Q (due to the magnetic concentration property of the iron).
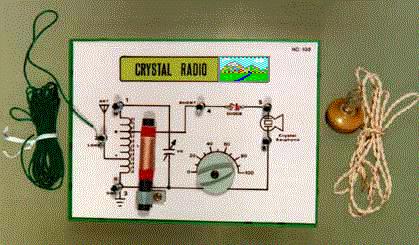
The other common crystal radio kit looks something like the following
picture:
The tuner on this radio has a coil with a soft iron core (ferrite rod)
for the fixed inductor, and it usually has two additional leads off of
the coil. The schematic diagram for this radio is shown below:
The antenna lead is normally connected to the A2 terminal shown above, but for a very long wire antenna it can be connected to A1, and for a short antenna it can be connected to A3. Although the above diagram has the diode connected to the A3 terminal, most kit radios of this type have the diode connected to the A2 terminal instead (as is shown in the next diagram). There doesn't seem to be much difference whichever way you choose.
Using the iron-core coil radio, there are several modifications that can
be made (refer to the schematic that follows). The first involves replacing
the long wire antenna and ground wire with a loop antenna (more about this
following the schematic). One end of the antenna is connected to the
ground lead and the other to either A2 or A3. The second modification,
which is optional, is to add another earphone. With an earphone in each
ear external sounds are muted and weak sounds are more easily discernable.
When we used a diode to pass the alternating current in only one direction,
the current in the opposite direction was discarded. By hooking up a
second diode and earphone as shown below, the opposite current is passed
through the second earphone instead of being discarded. Another change
that can often be made is to remove the iron coil altogether. Because
the loop antenna is just a big coil, it can be used as the coil part of
the circuit; the design of your loop antenna will determine how well it
will act as an inductor, and the loop will probably need to be "tuned" to
the capacitor by adding or removing loops to achieve maximum signal.
Finally, if you only want to receive one station,
you can replace the variable capacitor with a fixed capacitor by either
experimenting with different capacitors to find the right amount or you
can pick a suitable fixed capacitor and tune with the antenna by adding
or removing loops.
Working with crystal radios has led to the discovery of certain problems that others may have encountered; the following troubleshooting tips may be of benefit for them. If you are using a long wire and ground and can only tune in one station, regardless of the capacitance, be sure to use an iron-core coil. If you still cannot get any other stations then you are too close to a strong transmitter that is overpowering the simple tuning circuit. The best solution is to abandon the wire antenna and use a loop antenna. If you orient the loop to block out the strong signal you may be able to detect other frequencies. With proper antenna design and tuning (number of loops, loop spacing, loop area) the strong signal should not impede the detection of other frequencies, even if the loop is not oriented at the null of the strong transmitter. Loop antennas are sensitive to local electrical interference from many sources, the most common being the wiring in the walls of your house. Try to place your loop antenna as far away from where the power lines attach to the house and away from the fuse box or other electrical connections (out in an open field is best). You can use a good amplified radio to detect any interference by tuning all the way high or low (where no signal should be) and turn the volume up; if you hear a hum, move around until you find a place where the interference is at a minimum.
Occasionally the sound coming out of your radio will simply stop. If you are using a variable inductor to tune, repeated twisting of the iron core often causes the inductor to fail, usually with considerable static while twisting to tune. If the sound fades out (sometimes slowly and other times quickly) instead of clicking off suddenly, it is probably a defective variable capacitor (especially if you notice some static while tuning the capacitor). A quick fix that seems to work in this case is to simply apply a charge across the capacitor -- connect the negative lead of one battery to the ground and then touch the positive lead to the other end of the coil-capacitor pair and remove the battery. This should cause a loud click in the earphone followed by the return of the sound (don't change the tuning of the capacitor). If the sound abruptly switches off it may be a defective diode (try replacing). If it goes off suddenly and sometimes switches on again (especially if you move), the fault may lie with the crystal earphone. Using the two-earphone radio design above, this defect can be identified because only one earphone will go out. Try loosening the screw on the back of the earphone or gently squeeze the sides of the earphone to get it working. Interestingly, the battery technique used to solve the variable capacitor problem will usually kick the earphone into operation too.
The instructions to follow will show you how to build a loop antenna out of wood dowels that will provide excellent reception for all AM frequencies when tuned with the iron coil crystal radio. Of course you can use your imagination to build your antenna with whatever materials you have on hand. There are several rules of thumb that have been learned through trial and error to guide you: the greater the area of the loop the better the antenna will work to bring in weak signals; and the more loops you make the stronger the signal will be up to a point, and then will weaken as more loops are added (called tuning the loop). If there are too few loops and you can't add more, you may need to add a fixed capacitor (50 to 100 pfd) across the variable capacitor leads to increase the total capacitance in order to tune the entire AM band; if there are too many loops and you can't reduce them or place a tap into an interior loop, you need to reduce the inductance by choosing the A1 antenna input to the iron coil (see above) or by removing the coil entirely. The most important aspect of winding the loops is to keep the wires from touching, for when adjacent loops are near enough some charge is lost to self capacitance instead of to flowing current. In the dowel antenna shown, notches for the windings are cut no closer than ten per inch. Also it is important to keep the two leads coming off the loop assembly from getting near to each other until they are connected to the radio as this will also result in signal losses. However, if your loop antenna is to also be used as the tuning coil in the circuit, by placing the loops closer together the inductance of the coil can be increased. When operating the loop antenna it is important that it not be placed near anything conducting; this means the loop should not rest against any metal, and your hands should not be touching or even near any of the wires (including the leads from antenna to radio). The reason for this isolation is that any large conducting mass acts as an electrical antenna (like the wire or dipole) that reradiates the electric field which disrupts the detection of the magnetic field that the loop is trying to achieve. As a related aside, a short dipole (or even a monopole) antenna that normally will not pick up a signal will act as a good antenna if placed very near to a conducting mass (like the wiring inside the walls of a house).
The materials you will need for the loop antenna are 6 feet of 1/4 inch
and 6 inches of 3/8 inch wood dowel, and about 125 feet of
enamel-coated copper magnet wire (#26 or #30). Cut the half-inch dowel
into 4 pieces of 1.5 inches each and the quarter-inch dowel into two
3-foot pieces. In each of the four short dowels drill a hole
perpendicular to the dowel length, in the midpoint of the dowel, halfway
deep, to fit on the ends of the two long dowels. On the side opposite
the hole mark off and saw (with a coping saw) or otherwise make notches
perpendicular to and
along the length of the dowel. There should be 15 notches in all, spaced
8 to the inch for #26 wire and 10 to the inch for #30 wire. With all 4
short dowels notched, glue them onto the long dowels so they are parallel.
Then place each long dowel on a bench with the ends overhanging and the
short dowels oriented up and down, and make a square notch 1/4 inch wide
in the center. Glue the two long dowels together at their notches and
wrap wire around the joint. You should be left with the antenna frame
that looks something like the following picture:
Tape the free end of the wire to one leg and bring the wire up to the foot and begin wrapping your loop from one foot to the next, keeping the spiral correct by placing the wire in the corresponding notch on each foot until all 15 notches (if possible) are filled. Don't use too much tension while wrapping or the dowels will bend, and don't use too little tension or the wire will be slack. When complete, bring the wire off the last foot down its leg, but not the same leg as the starting wire. Finally you can solder an insulated lead wire to each end to connect the antenna to the radio. When the antenna works to your satisfaction, you can secure the wires to the feet by applying a thick glob of shoe goo (also called goop) over the wires and wood and let harden.
Another loop antenna using the same type of materials can be made where the loop area is reduced to one fourth and the number of loops is increased fourfold. Cut the 6 feet of 1/4 inch dowel into four pieces of 18 inches each, notch the centers, and glue into two X shapes. Next have 2 feet of 3/8 inch dowel cut into four 6-inch pieces. Instead of connecting one leg to the center of each foot as in the big antenna, here we drill two holes in each foot at the ends and connect two legs to each of the four feet. Cut 60 notches in each of the feet and wind up the magnet wire as before, except now you will need 250 feet of wire. This antenna will work almost as good as the big one; it is smaller in area but thicker along the loop axis (the large antenna can be tacked to a wall, while the small one can be set on a table without falling). The small antenna is also more sensitive to orientation direction than the other because it must capture as much magnetic field within the coil as it can.
The last type of loop antenna is quite useful because it is easy to make (no winding of magnet wire) and can be folded up for easy transportation. You need the materials to make RS-232 cables, which includes the 25-pin connectors (male and female) and 25-wire ribbon cable. Attach one end of the ribbon cable to a connector in the normal manner, but for the other end strip off one of the wires from the ribbon and mount the ribbon in the connector offset by one wire (the wire next to the stripped off one fills the last slot, and the first slot is empty). In this way when you plug the two connectors together you have an instant 25-loop coil. Attach one antenna lead to the stripped off wire and the other lead to the other connector on the wire that is on the opposite end of the ribbon from the stripped wire (i.e. the wire that connects to the empty slot). The antenna can be disconnected and rolled up or folded for compact storage. To use, simply drape the ribbon over some furniture (bed posts work well) or a box or some kind of frame for the loop that gives you the most effective area. You can make multiple loops with the ribbon, and you don't have to worry about twists in the ribbon as you mount it.
Press Here to return to Steve Fry's Home Page.