SOME HELPFULL HINTS ON :
-coils-
-taped coils-
-multi-layerd coils-
-capacitors-
-wire-
-antenna's-
-ground-
-coil former's-
-experiment-
-detector-
-bread board-
-the phones-
my projects
-xtal radio project-
-another xtal radio project-
-yet another xtal radio project-
-antenna tuner project-
-3MHz to 7MHz receiver-
my Homegrown Homepage
never get within 10 foot of power-lines or cross over or under power lines with an antenna!
and do not hook up to a gas line for ground!
i hope these pages have been some help to you below is some stuff that might help you get started well have fun and good luck!
- COIL FORMER'S
- well air would be the best but its nearly impossible. i use pvc pipe. or you can use an toilet tissue roll. if you use the toilet tissue roll former you can shelack it before you start winding. i like that idea but after you step on it its trash! thats why i like pvc! or wooden dowel or what ever you have on hand as long its non-conductive
back to top
- COILS :
- if your set seems to tune to low. you dont hear the higher frequency stations then you can remove some wraps off the coil. try 10 at a time. but on the other hand your set tunes to high you will have to add some wraps to the coil. try 10 at a time.
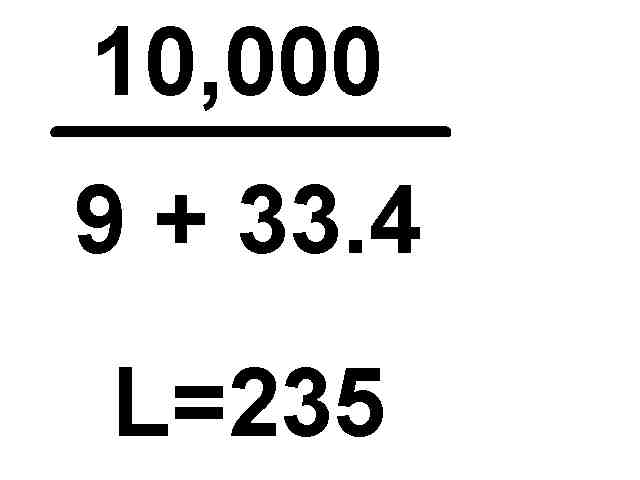
- when winding coils always wind them in the same direction. when coils are wound in different directions they buck and your set will suffer from this action. so i always start at the same end and wind in the same direction so i dont have this problem. we also dont want the coil to unwind after we get done so i take some goo [thats real stickie glue] and cement the windings real good so the windings stay tight! remember we want it to look neat when we are done. and work to! our coils should have around 230 micro henries to hit the BC band. so if your former is not 2"od. then you can use the forumala below to figure how many turns of wire you will need.
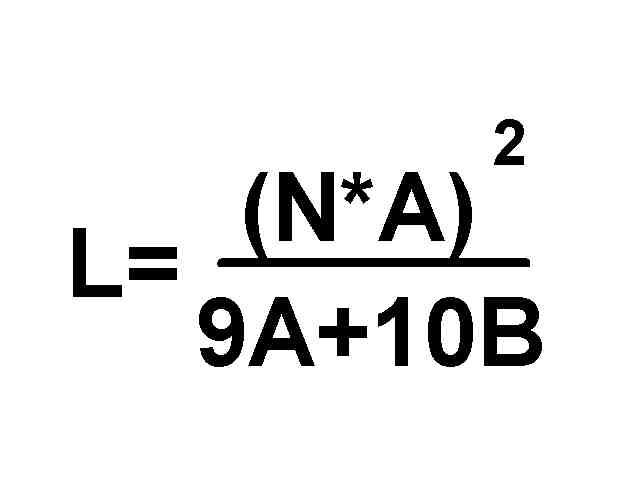 |
buy using the formula with a 2"od former and 20 gauge wire you get |
 |
WHERE :
- L - is the inductance in microhenries
- N - is the number of turns
- A - is the mean radius in inches
- B - is the length of the coil windings in inches.
back to top
- TAPED COILS :
- you take a nail or drill bit or a small screwdriver and lay the wire over the nail then make 2 turns to form a loop that is your tap! when done winding the coil you will have to take some sand paper and clean the enamel off the tap to make an electrical connection.
- another method i have found to tap coils is to take a strip of tough paper [brown shopping bag] cut a strip about 1 inch wide and as long as the coil former. when you get to the point where you want to tap you place the paper under the wire and wrap over the paper for that wrap. then continue to wrap the coil till you get to the next tap then do it again! when done you take some sand paper and clean the tap be shure you dont hurt the coil, then to connect the coil to the set you will have to solder the taps. i like the loop method better, its eayser to hook alligator clips to!
back to top
- MULTI-LAYERD COILS :
- this is where you first wrap the primary winding on the former. then you can wrap the secondary winding over the top of the primary. you may want to insulate between the primary and the secondary windings to prevent a short between the two. some electrical tape or an old brown shopping bag.
- you can wrap 30 or so turns of wire for the antenna and ground that will be the primary but you will want to be able to slide that winding. then wrap 80 or so turns along side the primary you can secure these windings. hook the secondary to the capacitor. then wind 30 or so wraps on top of the secondary this will be your detector winding. now we just made another crystal set.
back to top
- CAPACITORS :
- i like to use those expensive ones. if you dont want to buy one you can take them out of an old transistor radio they work just as good as the ones you buy! they usually have 3 different sections tuner, oscillator and antenna trimmer. you will want to use the tunner section thats the larger of the three.
- THE STATOR : thats the part that don't move. for the xtal radio we will hook to the hot side of coil!
- THE ROTOR : the part that moves. for the xtal radio we will hook that to the cold side of the coil or ground!
- but if you hook up them up backwards thats no biggie it will tune ccw. instead of cw.
back to top
- ANTENNAS :
- here i could fill up the rest of my hard-drive and still not have the right answer. you will want 14 or 12 gauge wire for the antenna especially if you live out in the country. you see the RF travels on the outside of the wire so the thicker the wire the more RF can travle to your set. so we can put up 2 or 3 antenna's hook them up to the set and switch the antenna's on or off or leave them all on and series tune with a capicitor.
- you say you dont have the room to run 200 foot of wire no problem we got you covered! make an inverted V. there you start at the ground run the wire up a tree or a pole as far as you can and then back to the ground wala! [i call them invwxyz's say it real fast it sounds real technical!]
- antenna we built is the long wire. when i connected mine to the tree i use a pulley and hung weight on the end to hold the antenna up. a wind storm will get you if you dont do that. well it got me! there is a few things to keep in mind while building.never get within 10 foot of power-lines or cross over or under power lines with an antenna! i usually make mine as long as possable. 200 foot or so then i use my antenna tuner to tune the antenna and its a big help!
back to top
- GROUND :
- you will want to have a good connection to good ole mother earth for the xtal radio. this means just that. you will want to drive a metal [copper preferd] rod, pipe or what ever about 8 foot in the ground. why so deep you ask? the ground is moist down there and moisture [water] is a good conductor. so we are shure to get a good connection. it would not hurt to drive a couple in the ground spaced a few feet apart especially if you live in a dry climate, you also in the summer can pour some water around the ground rod if it's been dry for a while. a cold water pipe [metal one] is a good stand by for a crystal set! the ground wire should be as short as possable or it will act as an antenna.
DO NOT hook up to a gas line for ground! for people that have natural gas!
back to top
- WIRE :
- for winding the coils we need to use enamel coated wire but i have used regular 20 gauge insulated solid wire with success but you might have to play around with the amount of turns. if you have access to an old non-working television set then you hit a gold mine. the yolk on the back of the picture tube is loaded with enamel coated wire. all you have to do is un-wind the wire off the yoke. there you will have plenty of wire for coil experiments! its real thin so listen hard!
below is a wire table chart for enamel coated wire
| Gauge |
Diameter |
Turns per in. |
| 16 |
.0508 |
19.0 |
| 17 |
.0453 |
21.3 |
| 18 |
.0403 |
23.9 |
| 19 |
.0359 |
26.7 |
| 20 |
.0320 |
29.9 |
| 21 |
.0285 |
33.4 |
| 22 |
.0253 |
37.5 |
| 23 |
.0226 |
41.8 |
| 24 |
.0201 |
46.8 |
| 25 |
.0179 |
52.5 |
| 26 |
.0159 |
58.8 |
back to top
- THE PHONES :
- here is the biggest problem we have to over come. we can not use a regular head set like the one's you buy today. they dont have the right impedance for the set. impedance is the opposition to alternating current flow if this impedance is not matched with the set there will be a poor transfer of power. with crystal sets the loss of power in any part is to discredit the builder.
- head phones for our set must have an impedance of 10,000 ohms or more. you should not be confused with [impedance and resistance] both values are expressed in ohms but they mean different things! so our phones should measure 2,00 ohms or more D.C. resistance and 10,000 ohms or more A.C. impedance!
- they are not as easy to find today as a few moons ago but they are still floating around at a few parts suppliers and not to mention flea markets, garage sales and up in grandpas attic! i found a set of phones for 5.00 dollars and they work good. some of the names you might try looking for :rheem califone, western electric, ace, red seal and dixie just to name a few.
- to check the phones you can take a pen light battery and touch it across the input wire you should here a click this is a good indication that the phones are working. if they dont want an arm and a leg for them you might want to pick them up. remember you can buy them for 15.00 bucks, so dont spend a whole lot on them!
- you can also use your phones as a tool. when you cant find the problem with the set you can hook a germanium diode in series with the phones then start from the antenna connection and work your way back to the next stage and so on un till you find the loose wire or whatever the problem might be!
- if you plan to use an audio amp with the crystal radio then you can use any head phones or 8 ohm speaker. happy DX'ing!
back to top
- THE DETECTOR :
- with out a good detector our set wont work. the germanium diode is the easiest way to to make the detector work. that is not the only way! to make your set look vintage you can build or buy a cats whiskers. or if you really want it to look home made you can make one out of a razor blade [stainless steel] and some carbon or lead from a pencil. you mount the stainless steel on a base then you take a safety pin and attach the pencil led to it with some small gauge wire. bend the head so you can run a small screw through it and let the lead touch the stainless steel [i think we are working on another science project here?]. try light pressure and move it around a little to find the right spot. it works! there is a list somewhere that someone made with all the good detectors if you find it please let me know!
back to top
- BREAD BOARD :
- you will want to test your idea before building a permanent version so you make a bread board. you take a piece of wood make it big enough to fit 2 or 3 capacitors and 2 or 3 coils on enough room to fit a bunch of Fahnestock clips on and thats it! now you can test your idea and perfect it before building! not only do we want it to look good when we finish but we want it to work!
back to top
- EXPERIMENT :
- through my trials and errors i have found that you need to write every thing down that you do. the stuff that works and the stuff that dont! build on a bread board for starters, and make a schematic!. this way you will be able to make changes to your project easy. then when you get every thing down and working good then you can build a permeant version. all values for the parts we used are not the only. you can change mostly everything around or what ever i just gave you some starting points and a easy to build working set.
back to top
back to my projects page
quick link to my site

FastCounter by LinkExchange